©cPTo Wiew UL 14" Color Monitor ( 13.
U.S.A. U.S. FEDERAL COMMUNICATIONS COMMISSION RADIO FREQUENCY INTERFERENCE STATEMENT INFORMATION TO THE USER NOTE : This equipment has been tested and found to comply with the limits for a Class В digital device pursuant to Part 15 of the FCC Rules. These limits are designed to provide reasonable protection against harmful interference in a residential installation.
Standards and Recommendations Safety and Radio Interference Approvals This product is designed in conformity with the following standards or other normative documents : Safety : EN 60950 / 1992 + Al, A2, A3 EMC : EN 55022 / 1994, EN 50082-1 / 1992 IEC 801-2 / 1991, IEC 801-3 / 1984, IEC 801-4 / 1988 to satisfy the basic requirements of Safety and EMC required by following Directives: • EMC Directive 89/336/EEC • Low Voltage Directive 73/23/EEC & 93/68/EEC Conformity with the above basic requirements is cert
ENGLISH CONTENTS 1. H o w to get the most enjoyment from this monitor 1 • Color display tube 1 • Features 1 • General safety precautions 1 • Precautions for using the video monitor 2 • Power source precautions 2 2. Tilt and swivel base installation 3 3. Connecting with external equipment 4 4. Control description 5 5. External controls 6 6. Micro-controller features 8 7. Power management 9 8. Preset timing chart 10 9. Video input terminal 11 10.
1. How to get the most enjoyment from this monitor This is a 14" (13.2" viewable) color monitor to display signals from personal or micro computers. This manual has been prepared to assist you in becoming familiar with your new display monitor. Color display tube Dot pitch 0.28mm Notice In order to prevent fire, shock hazards, do not expose this display to rain or moisture. Features • High resolution CRT for sharp and crisp images. • 14" (13.2" viewable) Diagonal screen with non-glare direct etched surface.
• Make sure that the power cord and the other cords are securely and rightly connected. • Avoid operating the monitor in the place extremely heated, humid or. affected by dust. • Never cover the ventilation openings with any material and never touch them with metallic or inflammable materials. • Overloaded AC outlets and extention cords are dangerous. So are frayed power cords and broken plugs. They may result in a shock or fire hazard. Call your service technician for replacement. • Do not open monitor.
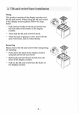
2. Tilt and swivel base installation Fixing This product consists of the display monitor and the tilt and swivel. When fixing the tilt and swivel to the display monitor,please follow the steps below. / _ s Push the four hooks of the tilt and swivel into the four holes at the bottom of the display monitor. Then slide the tilt and swivel forward. Then the latch is going to come above the tilt and swivel base, and it is fixed firmly.
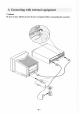
3. Connecting with external equipment Cautions Be sure to turn off the power of your computer before connecting the monitor.
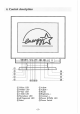
4.
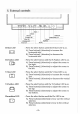
5. External controls Е Э CCD C D © • • • A RECALL о о о о СИ • SELECT • ffA П ~ ) ТСА СИР © Adjust • + SELECT PIN LED POWER S/W V-Position LED P O W E R ( D P M S ) LED Contrast V-Size LED Brightness H-Position LED H-Size LED H-Size LED 0 H-Position LED Ш V-Size LED Ш RECALL : Press the select button until the H-Size LED is on. A) Press button[(+)direction] to increase the horizontal size. B) Press button[(-)direction] to decrease the horizontal size.
Press the select button until the Trapezoid LED is on. A) Press button[(+)direction] to make the image wider the bottom. B) Press button[(-)direction] to make the image wider at the top. If you want to retrieve the factory presetting, press the recall button. The Brightness Control button adjusts the picture mood according to the brightness of the room. A) Press button[(+)direction] to heighten the brightness level of the picture. B) Press button[(-)direction] to lower the brightness level of the picture.
6. Microcontroller features The microcontroller automatically detects the video board installed in user system. When user turn on the monitor, the microcontroller first checks the display mode memory stored in the user setting area and the factory presetting area. Display modes memory The microcontroller has the memory capacity to store 17 different display modes including timing formats and display settings.This memory capacity is divided into two parts.
7. Power management This monitor is equipped with DPMS(Display Power Management Signaling) function which automatically leads the monitor to the state of power saving that consumes just a little power less than 8W, when the computer is left unattended. Although the monitor can be left in power-saving mode for longer periods, we recommend that users turn it off after your daily work, because degaussing helps maintain faultless color purity.
8. Preset timing chart Supported Video timings This monitor shall be capable of displaying following video timing charts. Timing charts Border(T6) ACTIVE(T4) Bofdef(T6) VIDEO SYNC FRONT PORCH(T5) BACK P0RCH(T3) PERIODfTI) SYNC WIDTH (T2) Timing table L 0 W ^ . ^ ^ HIGH LEVEL: 2.4V min Horizontal Frequency Period (Г1) Sync Width (T2) Back Porch
9. Video input terminal A 15 pin D-sub connector is used as the input signal connector. Pin a n d input signals are shown in the table below. Pin description SIGNAL SEPERATB SYNC DOC 1/2B (Option) 1 RED RED 2 GREEN GREEN 3 BLUE BLUE 4 N.C N.C 5 N.C GROUND 6 RED GROUND RED GROUND 7 GREEN GROUND GREEN GROUND 8 BLUE GROUND BLUE GROUND 9 N.C N.C 10 LOGIC GROUND LOGIC GROUND 11 GROUND GROUND 12 N.C SDA 13 H-SYNC H-SYNC(TTL) 14 V-SYNC V-SYNC(V CLK) 15 N.
10. Specifications SIZE CRT Dot Pitch Input 0.28 mm Type Non-Glare, VLMF Type Signal R.G.B Analog Connector 15 pin D-Type SYNC H-F 30—50 kHz(Automatic) V-F 50—130 Hz(Automatic) Area(H x V) Color Display 14" (13.2" viewable) Resolution 255 X 190mm (Max.