TABLE of CONTENTS 1. 2. 3. 4. 5. 6. 7. PRODUCT OVERVIEW ......................................................................................................................................................... 4 1.1 What’s Included ................................................................................................................................................... 4 1.2 Safety Instructions ...............................................................................................
7.3 8. COMPLIANCE INFORMATION ........................................................................................................................................ 33 8.1 9. Warranty Terms and Conditions ..................................................................................................................... 31 FCC Notice ..........................................................................................................................................................
1. PRODUCT OVERVIEW 1.
1.2 Safety Instructions Safe Environment Do not store or use the InterView in locations that are exposed to heat, extreme cold, high humidity or dusty environment. Room temperature conditions are recommended. Do not subject InterView to severe vibrations or high impact conditions. Do not allow water or other liquids to spill on or into InterView. InterView may become unstable if not placed on a solid and horizontal surface. Safe Use To avoid electric shock, never touch the components inside of InterView.
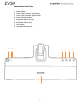
1.3 Product Views Panel Front View 1. Integrated Webcam 2. Balance Bar 3. Multiplatform Control Base 4. Integrated 3-Port USB 2.0 Hub 5.
Control Base Front View 1. 2. 3. 4. 5. 6. 7. 8.
Control Base Back View 1. 2. 3. 4.
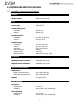
2. INTERVIEW SPECIFICATIONS 2.1 InterView Technical Specifications General Model number EVGA InterView 1700 LCD Screen type 17’’Wide TFT Preset display area Horizontal Vertical 367.20 mm 229.50 mm Synchronization Horizontal Vertical 31.5 kHz to 81.1 kHz 56 Hz to 76 Hz Viewing angle Horizontal Vertical Pixel pitch White luminance Contrast ratio Response Time 20° / 35° (CR=10) 45° / 45° (CR=10) 0.255 X 0.255 mm 220 typ. 500:1 typ. 8ms typ. (14ms typ.
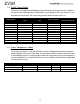
2.2 Preset Timing Modes The screen will be adjusted automatically when the signal transferred from the computer is the same as the following Preset Timing Modes. If your display mode is not listed, it is not supported by this monitor; the screen may go blank while the power LED is on. Display Mode VESA, 640x480 VESA, 640x480 VESA, 800x600 VESA, 800x600 VESA, 800x600 VESA, 1024x768 VESA, 1024x768 VESA, 1152×864 VESA, 1280x1024 VESA, 1280x1024 VESA, 1440x900 VESA, 1440x900 Horizontal Frequency (kHz) 31.
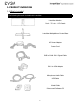
3. SETTING UP INTERVIEW Read the safety instructions before setting up the InterView. 3.1 Steps to Assembling InterView 1. Rotate the balance bar out from the bottom of the base: 2. Remove the caps on the stand and the panel: 3.
4. Push in the button and turn it clockwise to lock up the stand and the panel: 5. Open up the panel: 6.
3.2 Connecting InterView to a PC Before setting up InterView, you must power down your computer(s). 1. Connect the monitor to a computer(s) using the DMS to Dual DVI-I cord. Note: You can use either the D-Sub plug or the DVI-D plug if there’s no available DVI-I port on your PC. 2. Plug the power cord into the power adapter: 3.
4. Power on InterView and the computer(s): 5. Use the audio cable to connect InterView to the MIC or Line-in input of the computer. This is required to use the onboard microphone. 6. Connect InterView to the computer(s) with the USB cable to enable the front USB 2.0 HUB located on the monitor base. This is also required to use the onboard webcam.
3.3 Plug and Play Compatibility You can use InterView with any Plug and Play compatible system. The system configures itself and optimizes the display’s settings. In most cases, InterView‘s installation is automatically processed unless the user intervenes.
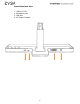
4. HOW TO ADJUST INTERVIEW 4.1 Rotating/Folding Each panel can rotate 180 degrees. The display will automatically adjust to the correct position. Each panel can be opened and closed 90 degrees horizontally.
4.2 Control Buttons 2 3 4 5 1 1. 2. 3. 4. 5. Power Button: Powers the InterView ON or OFF Panel Selection Button: Selects the monitor to be adjusted Brightness Adjust (Down): Decreases brightness levels Brightness Adjust (Up): Increases brightness levels Auto Adjust: Adjusts vertical position, phase, horizontal position, and pixel clock automatically 4.3 Brightness Adjustment Users can adjust the monitor brightness levels from the Brightness (Up/Down) buttons.
5. SYSTEM REQUIREMENTS AND SOFTWARE INSTALLATION 5.1 System Requirements Operating Systems Supported: - Windows Windows Windows Windows Windows XP Home Edition XP Professional XP Professional X64 Edition Vista™ Vista™ 64-bit Hardware: - 64MB of System Memory or more - 50MB Hard Disk space or more Others: - Microsoft DirectX 9.0C 5.
(Step 2) Processing Installation - Click Webcam software installation to start the installation process - Click Next, select the application you would like to install, then click Next to continue Note: For users who select to install both webcam driver and application, the installation will starts from the webcam software then to the webcam driver.
- Installation in process, the dialogue box will automatically close when the installation completes.
- Click Finish then select the option to restart you computer after the installation completes Note: Depending on each user’s PC system and hardware performance, it may take 10 to 15 seconds before entering to the next step, please be patient. - Click Finish to exit the wizard, then the computer will automatically restart. (Step 3) Self Check To ensure the driver has successfully installed, visit the Device Manager to check if the device name has changed to InterView USB 2.0 Webcam.
5.3 Using the InterView Camera Application Main Panel Layout 4 6 2 1 7 5 3 1. 2. 3. 4. 5. 6. 7.
Color Setting Page This panel allows users to adjust the color settings by dragging the track bars. 1 2 3 4 5 6 7 8 9 1. 2. 3. 4. 5. 6. 7. 8. 9.
Snapshot Setting Page The InterView webcam application allows users to capture a single photo as well as continuous shooting. In this panel, the application allows users to set snapshot functions, such as time intervals and output formats. 1 2 3 4 5 1. 2. 3. 4. 5. Photo quantity for continuous shooting (1-30) Time intervals for continuous shooting (500ms – 2000ms) Image format.
Record Setting Page This panel allows adjustments to the recording function of the webcam. 4 1 2 3 5 6 7 1. 2. 3. 4. 5. 6. 7. Select the audio device to be captured Select the audio recording source.
Misc Setting Page Within this panel, users can adjust settings that control different aspects of the image. 1 2 3 4 1. Video Flip: Flips the video horizontally/vertically 2. Exposure control - Low Light: avoid under-exposure in low light environment - High Light: avoid under-exposure in high light environment. 3. Flicker Reduction: Avoids flicker 4. Picture Quality: Select for better quality or faster speed.
6. TROUBLESHOOTING 6.1 Self-Test Feature Check Self-Test Feature Check (STFC) allows users to check if the monitor works properly. 1. 2. 3. 4. Turn off both your computer and the monitor Unplug the DMS cable from the back of the computer Turn on the monitor If the monitor is functioning properly, you will see a box in the illustration below This box appears during normal operation if the video cable becomes disconnected or damaged. 5.
• • • • Auto Adjust via OSD Perform monitor reset Check environmental factors Relocate and test in another room LCD screen has spots • • Cycle power on-off These are pixels that are permanently off and is a natural defect that occurs in LCD technology LCD screen has bright spots • • Cycle power on-off These are pixels that are permanently on and is a natural defect that occurs in LCD technology Picture too dim or too bright • • • Perform monitor reset on "Factory Reset" Auto Adjust via OSD Adjust
Picture missing color Picture color not good Faint shadow from the static image displayed appears on the screen • • • Perform monitor self-test feature check Check connection integrity at both end of the video cable Check for bent or broken pins • • • Change the color to "PC Custom Color" or "MAC Custom Color" Adjust R/G/B value of "PC Custom Color" or "MAC Custom Color" Change the Color Format to "PC RGB" or "YPbPr" (for Video/DVIHD inputs) • Use the Power Management feature to turn off the monitor
7. SERVICE INFORMATION 7.1 Product Registration and Customer Support Should you require any assistance with the installation or troubleshooting of the EVGA InterView, please visit the Support section of our website at www.evga.com/support. There you’ll be able to download drivers, check out our extensive Knowledge Base, and submit technical and customer support inquiries. Be sure to visit the EVGA community message boards: http://forums.evga.
Your LCD display is subject to replacement if it meets the criteria outlined in the following table: Product Bright Dots Dark Dots InterView 6 or more 6 or more Total Dots Combination of Bright and Dark = 6 or more 7.3 Warranty Terms and Conditions EVGA monitors are covered by a 3 Year limited warranty with registration within 30 days of the purchase date as stated on the terms and conditions.
8. Software related faults resulting from incorrect software installation or usage or software viruses or software inherent bugs shall not be considered as product faults and may incur a charge for rectification.
8. COMPLIANCE INFORMATION 8.1 FCC Notice This device complies with FCC Rules Part 15, Operation is subject to the following two conditions: 1) This device may not cause harmful interference, and this device must accept any interference received, including interference that may cause undesired operation. 2) This equipment has been tested and found to comply with the limits for a Class B digital device, pursuant to Part 15 of the FCC Rules.
9. LEGAL INFORMATION 9.1 Trademark Information 1) 2) EVGA Corp., EVGA, the EVGA logo and combinations, INTERVIEW and INTERVIEW in lower or cap combinations, thereof are trademarks of EVGA Corp. All brand names, company names, service marks, logos, and trademarks of the company, or its affiliates or licensors are trademarks or registered trademarks of the company or its subsidiaries, affiliates or licensors in the US and other countries.