Introduction Congratulations on purchasing your Eviant Portable Digital TV. On June 12, 2009 the conversion to digital television broadcasting will be complete all throughout the United States and Puerto Rico. Your portable digital television is designed to pick up both the older analog signals as well as the new digital signals. In addition, you can use your digital TV to view movies from a VCR or DVD player.
14) 15) 16) 17) 18) 19) 20) long periods of time. Refer all servicing to qualified service personnel. Servicing is required when the apparatus has been damaged in any way, such as power-supply cord or plug is damaged, liquid has been spilled or objects have fallen into the apparatus, the apparatus has been exposed to rain or moisture, does not operate normally, or has been dropped.
FCC Compliance This device complies with part 15 of the FCC Rules. Operation is subject to the following two conditions: This device may not cause harmful interference. z This device must accept any interference received, including interference that may cause undesired operation. This equipment has been tested and found to comply with limits for Class B digital device, pursuant to part 15 of the FCC Rules.
Table of Contents Introduction Important Safety Instructions……………………....Ⅰ FCC Compliance……………………………………Ⅲ Accessories………………….................................Ⅲ Getting Started Controls, Inputs &Outputs ....................................1 Antenna................................................................2 Using AC Adapter.................................................2 Using DC Adapter ................................................2 About Rechargeable Battery ................................
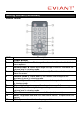
Getting Started Controls 1. 2. 3. 4. 5. 6. 7. 8. LCD Screen Channel Up (Direction Up) Volume Down (Direction Left) Channel Down (Direction Down) Volume Up (Direction Right) Menu Remote Sensor Charge Indicator Inputs & Outputs 1. 2. 3. 4. 5. 6. Headphone Jack Audio Input Video Input 12V DC Power Jack Power Switch Speaker 1. 2. 3.
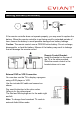
Getting Started (continued) Antenna The TV unit is supplied with a telescoping antenna that will provide good reception in most situations. Be sure keep the TV stationary when trying to receive a signal, any movement of the TV can result in loss of the digital signal. Note: You can also connect your own antenna cable connected to any suitable TV antenna or cable system to improve reception. For cable TV, see page 10 for setting the antenna option to Cable.
Getting Started (continued) Remote Control NUM 1 2 3 4 5 6 7 8 9 10 11 Description Power Button 0-9 Number buttons: To change the channel and to select individual menu options. Volume Down ◄: Move left/change settings in menus. Decrease the volume level in viewing mode. Return button (return to the last channel): To exit a selection or to close the menu. Channel Down▼: Move down in the menus and change to the previous channel in viewing mode.
Getting Started (continued) OPEN PUSH If the remote controller does not operate properly, you may need to replace the battery. When the remote controller is not being used for extended periods of time, remove the battery to avoid possible damage from battery leakage. Caution: The remote control uses a CR2025 button battery. Do not recharge, disassemble, or heat the battery. Misuse of the battery may result in leakage that will damage the remote control.
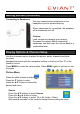
Getting Started (continued) Connecting to Earphones You may connect stereo earphones to the headphone jack for private listening. When earphones are connected, the speakers will automatically turn off. Caution: Loud volume can damage your hearing. Decrease the volume before connecting earphones, and then raise the volume back to a comfortable level. Display Options & Channel Setup Use the on-screen menus to adjust the picture, audio, channels and other functions.
Display Options & Channel Setup (continued) Picture Mode Press the ▲▼ buttons to select Picture Mode. Press the ◄ ► buttons to select Personal, Standard, Dynamic or Soft picture quality. Contrast (Brightness/Color/Sharpness/Tint) Press the ▲▼ buttons to select Contrast, Color, Brightness, Sharpness or Tint and press the ◄ ► buttons to adjust the value. Press MENU button to return to the previous menu.
Display Options & Channel Setup (continued) Audio Language Press the ▲▼ buttons to select Audio Language. Press the ◄ ► buttons to select English, French or Spanish. Your favorite audio language will be chosen when a channel transmits in more than one language. Note: This item is only available under ATSC signal mode. Time Menu Press the ◄ ► buttons to select Press the ▼ button to enter. Press the ▲▼buttons to select the desired sub-menu. Time Zone Press the ▲▼ buttons to select Time Zone.
Display Options & Channel Setup (continued) Menu Language Press the ▲▼ buttons to select Language Press the ◄ ► buttons to select English, French, or Spanish. Transparency Press the ▲▼ buttons to select Transparency. Press the ◄ ► buttons to select On or Off. Color Mode Press the ▲▼ buttons to select Color Mode. Press the ◄ ► buttons to select Normal, Warm, or Cool. Zoom Mode Press the ▲▼ buttons to select Zoom Mode. Press the ◄ ► buttons to select Normal or Wide.
Display Options & Channel Setup (continued) Option Press the ▲▼ buttons to select option and press the ► button to enter. Press the ▲▼ buttons to select Mode, Font Style, Font Edge Style, Font Edge Color, FG Color, BG Color, FG Opacity or BG Opacity. Press ◄ ► buttons to set these options. Note: This selection is only available under ATSC signal. Restore Default Press the ▲▼ buttons to select Restore Default. Press the ► button to enter the submenu.
Display Options & Channel Setup (continued) Channel Setup Each region has different broadcast channels. Your portable TV will scan for all the channels in the area and remember each location. You can then go through and add or delete channels individually as you prefer. When completed, pressing the up / down channel buttons will take you through all of your selected channels in sequence. Note: If you scan for broadcast channels (Air) and then switch to Cable TV, you will need to re-scan.
Display Options & Channel Setup (continued) Start to Scan Press the ▲▼ buttons to select Start to Scan. Press the ► button to start scan. The unit will automatically memorize the available channels in sequence. After complete scan the unit will tune to the first channel. To stop scanning, press Menu. Favorite Add channels to your favorite list as following steps: In channel menu, press the ▲▼ buttons to select Favorite and press the ► button to enter the sub-menu.
Display Options & Channel Setup (continued) Press the MENU button to return to the previous menu. DTV Signal In this item, it will display the signal strength of current ATSC channel. Note: It is only available under ATSC channel. Troubleshooting Before contacting customer service, review the steps below to solve simple problems. If you still suspect something wrong with this unit, immediately turn the power off, disconnect the power connector from the unit, and contact Eviant Customer Service.
Troubleshooting (continued) Other possibilities Static or other external interference may cause the unit to function abnormally. In order to reset normal status, turn off the unit and unplug the power supply and try again. If the problem is still present, turn off the unit, disconnect the power supply and consult a qualified technician. Specifications TFT screen size.................................. 10 inches Resolution .......................................... 800x 480 AC Power Adapter..................