FM /AM TV ALARM CLOCK P P
Introduction Congratulations on purchasing your Eviant T7UC Digital TV. On June 12, 2009 the conversion to digital television broadcasting will be complete all throughout the United States and Puerto Rico. Your digital television is designed to pick up both the older analog signals as well as the new digital signals. This 7" Under-Cabinet Digital LCD TV lets you watch your favorite TV shows in your kitchen.
14) 15) 16) 17) 18) 19) 20) Refer all servicing to qualified service personnel. Servicing is required when the apparatus has been damaged in any way, such as power-supply cord or plug is damaged, liquid has been spilled or objects have fallen into the apparatus, the apparatus has been exposed to rain or moisture, does not operate normally, or has been dropped. Apparatus shall not be exposed to dripping or splashing and no objects filled with liquids, such as vases, shall be placed on the apparatus.
FCC Compliance This device complies with part 15 of the FCC Rules. Operation is subject to the following two conditions: This device may not cause harmful interference. This device must accept any interference received, including interference that may cause undesired operation. This equipment has been tested and found to comply with limits for Class B digital device, pursuant to part 15 of the FCC Rules.
Table of Contents Introduction Important Safety Information ................................1 FCC Compliance..................................................3 Accessories..........................................................3 Getting Started Unit view description ..........................................5 Remote control ...................................................7 Installing the unit under a cabinet.........................9 Plug in your T7UC...............................................
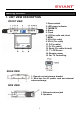
Getting Started 1. UNIT VIEW DESCRIPTION FRONT VIEW 1. Power switch 2. LED power indicator 3. FM/AM/TV 4. Alarm 5. Clock 6. LCD for radio and clock 7. MEM. 8. VOL-(For radio) 9. VOL+ (For radio) 10. P-(For radio) 11. P+ (For radio) 12. Reset (For radio & clock) 13. 7” LCD Screen 14. Remote sensor 15. For TV Controlling: REAR VIEW 1. Remote control storage bracket 2. Wire box for AC power cord and external antenna storage SIDE VIEW 1. External antenna jack 2.
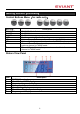
Getting Started(continued) Control Buttons Menu(for radio only) BUTTON FM/AM/TV ALARM CLOCK MEM. VOLVOL+ PP+ Description FM/AM/TV Mode Switch. ALARM Mode CLOCK Mode Start for scanning/Confirm the setting. Volume Down ◄: Decrease the volume level in FM/AM mode. Volume Up ►: Increase the volume level in FM/AM mode. Channel Down▼: Move down the parameters and switch to the previous channel in FM/AM mode. Channel Up ▲: Move up the parameters and switch to the next channel in FM/AM mode.
Getting Started(continued) TV Navigation Buttons BUTTON MENU Description To go back one level at a time within menus. To open/close the menus. CH- Channel Down: Move down in the menus and change to the previous channel in viewing mode. CH+ Channel Up : Move up in the menus and change to the next channel in viewing mode. Volume Up: Move left/change settings in menus. Increase the volume level in viewing mode. Volume Down: Move right/change settings in menus. Decrease the volume level in viewing mode.
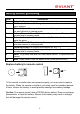
Getting Started(continued) NUM 1 2 3 4 5 6 7 8 9 10 Description Unit standby or wakes up. 0-9 Number buttons: To change the channel and to select individual menu options. Channel Up ▲: Move up in the menus and change to the next channel in viewing mode. Volume Down ◄: Move left/change settings in menus. Decrease the volume level in viewing mode. Return button (return to the last channel): To exit a selection or to close the menu.
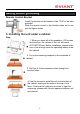
Getting Started(continued) Remote Control Bracket Install the bracket on the bottom of the T7UC in the slots provided. Slide the remote control in the bracket when not in use just like figure shows. 3. Installing the unit under a cabinet Step: 1. When you open all of the speakers, LCD screen and wire box, the volume of the unit will reach 470*285*220 mm. Before installation, please make sure it has enough room for operating where under the cabinet. 2.
Getting Started(continued) 4. Plug in your T7UC Plug the AC power supply cord of T7UC to the grounded AC socket. Note: When not using the unit, please turn off the power, and then unplug the power supply to avoid malfunctions. 5. Connecting to external antenna Your Eviant T7UC is supplied with an external TV antenna that can be located a short distance away from the T7UC。Insert the external antenna plug just like below figure shows and position the antenna for best reception. 6.
Display Options Of DTV Use the on-screen menus to adjust the picture, audio, channels and other functions. Navigate the menus with the navigation buttons on the front of the T7UC or the Remote Control. Press MENU to enter the setup modes. Press MENU again to go back or exit the menu. Picture Menu Press the ◄ ► buttons to select . Press the▲ ▼buttons to select the desired sub-menu. Source Press the ▲▼ buttons to select Source and press the ► button to enter the Source sub-menu.
Display Options of DTV(continued) Audio Menu Press the ◄ ► button to select . Press the ▲▼ button to select the desired sub-menu. Balance Press the ▲ ▼ buttons to select Balance. Press the ◄ ► buttons to adjust the level. Prefer Language Press the ▲ ▼ buttons to select Prefer Language. This is your preferred language that will be chosen when a station transmits in more than one language. It applies to all channels. Press the ◄ ► buttons to make your selection.
Display Options Of DTV(continued) Time Zone Press the ▲ ▼ buttons to select Time Zone. Press the ◄ ► button to select the desired time zone. Note: This item is only available under ATSC signal mode. Day Saving Time Press the ▲ ▼ buttons to select Day Saving Time. This will automatically adjust the internal clock when Day Saving Time is in effect. If your region does not observe Day Saving Time, turn this feature off. Press the ◄ ► buttons to select ON or OFF.
Display Options Of DTV(continued) Closed Caption Press the ▲ ▼ buttons to select Closed Caption and press the ► button to enter the submenu. Press ▲ ▼ buttons to select desired submenu. CC Mode Press the ▲ ▼ buttons to select CC Mode. Press the ◄ ► buttons to turn closed captioning ON or OFF. Basic Selection Press the ▲▼ buttons to select Basic Selection. Press the ◄ ► buttons to select CC1, CC2, CC3, CC4, Text1, Text2, Text3 or Text4.
Display Options Of DTV(continued) Channel Setup Each region has different broadcast channels. Your T7UC will scan for all the channels in the area and remember each location. You can then go through and add or delete channels individually as you prefer. When completed, pressing the up / down channel buttons will take you through all of your selected channels in sequence. Note: If you scan for broadcast channels (Air) and then switch to Cable TV, you will need to re-scan.
Display Options Of DTV(continued) Start to Scan Press the ▲ ▼ button to select Start to Scan. Press the ► button to start scan. The unit will automatically memorize the available channels in sequence. When completed, the unit will tune the first scanned channel. To stop scanning, press Menu. Auto Scan Add CH Press the ▲ ▼ button to select Auto Scan Add CH. This will search for any new channels that were not previously found.
Setting of FM/AM radio Press FM/AM/TV button to FM or AM radio mode. In radio mode, the TV will be shut down. Use P- button to switch to the previous channel. Use P+ button to switch to the next channel. Use VOL- and VOL+ buttons to adjust the volume. The first time when you enter FM or AM radio mode, please set the radio programs by AUTO scan or Manual scan: AUTO scan Long press MEM. button to enter Auto scan mode of radio, it will scan FM or AM radio programs and save 20 channels automatically.
Troubleshooting Before contacting customer service, review the steps below to solve simple problems. If you still suspect something wrong with this unit, immediately turn the power off, disconnect the power connector from the unit, and contact Eviant Customer Service. Never try to repair the unit yourself.
Specifications TFT screen size ............................ 7 inches Active area…………………….………154.08.0(W)*86.58(H) mm Resolution…………………………... 480*3(RGB)*234 Receiving systems…………………..ATSC, NTSC TV Full Frequency Range…………..54MHz ~ 863MHz FM band support……………………. 76-108MHz AM band support…………………… 520-1710 kHz Design and specifications are subject to change without notice. All products distributed by Eviant Inc. unless otherwise indicated ©2009-2010 Quatto Management Limited.