
User Guide
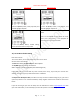


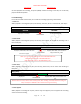


Table Of Contents
- CHAPTER ONE
- Basic Operation Guide- L53
- CHAPTER TWO
- ADVANCED OPERATION GUIDE
- 1)How to Select Record Quality
- 2)Voice Activated Recording (AVR Mode)
- 3)Microphone Sensitivity Control
- 4)What is TRACK ON Recording
- 5)What is Subsection Recording
- 6)What is AUTO Record
- 7)What is Record Monitor
- 8)Telephone Recording
- 9)T-mark
- 10)Set Date and time
- 11)Information
- 12)Format Device
- 13)Factory Settings
- 14)A-B Repeat
- 15)Lock Button, No Button Works
- 16)Connect External Microphone
- 17)Line-in Recording
- 18)Why LINE-IN Recording with Noise
- CHAPTER THREE
- CHAPTER FOUR
- TROUBLE SHOOTING
- 1)No Voice Recordings
- 2)Format Error
- 3)How to connect to computer
- 4)Can I delete recordings from computer
- 5)When Connect to computer, the buttons not work
- 6)Cannot find my recordings in the recorder
- 7)How to turn on voice activated function
- 8)How to Use Voice Activated Function
- 9)Press REC, it not recording
- 10)Memory is full
- 11)How to use the A-B repeat function
- 12)LOCK, No Button Works
- 13)The recording is noise
- 14)It suddenly shows delete file
- 15)No songs
- 16)Cannot Shut Off Recorder
- 17)How to format the recorder
- 18)Space is full

EVISTR VOICE RECORDER
http://evistr.com support@evistr.com
Page - 12 - of -18 -
So when playback the recording, we press FF/REW, instead of moving to next file, we can directly
jump the bookmark position.
B. Edit Recordings
For the file recorded at wav format, we can edit the recording by pressing T-mark button
1. Voice Cut:
When playback a recording file at point, and we stop, Voice Cut, we can cut the rest file, and drop it.
Voice Cut
REMAIN
DELETED
2. Voice Divide:
When playback a recording file at point, and we stop, Voice Divide, we can split the recordings into 2
files at that point
3. Voice Insert:
When playback a recording file at point, and we stop, Voice Insert, we can insert new recording at
that point
4. Voice Append:
When playback a recording file at point, and we stop, Voice Append, we can append new recording
at the end of that recording
Voice Divide
PART ONE
PART TWO
Voice Insert
PART ONE
NEW PART
PART TWO
Played part, PART ONE, it will be the same
file name as original
Paused Point
Unplayed, PART TWO, it will renamed as
“Original File Name_0.wav”
NOTE: if you use T-mark to divide the file named ”20170930141945.wav”
PART ONE will be named as “20170930141945.wav”
PART TWO will be named as “20170930141945_0.wav”
Played part
Paused Point
Unplayed, PART TWO,it will behind the new
part
NOTICE: select voice insert, and then enter recording mode, after recording, press STOP, saved the recording, the
newly recorded part “NEW PART” will be inserted to the original recording
Played part, it will keep
Paused Point
This Part will be deleted