
User Guide
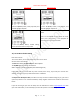


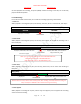


Table Of Contents
- CHAPTER ONE
- Basic Operation Guide- L53
- CHAPTER TWO
- ADVANCED OPERATION GUIDE
- 1)How to Select Record Quality
- 2)Voice Activated Recording (AVR Mode)
- 3)Microphone Sensitivity Control
- 4)What is TRACK ON Recording
- 5)What is Subsection Recording
- 6)What is AUTO Record
- 7)What is Record Monitor
- 8)Telephone Recording
- 9)T-mark
- 10)Set Date and time
- 11)Information
- 12)Format Device
- 13)Factory Settings
- 14)A-B Repeat
- 15)Lock Button, No Button Works
- 16)Connect External Microphone
- 17)Line-in Recording
- 18)Why LINE-IN Recording with Noise
- CHAPTER THREE
- CHAPTER FOUR
- TROUBLE SHOOTING
- 1)No Voice Recordings
- 2)Format Error
- 3)How to connect to computer
- 4)Can I delete recordings from computer
- 5)When Connect to computer, the buttons not work
- 6)Cannot find my recordings in the recorder
- 7)How to turn on voice activated function
- 8)How to Use Voice Activated Function
- 9)Press REC, it not recording
- 10)Memory is full
- 11)How to use the A-B repeat function
- 12)LOCK, No Button Works
- 13)The recording is noise
- 14)It suddenly shows delete file
- 15)No songs
- 16)Cannot Shut Off Recorder
- 17)How to format the recorder
- 18)Space is full

EVISTR VOICE RECORDER
http://evistr.com support@evistr.com
Page - 13 - of -18 -
5. Go to Bookmark:
If a recording had bookmarks, go browse it
6. Delete Bookmark:
If a recording had bookmarks, go to delete it
10) Set Date and time
The path for set data & time
Set Date
Press M (menu) -- >> Menu choice -- >> System setting -- >> Date and time -- >> Set date
And now we can adjust the year month day (YY/MM/DD)
By pressing FF/REW to adjust, tap PLAY button to move to next. When completed date setting, press
M to confirm and save.
Set Time
Press M (menu) -- >> Menu choice -- >> System setting -- >> Date and time -- >> Set time
And now we can adjust the hour, minute (HH/MM)
By pressing FF/REW to adjust, tap PLAY button to move to next. When completed date setting, press
M to confirm and save.
11) Information
Player Information: Device shows the firmware version and the release date.
Disk Space: Device shows the free space and total space.
12) Format Device
This will format the disk and erase all data on the device, so remember to back up important files
before doing.
Select Yes, press M confirm. Device will start to reformat and erase all data. Wait until the device
reboots and completes the process.
Note: Do not turn off power when formatting device. If, unfortunately, the devise is mistakenly cut
off, it will show as disk error.
Voice Append
PART ONE
PART TWO
NEW PART
Played part
Paused Point
New part will be added at the end of
your original recording
NOTICE: select voice append, and then enter recording mode, after recording, press STOP, saved the recording, the
newly recorded part “NEW PART” will be added at the end of the original recording