
User Guide
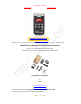
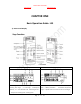


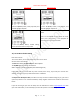

Table Of Contents
- CHAPTER ONE
- Basic Operation Guide- L53
- CHAPTER TWO
- ADVANCED OPERATION GUIDE
- 1)How to Select Record Quality
- 2)Voice Activated Recording (AVR Mode)
- 3)Microphone Sensitivity Control
- 4)What is TRACK ON Recording
- 5)What is Subsection Recording
- 6)What is AUTO Record
- 7)What is Record Monitor
- 8)Telephone Recording
- 9)T-mark
- 10)Set Date and time
- 11)Information
- 12)Format Device
- 13)Factory Settings
- 14)A-B Repeat
- 15)Lock Button, No Button Works
- 16)Connect External Microphone
- 17)Line-in Recording
- 18)Why LINE-IN Recording with Noise
- CHAPTER THREE
- CHAPTER FOUR
- TROUBLE SHOOTING
- 1)No Voice Recordings
- 2)Format Error
- 3)How to connect to computer
- 4)Can I delete recordings from computer
- 5)When Connect to computer, the buttons not work
- 6)Cannot find my recordings in the recorder
- 7)How to turn on voice activated function
- 8)How to Use Voice Activated Function
- 9)Press REC, it not recording
- 10)Memory is full
- 11)How to use the A-B repeat function
- 12)LOCK, No Button Works
- 13)The recording is noise
- 14)It suddenly shows delete file
- 15)No songs
- 16)Cannot Shut Off Recorder
- 17)How to format the recorder
- 18)Space is full

EVISTR VOICE RECORDER
http://evistr.com support@evistr.com
Page - 5 - of -18 -
2) Charging Your Voice Recorder
Use the USB cable provided. Connect to a computer, USB socket, or USB Adapter. The battery can be
fully charged in 2 hours, single full charge can work up to 12 hours.
3) Turn On Voice Recorder
Push power button to ON position, in future, we can press PLAY button to
turn ON/OFF the recording device.
Notice: if we push down the power button, it will totally cut off its power.
During recording, cannot do this, otherwise, file will be lost
4) How to Recording
Hit REC button to begin recording. Press STOP to save
recording successfully, it will show “saved!”.
Notice: During recording, press VOL+/VOL-, we can
control the microphone gain
Must press STOP to save file before pushing down power
button, otherwise file will be lost.
What’s the file name stands for?
If, for example, you press REC and STOP 3 times, the recorder will create 3 recorded files
corresponding to each time, and they will typically be named in this format:
Year-Month-Day-Hour-Minute-Second.MP3 (or. WAV)
Example: we record a recordings at 2017-09-27. So recordings name will be :
2017 09 27 16 14 29.MP3
See Like below pictures, it has 3 sample recordings
TURN ON