
User Manual


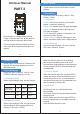


Options What is for
Use the built-in microphone to record
Use for recording with telephone adapter
Use for recording with line in cable, or
external microphone
Microphone
Telephone
Line In
From Level 1 to Level 5: Level 1 only picks up
voice or sound above 70db, a very loud sound.
Level 5 is very sensitive, so any quiet sound
will be recorded. (i.e. normal environmental
noise will activate recording).
Turn On, plug in earphone, we can hear and
monitor what it is recording
Record on/off: turn on the auto record function
Start Time: set when the device start to record
End Time: set when the device save file and
stop record
Record Cycle: set auto record function cycle. It
can function at Once, Daily or Work Day
To use this function properly, we must do this:
A. Set correctly system time for the device
B. Keep the power button at ON position,
ON: default. LED indicator light is ON. OFF:
turn off the LED indicator light.
Return to up level menu choice
Note: do not turn on this function for important
lectures or meetings. It may skip or lose some
very important sentences at low decibels. Use
regular on/record/stop for meetings.
At this option, we can choose Microphone,
Telephone, Line In
3.5 Record From
3.7 Auto Record
3.8 Record LED
3.9 Exit
3.6 Record Monitor
5 6
4. System Settings
Press Play (turn on device) -> hit M -> use
FF/REW to System Setting -> hit M
It can set 10seconds, 20seconds, 30seconds,
always on.
Select at Set Time, Hit M
Press REW/FF to adjust, press PLAY to move
next. When set correctly, hit M to confirm and
finish setting.
When always on, the device screen will not go
dark, it will consume a lot of battery power.
OFF: close this function
Set sleep timer: use FF/REW to set the sleep
timer, range from 1 to 240 minutes
Notice: When this function was ON, device will
count down at the set time, and force to shut
down the device when time was elapsed
4.1 Sleeper Timer
4.2 Backlight Timer
4.3 Date and Time
4.3.1 Set Time
7
Press REW/FF to adjust, press PLAY to move
next. When set correctly, hit M to confirm and
finish setting.
This will format the disk and erase all data on
the device, so remember to back up important
files before doing.
Select Yes, press M confirm. Device will start
to reformat and erase all data. Wait until the
device reboots and completes the process.
Device shows the firmware version and the
release date.
English default. We can select for other
language of the device. If, unfortunately,
the device is set to the wrong language,
please contact customer service. sup-
port@evistr.com.
Device shows the free space and total space.
4.5 Information
4.4 Language
4.6 Format Device
4.5.1 Player Information:
4.5.2 Disk space:
4.3.2 Set Date
8