
installation and_manual


INSTALLATION INSTRUCTIONS
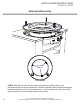
A f f i n i t y 3 0 G
Evo, Inc., 20560 SW 115th Ave., Tualatin, OR 97062 USA
Phone 503.626.1802 | Fax 503.213.5869 | www.evoamerica.com | support@evoamerica.com
12
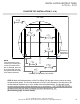
COUNTER TOP INSTALLATION (2 of 4)
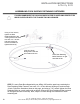
STEP 2 continued: Make sure cabinetry box is 3cm (minimum) below counter top surface
and mounting brackets are positioned correctly so drip pan and chassis are aligned to
counter top(see diagrams above). A black o-ring is recessed in the top bead and designed to
create a seal against the counter top.
Also ensure allowance for the counter top overhang as shown on the SIDE VIEW (see next
page).
When you have confi rmed the position is correct, cut the counter top and substrate.
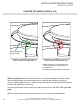
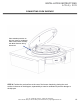
CORRECT ALIGNMENT OF DRIP PAN
AND CHASSIS TO COUNTERTOP
INCORRECT ALIGNMENT OF DRIP PAN
AND CHASSIS TO COUNTER TOP
Possible reasons for incorrect alignment:
1. Top of cabinetry box is less than 3 cm
from counter top
2. Chassis mounting brackets are too high.
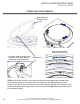
Black o-ring under
drip pan bead