Portable Air Conditioning Unit & Remote Control manual EVO-3008CH English: Nederlands: 2-24 25-47 Contents Air Conditioning Unit 2 Safety Precaution 4 Important 5 Parts Description 6 Accessories 7 Control Panel 9 11 14 17 18 18 Operation Installation Maintenance Troubleshooting WEEE Warning Refrigerant Gas AC Unit Remote Control 19 Button description 23 Usage 24 Fit batteries
Safety Precaution Your safety and safety of others is very important. We have provided many important safety advisories in this manual and on your appliance. Always read and obey all safety requirements. WARNING This symbol indicates the possibility of death or serious injury. CAUTION This symbol indicates the possibility of injury or damage to properties only.
Do not put fingers or other objects into the air outlet or inlets, as fan rotates at high speed and will cause injury. Do not touch the swinging wind vanes. It may clamp your finger and damage the driving parts of the wind vanes. Do not attempt to repair the air conditioner by yourself. All repair works must be carried out by a fully qualified engineer with the appropriate accreditations. Do not operate in lightning storm weather.
Important • The room space for the installation, use, repair, and storage of this air conditioner should be greater than 12m². • If the AC unit is installed, used or stored in an unventilated room, ensure any build up of possible refrigerant gas leaks is prevented, as there could be a danger of fire or explosion should the refrigerant come into contact with electric heaters, stoves or other ignition sources.
Parts Description Front view Control panel Air outlet Handle recess Front panel Air outlet SE AU COOTO DRY L HEA T T TE MP ER AT UR SET ROOM TIMER °C ON h OFF SET E FAN HIG MID H LOW Remote controller ON/ OFF MO DE TUR SLE BO EP ºC SWI NGS SPE ED / ºFD ISPL AY WIN Ant i-F G ELE iFEE .
Accessories iFEEL ISPLAY EALTH TIMER CLEAN WING ECOi ºC / ºFD ELE.
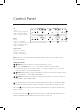
Control Panel Fan • AUTO • HIGH – High speed indicator • MED – Mid speed indicator • LOW – Low speed indicator auto cool dry fan heat auto hi med heat 1 swing timer sleep mode fan speed filter on•off reset 3 auto Mode • AUTO swing timer sleep mode • COOL – Cool indicator • HEAT – Heating indicator (cold wind type unit without this display) • DRY – Dehumidify indicator • FAN – Fan indicator auto 1 fan speed 2 filter on•off reset 4 Extra Features • TIMER – Time indicator • SLEEP – Sleep indica
The mode indicator light illuminates under the different mode. Note: HEAT mode is not available for cool only units. / button Press this button to enter sleep mode, which the unit will exit after 8 hours of continuous operation and restore to the previous status. Note: The SLEEP function can not be activated in fan and dry mode. a. Press the / button, the timer indicator light illuminates. b. Press “+” and “–” button to select the desired time. c.
Operation WARNING Failure to follow the below precaution could result in electrical shock, fire or personal injury. 1. The plug must be plugged into an outlet that is properly installed and grounded. 2. Do not use an extension cord or plug adaptor with this unit. Before starting the unit • Select a suitable location, make sure the unit is near to an electrical outlet. • Install the flexible exhaust hose and the adjustable window slider kit. • Plug the unit into the correct outlet. • Turn the unit on.
Drying operation mode 1. Press the MODE button in a sequence until the dry indicator is lighted. 2. The fan will run at a fixed speed at this operation mode. 3. Close windows and doors for the best dehumidifying effect. Note: The setting temperature and fan speed can not be adjusted.The setting temperature is 25° (77°F) and the fan speed is low. Note: The setting temperature can not be adjusted.
Installation Select a best location • Install the mobile air conditioner in a flat and spacious location where the air outlets will not be obstructed. • A minimum clearance of 50cm from walls or other obstacles should be kept. • The gradient can’t be more than 10 degrees in the horizontal plane while using the unit & fitting kit. More than 50 cm More than 50 cm Note: 1. The air conditioner shall not be used in the laundry room. 2. The plug shall be accessible after the unit is positioned.
Install the Window Slider Kit Horizontal Vertical Foam Seal A window sash 1. Cut the foam seal (adhesive type) to the proper length and attach it to the window sash. window slider kit Screw A 2. Attach the window slider kit to the window sash. Adjust the length of the Window Slider Kit: Loosen the screw A to adjust the length of the Window Slider Kit, then tighten the screw when the length is suitable. Note: the length of the Window Slider Kit is 67.5cm to 120cm. Screw B 3.
4. Cut the foam seal B (non-adhesive) to the window width. Stuff the foam seal B between the glass and the window to prevent air and insects from getting into the room. Foam Seal 5. Install the security bracket with a type B screw, as shown. Install the exhaust duct into the window Remove the unit with the packed exhaust duct next to the window, and then connect the adaptor B (flat mouth) of the exhaust duct with the window.
Maintenance Your new air conditioner is designed to give you dependable service for many years. This section tells you how to clean and care for your air conditioner properly. We advise that you contact your local accredited specialist for the annual maintenance. Remember the cost of this service call is your responsibility. Water drainage During dehumidifying mode, remove the upper drain plug from the back of the unit. Attach the drain hose to the hole.
When the water level of the bottom tray reaches predetermined level, the digital display area shows «P1» and the WATER FULL indicator light illuminates. Carefully move the unit to a drain location, remove the bottom drain plug and let the water drain away. Reinstall the bottom drain plug and restart the machine until the P1 symbol disappears. If the error repeats, call for service. Note: Be sure to reinstall the bottom drain plug before using the unit.
Cleaning The Unit • For the purpose of safety, please turn off the air conditioner power supply. • Wipe the unit with a dry cloth. • If the unit is very dirty, please wipe with a damp cloth. Note: If the unit remains unused for a long period of time please remove the condensate water & leave the drain bung out.
Troubleshooting Before making a service call, please try the suggestions below if your unit is not operating correctly. Air Conditionining unit will NOT operate Causes Solutions The power switch is off Switch on the power.
WEEE directive warning Meaning of crossed out wheeled dustbin Do not dispose of electrical appliances as unsorted municipal waste, use separate collection facilities. Contact your local government for information regarding the collection systems available. If electrical appliances are disposed of in landfills or dumps, hazardous substances can leak into the groundwater and get into the food chain, damaging your health and well-being.
Portable Air Conditioning Unit Remote Control Read the following instructions carefully to ensure safe and correct usage of Portable Air Conditioning Unit remote control. Keep instructions so that they can be referred to at any time.
3. «SPEED» button Select fan speed as following: LOW › MID › HIGH › AUTO 4. «DISPLAY» • Press this button to turn on/off the display. This is for the convenience of users who are uncomfortable sleeping with the backlight on. 5. «iFEEL» • Press this button to set the temperature display on the remote controller to ambient temperature and press this button again to set it to preset temperature. 6. «TIMER» • With the unit ON, press this button to set OFF timer or with it OFF to set ON timer.
The iCLEAN function runs for approximately 30 minutes, during which if the unit is turned on with the remote controller or this button is pressed again, the iCLEAN will be deactivated. 8. “ ” or “ ” Each time the “ ” is pressed, the temperature setting will increase by 1ºC and each time the “ ” is pressed, it will decrease by 1ºC. • The temperature setting ranges from 16ºC (60ºF) – 35ºC (90ºF). Note: The temperature cannot be set in AUTO or FAN mode, thus these two buttons are not functional. 9.
14. «Anti-F» • The Anti-F functions when the unit is turned off with the remote controller in COOL, DRY or AUTO mode. It will operate in HEAT mode (FAN mode for cool only units), with the internal fan running with weak flow for 3 minute before stop, to remove the moisture within the evaporator so as to prevent it from giving off bad smell from mould. • This function is not set in the factory.
Usage Automatic operation mode • Press the MODE button, select the automotive operation mode. • Press the SPEED button, to select the fan speed – you can select the fan speed from LOW, MID, HIGH, AUTO. • Press the ON/OFF button, the air conditioner starts to operate. • Press the ON/OFF button to stop the air conditioning unit. Cooling/ heating operation mode (Cooling only units have no heating function) • Press the MODE button, select the cooling or heating operation mode.
Fit Batteries • Slide open the cover in the direction as indicated by the arrow on the handset. • Put in two brand new batteries and position the batteries to the right electric poles (+ & –) • Replace the cover. Attention: • Aim the remote controller towards the receiver on the air-conditioner. • The remote controller should be within 8 meters away from the receiver. • No obstacles between the remote controller and receiver. • Do not drop or throw the remote controller.
Veiligheidsmaatregelen Uw veiligheid en die van anderen is erg belangrijk. Deze handleiding bevat veel belangrijke veiligheidsaanwijzingen en er zijn ook veiligheidsstickers op de airco aangebracht. Lees altijd alle veiligheidsaanwijzingen en neem ze in acht. WAARSCHUWING Dit symbool wijst op mogelijk ernstig of fataal letsel. ATTENTIE Dit symbool wijst op mogelijk letsel of schade aan eigendom.
Steek geen vingers of andere voorwerpen in de in- of uitlaten. De ventilator draait op hoge snelheid en zal letsel veroorzaken. Raak de draaiende lamellen niet aan. Uw vinger kan vastgeklemd raken, wat de aandrijving van de lamellen zal beschadigen. Probeer de airco nooit zelf te repareren. Alle reparaties moeten worden uitgevoerd door een vakbekwaam technicus die over de benodigde vaardigheden beschikt. Gebruik de airco niet tijdens onweer of wanneer het bliksemt.
Belangrijk • De ruimte voor installatie, gebruik, reparatie en opslag van deze airconditioner dient groter te zijn dan 12 m2. • Als de airconditioner wordt geïnstalleerd, gebruikt of opgeslagen in een ongeventileerde ruimte, zorg dan dat opbouw van koelgas door lekken wordt voorkomen, omdat er een risico op brand of ontploffing kan zijn als het koelmiddel in contact komt met elektrische verwarmingen, fornuizen of andere ontstekingsbronnen.
Beschrijving van onderdelen Vooraanzicht Bedieningspaneel Luchtuitlaat Handvat uitsparing Voorpaneel Luchtuitlaat SE AU COOTO DRY L HEA T T TE MP ER AT UR SET ROOM TIMER °C ON h OFF SET ON/ OFF MO DE FAN HIG MID H LOW E Afstandsbediening TUR SLE BO EP ºC SWI NGS SPE ED / ºFD ISPL AY WIN Ant i-F G ELE iFEE .
Accessoires Onderdeel Naam van het onderdeel Hoeveelheid Uitlaatslangadapter en adapter B (platte of ronde opening, afhankelijk van het model) Vensterschuifkit en bout 1 Raaminstallatieset 1 Schroef A 2 Schroef B 6 Beveiligingssteun 1 Schuimafdichting A 2 Schuimafdichting B 1 Adapter B (ronde opening) iFEEL ISPLAY EALTH TIMER CLEAN WING ECOi ºC / ºFD ELE.
Bedieningspaneel Ventilator • AUTO • HIGH – Hoge snelheid • MED – Gemiddelde snelheid • LOW – Lage snelheid auto cool dry fan heat auto 1 swing timer sleep mode fan speed filter on•off reset 3 auto Stand • AUTO • COOL – Koeling • HEAT – Verwarming (koude wind-type zonder dit display) • DRY – Ontvochtiger • FAN – Ventilator hi med heat auto 1 swing timer sleep fan speed mode 2 filter on•off reset 4 Extra functies • TIMER • SLEEP – Slaapstand • SWING – Draaifunctie Opmerking: Dit pictogram
Het standindicatorlampje duidt de verschillende standen aan. Opmerking: De VERWARMINGSSTAND is niet beschikbaar op apparaten die alleen koelen. / Knop Druk op deze knop om de slaapstand in te schakelen, welke het apparaat na 8 uur verlaat, waarna de vorige status wordt hersteld. Opmerking: De SLAAPSTAND kan niet worden ingeschakeld in de ventilatie- en droogstand. a. Druk op deze knop , het indicatorlampje gaat branden. b. Druk op “+” en “–” om de gewenste tijd in te stellen. c.
Werking WAARSCHUWING Als u onderstaande voorzorgsmaatregelen niet opvolgt, kan dit leiden tot een elektrische schok, brand of persoonlijk letsel. 1. De stekker moet in een stopcontact worden gestoken dat goed geïnstalleerd en geaard is. 2. Gebruik geen verlengsnoer of stekkeradapter voor dit apparaat. Voordat u de airco start • Kies een geschikte locatie, dicht in de buurt van een stopcontact. • Monteer de flexibele uitlaatslang en de verstelbare vensterschuifkit. • Steek de stekker in het stopcontact.
Droogstand 1. Druk herhaaldelijk op de MODE-knop tot de droogindicator brandt. 2. De ventilator loopt in deze stand met een vaste snelheid. 3. Sluit ramen en deuren voor het beste ontvochtigingseffect. Opmerking: De temperatuurinstelling en ventilatorsnelheid kunnen niet worden gewijzigd. De temperatuurinstelling is 25 ° (77 °F) en de ventilatorsnelheid is laag. Opmerking: De temperatuurinstelling kan niet worden gewijzigd.
Installatie Kies de beste locatie • Plaats de mobiele airco horizontaal in een grote ruimte, zodat de luchtuitlaten niet worden geblokkeerd. • Zorg voor een minimumspeling van 50 cm tussen de airco en muren of andere voorwerpen. • De helling mag niet meer zijn dan 10 graden van horizontaal, wanneer u de airco gebruikt en de kit plaatst. Mindestens 50 cm Ten minste 50 cm Opmerking: 1. De airco mag niet in een wasruimte worden gebruikt. 2.
Installeer de raaminstallatieset Horizontaal Verticaal Schuimafdichting A Raamvleugel 1. Snijd de schuimafdichting (klevend) tot de juiste lengte en bevestig deze op de raamvleugel. Schroef A Raaminstallatieset 2. Bevestig de raaminstallatieset aan de raamvleugel. Pas de lengte van de raaminstallatieset aan: draai schroef A los, pas de lengte van de raaminstallatieset aan en draai de schroef weer vast wanneer de lengte juist is. Opmerking: De lengte van de raaminstallatieset is 67,5 tot 120 cm.
4. Snijd de schuimafdichting B (niet-klevend) op de breedte van het raam. Duw de schuimafdichting B tussen het glas en het raam om te voorkomen dat lucht en insecten de ruimte binnen komen. Schuimafdichting 5. Installeer de veiligheidsbeugel met een schroef van type B, zoals is aangegeven. Installeer het afvoerkanaal in het raam Plaats het apparaat met het afvoerkanaal naast het raam en verbind vervolgens adapter B (vlak mondstuk) van het afvoerkanaal met het raam.
Onderhoud Deze nieuwe airco zal vele jaren betrouwbaar functioneren. In dit deel leest u hoe de airco op de juiste wijze gereinigd en onderhouden wordt. We raden aan dat u contact opneemt met uw lokale distributeur voor de jaarlijkse onderhoudsbeurt. Deze onderhoudskosten zijn voor uw rekening. Afvoeraansluiting Verwijder in de ontvochtigingsstand de bovenste afvoerplug aan de achterzijde van het apparaat. Bevestig de afvoerslang aan de opening. Plaats het andere uiteinde van de slang in een afvoerleiding.
Wanneer het waterpeil in de opvangbak een vooraf bepaald niveau bereikt, geeft het digitale scherm «P1” aan en gaat het indicatorlampje WATER FULL (Water vol) branden. Verplaats het apparaat voorzichtig naar een afvoerlocatie, verwijder de onderste afvoerplug en laat het water wegvloeien. Plaats de afvoerplug terug en herstart het apparaat, waarna het P1-symbool verdwijnt. Als de fout blijft, bel dan voor service. Opmerking: Zorg dat u de afvoerplug terugplaatst voordat u het apparaat weer gebruikt.
De airco reinigen • Voor alle veiligheid schakelt u de stroom naar de airco uit. • Veeg de airco met een droge doek schoon. • Als de airco erg vuil is, veegt u hem schoon met een vochtige doek. Opgelet Verwijder het gecondenseerde water verdunnen ofwel de stekker weer in de afvoerbuis als het apparaat niet gebruikt gedurende lange tijd.
Problemen oplossen Voordat u hulp inroept, leest u eerst onderstaande aanwijzingen als de airco niet juist functioneert. Airconditioner functioneert niet Oorzaken Oplossingen De stroom staat uit. Schakel de stroom in. De stroom is uitgevallen. Wacht totdat de netstroom wordt hersteld. De zekering is doorgebrand. Controleer de stroomonderbreker, vervang de zekering. (test of de zekering opnieuw doorbrandt, zo ja, neem dan contact op met een elektricien) De opstarttijd wordt niet bereikt.
AEEA-waarschuwing Betekenis van vuilnisbak op wieltjes met een kruis er doorheen Gooi elektrische apparatuur nooit met het huishoudafval weg. Gebruik alternatieve voorzieningen. Neem contact op met uw gemeente voor informatie over de beschikbare ophaaldiensten. Als elektrische apparatuur samen met het huishoudafval wordt begraven, kunnen gevaarlijke stoffen uitlekken en via het grondwater in de voedselketen terechtkomen, wat schadelijk is voor de gezondheid en het welzijn.
Handleiding van de afstandsbediening van de mobiele airconditioner Lees de volgende instructies aandachtig door voor veilig en correct gebruik van de afstandsbediening van de airco. Bewaar de instructies zodat ze op elk moment geraadpleegd kunnen worden.
4. Knop «DISPLAY» Druk op deze knop om het scherm in en uit te schakelen. Dit is voor het gemak van gebruikers die het niet prettig vinden om te slapen met de achtergrondverlichting aan. 5. Knop «iFEEL» Druk op deze knop om de omgevingstemperatuur weer te geven op de afstandsbediening. Druk nogmaals op deze knop om de ingestelde temperatuur weer te geven. 6. Knop «TIMER» Deze knop heeft geen functie.
De iCLEAN-functie loopt ongeveer 30 minuten. Als het apparaat gedurende deze tijd wordt ingeschakeld met de afstandsbediening of nogmaals op deze knop wordt gedrukt, wordt de iCLEAN-functie gedeactiveerd. 8. Knoppen en Telkens wanneer op “ ” wordt gedrukt, wordt de temperatuurinstelling met 1 ºC verhoogd en telkens wanneer op “ ” wordt gedrukt, wordt deze met 1 ºC verlaagd. • De temperatuurinstelling heeft een bereik van 16ºC (60 ºC) tot 35 ºC (90 ºF).
13. Knop «SWING » Druk op deze knop om links/rechts draaien in te schakelen en druk nogmaals om de positie vast te zetten. 14. «Anti-F» • De Anti-F -functie werkt terwijl het apparaat is uitgeschakeld met de afstandsbediening in de KOEL-, DROOG- OF AUTOMATISCHE STAND. De functie werkt in de VERWARMINGSSTAND (VENTILATORSTAND voor alleen koelende apparaten), waarbij de interne ventilator 3 minuten langzaam loopt, om het vocht in de verdamper te verwijderen, om te voorkomen dat deze gaat stinken door schimmel.
Gebruik Automatische werking • Druk op MODE en kies de automatische stand. • Druk op SPEED om de snelheid van de ventilator te kiezen. De standen zijn LOW, MID, HIGH, AUTO. • Druk op ON/OFF, dan schakelt de airco in. • Druk op ON/OFF, dan schakelt de airco uit. Koeling/verwarming (Airco’s alleen voor koeling hebben geen verwarmingsfunctie) • Druk op MODE en kies de koeling- of verwarmingstand. • Druk op “ ” of “ ” om de temperatuur in te stellen.
Batterijen • Schuif het deksel open in de richting van de pijl. • Plaats twee nieuwe batterijen in het vakje en let op de goede richting van de plus- en minpolen (+ & –). • Zet het deksel weer op zijn plaats. Opgelet • Richt de afstandsbediening op de ontvangstsensor van de airco. • Zorg ervoor dat er niet meer dan 8 meter afstand is tussen de afstandsbediening en de ontvangstsensor. • Zorg ervoor dat geen voorwerpen de signaaloverdracht tussen de afstandsbediening en de ontvangstsensor blokkeren.
EVOLARSHOP.