User’s Guide Plastic Card Printer Pebble User’s Guide part number: KU03E, Rev.
Copyright Information Evolis Card Printer © January 2006. All rights reserved. Copyright Notice Users must respect the copyright laws applicable in their country. This manual must not be photocopied, translated, reproduced or transmitted in whole or in part for any reason and by the means that might be, albeit electronic or mechanical, without the express, written authorisation of the company Evolis Card Printer. All information contained herein may be subject to modification without prior notice.
Contents Introduction . . . . . . . . . . . . . . . . . . . . . . . . . . . . . . . . . . . . . . . . . . . . . . . . . . . . . . . . . . . . . . . . . . . . . . . . . . . . . . . . . . . Chapter I • Starting up 4 5 Choice of a location . . . . . . . . . . . . . . . . . . . . . . . . . . . . . . . . . . . . . . . . . . . . . . . . . . . . . . . . . . . . . . . . . . . . . . . . . . . 5 Unpacking the printer . . . . . . . . . . . . . . . . . . . . . . . . . . . . . . . . . . . . . . . . . . . . . . . . .
Introduction We congratulate you on choosing a Pebble printer! Pebble printers are the ideal solution for all printing of plastic cards and badges, student cards, employee badges, access control badges, membership cards, loyalty cards and all other applications requiring color printing on one side of the card … This product comes with a wide range of assistance services from the company Evolis and its partners, specially selected to help you effectively and professionally.
Chap.1 Starting up Choice of a location The Pebble printer must be set up on a flat surface and in a dust-free environment. Access to the printer must be possible from all directions for its installation and use. Unpacking the printer Proceed as follows in unpacking the printer: 1. Remove the upper protection foam. 2. Lift the printer out of its box, remove the protection bag and set it in the chosen place. 3. Remove all adhesive from the outside of the printer.
Description of the printer and its functions We invite you to check the different components of your printer on the following drawings, to which we will refer in this manual.
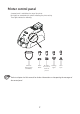
Printer control panel A control panel is available on the top of the printer. Four lights are associated with symbols indicating the printer activity. These lights indicate the following: Turned on Data reception (Pushbutton) End of ribbon No card in the feeder or feeder not present Cleaning signal Cover open Refer to chapter 4 of this manual for further information on interpreting the messages of the control panel.
Installation of the interface cable and power supply If you wish to use your Pebble printer with the USB port, install the Windows driver before connecting this port. 1. Connect the interface cable supplied with your printer as indicated in the following 2. Connect the other end of the cable to the corresponding port on your computer 3. Connect the cable from supply to supply and then connect the power cable to the printer. 4. Then connect the end of the power supply cable to an earthed socket 5.
Ribbon installation 1. Open the printer cover by pressing the opening lever then turn it. 2. Install the ribbon in the printer as shown. 3. Close the printer cover. The ribbon must be correctly installed for the printer to work. Only use Evolis ribbons. Evolis declines all responsibility if the printer or the print head are damaged through the use of an unapproved ribbon. The ribbon is automatically positioned each time the cover is closed.
Card loading Placing the cards in the feeder 1. Remove the feeder from the printer as shown. max. 2. Lower the spring system as shown and max. insert 100 cards of 0.76 mm at most. CLIC 3. Put the feeder back in the printer. Then press on the top of the feeder until it clicks. Card thickness: • Pebble printers admit cards with a thickness of 0.25 mm to 1 mm.
Installing the manual feed tray and loading the cards The Pebble printer may be optionally fitted with a manual supply tray for inserting cards one by one. Manual card feeder option should be set through the driver Properties. In the Tools tab click on Dialog box button. Then select Manual feed option in Source Tray menu and in Output Tray menu choose the option according to the required operation mode for the card exit. `Click on the Set button to confirm.
To adjust the thickness of the cards using the feeder cage: CLIC max. 1. Remove the feeder from the printer as shown. 2. Adjust the thickness of the cards used by moving the handle from right to left on the required card thickness 3. Put the feeder back in the printer. Then press on the top of the feeder until it clicks. To adjust the card thickness from inside the printer: CLIC 1. Open the printer cover by pressing the opening lever and then turn it. 2.
Removing the printed cards The Pebble printer is fitted with an output hopper with a capacity for 50 cards in 0.76 mm (30mil) format. This is intended to receive the printed and/or encoded cards. 1. Locate the output hopper. 2. Remove the printed and/or encoded cards as shown. Other stages to the installation You have now completed the installation (material) of your Pebble printer.
Chap. 2 Printing Installation of the driver Before using your Pebble printer, you must install its driver. Reminder: the driver and Pebble printer operate under Windows 2000, NT 4.0 and Xp. The CD provided with the printer includes a utility which automates the installation of the printer driver. This utility installs the right driver for your configuration.
Windows Users - Manual Installation ■ ■ ■ ■ ■ ■ ■ ■ ■ ■ ■ Close all applications before installing the pilot. Do not connect the USB or Parallel cable before the installation is complete. Insert the DRIVERS & DOCUMENTATION CD-Rom in your CD-Rom reader. On the Windows menu bar, click Start, Parameters and then Printers. Double-click on Add printers. Select Local Printer. Select the LPTx printer port (even if you wish to connect the printer on USB).
Printing parameter setup Before using your Pebble printer, it is best to check / modify the default parameters of the driver. Furthermore, if you have options installed, you must declare them to the driver. Your printer has numerous functions that can be parameterised in the printing manager. These printing parameters are accessible: ■ From Start in the Windows bar, Parameters and then Printers 1. Select Evolis Pebble 2.
“Graphic” dialog box If you previously selected a color ribbon in the Characteristics dialog box, the Drawing dialog box allows you to select: Black panel: the use of the black panel. Varnish panel: the varnish application of a color ribbon depending on a deliberate choice or a kind of card requiring a covering reserve. The More options button enables action on certain printing parameters, such as the contact and intensity of the colors.
“Tools” dialog box This dialog box offers first level help for your Pebble printer. If your Pebble printer has an option with a magnetic encoder, now proceed to set it up by clicking on the Encoding Definition button. For further information concerning this printer option, consult Annexe A of this manual. We also recommend you print a Test Card on the first use, and to keep it. This card records the information you might be asked for if you call the after-sales service.
3. In the Margin dialog box, select 0 cm for all margins, then in Orientation, select Landscape 4. Close the window by clicking OK. Your Word window should now be like this: You are ready to personalize your card by entering the different composition elements: ■ Logo and Illustration ■ Identity photo ■ Constant and variable texts ■ Barcode, etc. Example: Note that this example does not intend to teach the operator about the working of the Word application.
Parameterising the Evolis Pebble Driver To access the parameters from the Word window: 1. In the menu bar, point to File and select Print. 2. The dialog box tells you that the Evolis printer has been selected. Then click on Properties. The dialog box of the Evolis Pebble driver opens. The printing parameters for this example are: 1. Main dialog box, select: ■ Type of ribbon: Standard 5 panel ribbon (YMCKO) ■ Orientation: Landscape ■ Copy (number to be determined) 2.
Chap. 3 Cleaning Keep your warranty valid! Failure to observe the procedures concerning maintenance in this chapter may lead annuls the warranty of your Pebble printer and the print head. The company Evolis declines all liability if the printer is used under unapproved conditions of cleaning.
Cleaning the interior of the printer: This simple cleaning system requires the use of pre-saturated cleaning cards specially conceived for the printer. A cleaning kit with samples of these cards is provided with your Pebble printer. By repeatedly passing the card inside the printer, the card transport rollers, the cleaning roller, the print head and the magnetic head (option) are all cleaned. 1 Remove the feeder from the printer as shown. 2. Remove the cards in the feeder. 3.
Following a cleaning cycle, wait two minutes for the cleaner to evaporate completely before using the printer again. Although the cleaning alert might have been triggered, the printer will continue to work. It is also possible to trigger a cleaning sequence without waiting for the signal of the light of the printer. This is carried out by pressing the push button of the Control Panel for a few seconds. In this case, first repeat all the operations described above.
Maintenance of the cleaning roller Cleaning cycle: on each ribbon change Use: cleaning wipes Your Pebble printer has a cleaning roller. Its adhesive surface holds the dust caused by the cards. Although this roller is maintained when cleaning the inside of the printer, it is nevertheless advised to clean it regularly and simply with a wipe provided in the cleaning kit to ensure that the surface of the cards is perfectly clean. To maintain the cleaning roller: 1. Open the printer cover.
Chap. 4 Breakdowns To satisfy the demands of its customers, Evolis provides a complete range of technical assistance services in this manual and on the website www.evolis.com. This section includes information concerning first level repairs on the Pebble printer. Interpreting the messages of the control panel Although the Pebble printer has been conceived to work extremely reliably, problems may however arise.
The push button returns the control panel to its original state after dealing with the following cases: ■ ABSENCE OF CARD or INTERNAL PRINTER PROBLEM ■ ERROR IN MAGNETIC ENCODING ■ CARD EJECTION The push button also enables: The printer to be set to stand-by ■ A test card to be printed ■ A cleaning cycle to be started ■ Consult the following states of the control panel to determine the activity of the Pebble printer or the nature of the problem: State of the lights Interpretation Solution or explanation
State of the lights Interpretation Solution or explanation PRINTER CLEANING ALERT (AFTER 1000 INSERTIONS) ■ PRINTER CLEANING ALERT (AFTER 1200 INSERTIONS) ■ PRINTER COVER OPEN ■ MECHANICAL PROBLEM ■ The printer has to be cleaned Go to chapter 3 “Cleaning”. The printer has to be cleaned Go to chapter 3 “Cleaning”. The printer cover is open Close the printer cover. The activity in course restarts.
Printing and interpreting a test card Printing a test card gives certain technical information about your printer and confirms its correct working. We advise you to print it when the printer is put into service and to keep it at hand. Printing a test card 1. Make sure there are a ribbon and a card in the printer. 2. Press the push button for three seconds. All the lights go out. 3. Press the push button once more and hold it down. 4. The green light of the push button comes on. 5.
Printing quality problems The following information will help you to resolve any problems of printing quality that might arise in using your printer. If despite this information you are unable to resolve the problem, contact your Evolis reseller. Nothing is printed 1. Check the power supply Make sure: ■ the power supply cable is correctly connected to the printer and connected to a mains socket that works. ■ the printer is under power. The green light of the control panel is on.
The printing quality is not sufficient 1. The contrast and luminosity parameters must be modified ■ Lack of contrast and color saturation, increase the contrast and luminosity parameters in the setup of the driver. 2. The type of cards used is maybe unsuitable ■ Check whether the type of cards used corresponds to the specifications required See the ”Technical Specifications” chapter in this manual for further information. ■ The texture of the card is rough or not perfectly flat.
Correcting card jamming Remove the card as follows: 1. Open the printer cover and remove the ribbon. 2. Remove the card by pressing the push button and/or pushing it manually towards the printer outlet. If there are several cards, push the top one first. 3. Replace the ribbon then reclose the printer cover. 4. Press the push button on the control panel for one second. To prevent card jamming: 1. Make sure the cards are correctly adjusted with the right thickness. 2.
Stage 2 – Installation of the new printing head 1 2 1 2 3 3 1. Take the new printing head and insert the cable/s in its/their housing. 2. Insert the head vertically on the two guides 3. Turn the printing head to “clip” it in the metal part. 4. Close the cover of the printer. The printing head is now installed. Stage 3 - Installation of the new printing head 1. Make sure that the printer is turned on and connected to a computer where the printing pilot has been installed. 2.
Customer service If the suggestions given above in this section do not allow you to resolve the problem/s, connect to evolis.com for larger information or contact your Evolis reseller. Evolis website If you need extra technical help, you will find much information on the use and breakdown of Evolis printers under Support & Services in the Evolis website.
Chap.
Chap. 6 Supplies Evolis has a large choice of cards and ribbons as well as various accessories. In the following you will find the list of supplies available from an Evolis reseller.
Software P/N: L8001 eMedia Pro Software Software for conceiving and editing badges with connection to databases Plastic Cards P/N: C4001 Classic Blank White plastic cards – 0.76 mm (30mil) 5 packs of 100 cards P/N: C4002 Classic Blank White Plastic Cards – 0.50 mm (20mil) 5 packs of 100 cards P/N: C4003 Classic Blank White Plastic Cards with a HICO Magnetic Stripe – 0.76 mm (30mil) 5 packs of 100 cards P/N: C4004 Classic Blank White Plastic Cards with LOCO Magnetic Stripe – 0.
Appendix A Magnetic Encoding Introduction Pebble printers with a magnetic stripe card encoder are called Pebble Mag printers. The operating mode of a Pebble Mag printer is identical to that of a Pebble printer. The magnetic encoder encodes tracks ISO 1, 2 and 3 in a single passage and then checks the data.
Parameterising the Windows Driver When first installing the Windows driver, it is necessary to parameterise the functions of the magnetic encoder. The functions of the magnetic encoder are accessible from the Tools dialog box of the driver by clicking the Encoding Definition button. “Magnetic Encoder” dialog box The Magnetic Encoder dialog box opens on selecting the Encoding Definition button. Track format allows us to choose the ISO standard required for each track.
Appendix B Smart Card Contact Station Introduction Pebble printers with a Smart Card Contact Station are called Pebble Smart printers. The working mode of a Pebble Smart printer is identical to that of a Pebble printer. The Smart Card Contact Station of the Pebble Smart enables the chips to be programed to the ISO 7816-2 standards. Location of the Contact Station The Contact Station is a module installed in the factory on Pebble Smart printers.
Interface of the Contact Station The Pebble is fitted with a DB-9 female connector on the back of the printer. This connector, directly connected to the Contact Station inside the printer, is also connected to an external coupler to program the chip. DB-9 Connector USB or Parallel Port External Coupler Serial Port, USB, … DB-9 Connector pins 1 2 3 4 5 6 7 8 9 Chip card contact points C1 (V c.c.
Declarations of Conformity Concerning Safety and Electromagnetic Compatibility Manufacturer’s Name: Manufacturer’s Address: Evolis Card Printer 29, avenue de la Fontaine Z.I.