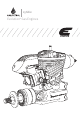
5GX2 Evolution Gas Engines ®
NOTICE All instructions, warranties and other collateral documents are subject to change at the sole discretion of Horizon Hobby, LLC. For up-to-date product literature, visit horizonhobby.com and click on the support tab for this product.
• Always use the throttle linkage to shut off the air or turn off the engine power switch to stop the engine. • Never use hands, fingers, or any other body part to stop the propeller. • Never throw any object into a propeller to stop it. • Never run the engine in the vicinity of loose small objects, such as gravel or sand, to avoid the propeller uncontrollably throwing such materials.
Introduction Congratulations on your purchase one of the exciting new engines in the Evolution® small block gas engine series. All of the Evolution brand gas engines are designed from the start to provide you with excellent performance at a fraction of your previous operating costs. We have painstakingly designed and tested each engine to ensure a hassle-free experience without giving away anything in expected performance or durability.
Included Content Engine EVOA107 Evolution®/Spektrum™ Telemetry RPM Adapter Cable EVOA121 Sintered Plastic Filter Clunk EVOG10300 Ignition Unit EVOG10350 Spark Plug EVOG15601 Muffler EVO9191A Muffler Screws & Gasket Optional Items APC13060 (APC14060) 13 x 6 propeller (break-in) (14 x 6 propeller (normal flight)) EVOA100 Optical Electronic Ignition Kill Switch EVOA102 (EVOA103) Medium Gas-FKM Fuel Tubing 1 meter (3 meters) EVOA112 Evolution 3 Wire Ignition/Receiver Switch EVOM9 15cc Inver
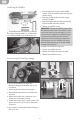
Installing the Muffler 1. Put a lock washer on each of the muffler screws. Push the muffler screws through the cylinder head. 2. Place the muffler gasket over the engine mounting screws. 3. Align the muffler with the exhaust opening and the muffler mounting screws. 4. Tighten the muffler screws. Important: Tighten the muffler screws after the first few tanks of fuel. The muffler screws may loosen from heat and vibration.
Adjusting the Throttle Opening 1. Lower the throttle and center the throttle trim. 4. Move the throttle stick and throttle trim down to confirm the throttle closes. 2. Adjust the length of the throttle linkage until 5. If you reversed the throttle channel in your the throttle is open 1mm. transmitter and you are using a 2.4GHz radio 3. Move the throttle stick up to confirm the system, you must re-bind your radio system throttle opens. If the throttle does not to set the correct failsafe position.
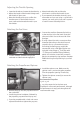
Connecting the Electronic Ignition The Evolution Electronic Ignition Assembly is designed and engineered specifically for the small block engine series. It is smaller and lighter so it fits into tighter spaces of the airplanes the engines are designed to power. The battery voltage required is between 4.8V (4-cell Ni-MH pack) and 8.4V (2S Li-Po battery) and no voltage regulators are needed with any of these batteries. We recommend a 2S Li-Fe or Li-Po battery with a capacity of at least 800mAh.
Fuel This engine requires a mix of 20:1 gas to oil lubricant ratio for break-in and a mix of 32:1 gas/oil ratio for normal operation in order to last a long time. The needle bearing at the bottom end of the conrod depends upon this lube ratio to operate properly. Do not go leaner than a 20:1 gas/oil ratio for the first gallon of fuel. After this you may decrease the oil content to a 32:1 gas/oil ratio if desired. Do not go leaner than a 32:1 gas/oil ratio or the warranty on your engine will be voided.
Engine Break-in Your new engine needs to be broken-in to ensure a long life of all the components. This engine features a piston ring design, which requires a specific break-in procedure to ensure a tight seal between the piston ring and liner. For this to be accomplished, this process requires repeated heating and cooling cycles, and must be done at a needle setting that is slightly rich of peak to ensure the ring expands and contracts. The ring needs to “grow” into the liner for it to develop a good seal.
Telemetry Telemetry is a huge asset to help you tune your engine. The ignition module is even capable of communicating with Spektrum telemetry systems directly so you won’t have to add an additional RPM sensor. You will need to connect the Evolution Ignition Telemetry Adapter (EVOA107) between the RPM port on the ignition unit and the RPM port on your Spektrum telemetry module in order to utilize this feature. Telemetry systems other than Spektrum may require a dedicated RPM sensor.
High-Speed Needle Adjustment Because of the small amount of fuel actually needed for this engine, needle adjustments need to be made in small increments. It may take 5 seconds or more before you will notice a running change in your engine after making it. Be patient. Use a tachometer, this is a very important part of properly setting your high-speed needle valve. The procedure below is for ground setting the needles prior to flight.
Low-Speed Needle Adjustment If you have properly set the idle needle, the low-speed setting should be within 1/16th of a turn from perfect. Remember we are talking about minute amounts of fuel going through the carburetor, any adjustments you now make to the idle needle should be very, very small. Take into consideration the length in service (e.g. break-in time) and the size of propeller you are using. In the beginning, use a smaller propeller early in the break-in process.
Troubleshooting Guide If the Engine Does Not Start • Check and use a new spark plug if needed. • Check fuel lines. • Check for proper mechanical function by turning the engine over. • Check that the carburetor is correctly installed. • Reset the needle valves to the factory settings. High-speed 1.5 turns out, Lowspeed 4.5 turns out when the throttle barrel is 1.5mm open.
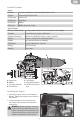
Parts List # Description Part 1 Cylinder Screw (6) EVO46408 2 Spark Plug EVOG10350 3 Cylinder Head EVOG15103 4 Cylinder Head Gasket (2) EVO91112 5 Cylinder EVOG15202 6 Piston Ring EVO91236 7 Ringed Piston EVOG15214 8 Piston Pin & Retainer EVO91213 9 Connecting Rod EVOG15204 10 Prop Washer & Nut EVO100228 11 Drive Washer EVOG15219 12 Spacer Washer EVO91225 13 Front Bearing EVO91109 14 Crankcase with Index Pin EVOG15101B 15 Rear Bearing EVO400110 16 Drive Key
# Description Part 40 Throttle Barrel (B) EVOG15813B 41 Low-Speed Adjustment EVOG15844 42 Main Carburetor Body (B) EVOG15827B 43 Carburetor Barrel Retaining Bolt EVOG15825 44 Carburetor Pump Screws (4) EVOG15825B Exploded View 2 1 3 4 24 5 6 22 7 30 8 19 9 17 29 15 18 36 16 14 13 29, 31 12 11 10 26 20 34 21 35 23, 36 23 44 27 32, 35 43, 45 23 27, 37 23, 27 25 28 40 39 40 41 27 38 16 42 37 33
2-YEAR LIMITED WARRANTY What this Warranty Covers - Horizon Hobby, LLC (Horizon) warrants to the original purchaser that the product purchased (the “Product”) will be free from defects in materials and workmanship for a period of 2 years from the date of purchase.
NOTICE: Do not ship LiPo batteries to Horizon. If you have any issue with a LiPo battery, please contact the appropriate Horizon Product Support office. Warranty Requirements - For Warranty consideration, you must include your original sales receipt verifying the proof-of-purchase date. Provided warranty conditions have been met, your Product will be serviced or replaced free of charge. Service or replacement decisions are at the sole discretion of Horizon.
Compliance Information for the European Union Declaration of Conformity (in accordance with ISO/IEC 17050-1) No.
©2014 Horizon Hobby, LLC. Evolution, the Evolution logo, DSMX, Hangar 9 and the Horizon Hobby logo are registered trademarks of Horizon Hobby, LLC. The Spektrum trademark is used with permission of Bachmann Industries, Inc. Tygon® is a registered trademark of Saint-Gobain Performance Plastics Corporation. Viton® is a registered trademark of E.I. DuPont de Nemours and Co. Corporation, Wilmington, Delaware. All other trademarks, service marks and logos are property of their respective owners.