33cc GAS/PETROL Evolution Gas Engines ®
EN NOTICE All instructions, warranties and other collateral documents are subject to change at the sole discretion of Horizon Hobby, Inc. For up-to-date product literature, visit horizonhobby.com and click on the support tab for this product.
EN • Always keep your fuel in a safe place away from sparks, heat or anything that can ignite. • Always ensure the aircraft is secure and will not move once the engine is started. • Always rebind your transmitter to your receiver(s) after setup and before first flight. • Always ensure the throttle failsafe is set to low throttle in your transmitter. • Always perform a range check prior to flight.
EN Introduction Congratulations on your purchase of one of the exciting new engines in the Evolution® gas engine series. All of the Evolution brand gas engines have been painstakingly designed and tested to ensure a hassle-free experience without giving away anything in expected performance or durability and are backed by a 2-year limited warranty. This manual, when read and followed, will guide you through the simple steps to your success. Welcome to the Evolution family.
EN Included Content ENGINE • Muffler (EVOG33601) • Muffler Screws & Gasket (EVOG33100A) • Spark Plug (EVOG33350) • Evolution/Spektrum™ Telemetry RPM Adapter Cable (EVOA107) • Large Gas-FKM Fuel Tubing (EVOA109) • Large In-line Fuel Filter (EVOA111) • Large In-tank Felt Filter/Clunk (EVOA112) OPTIONAL ITEMS • Tachometer (HAN156) • Propeller 17 x 8 (APC17080) for break-in; 18 x 8 (APC18080) for normal flight • Optical Electronic Ignition Kill Switch (EVOA100) • Evolution Synthetic 2-Cycle Oil, (EVOX1001Q) •
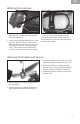
EN Installing the Muffler The muffler mounting accessory package includes mounting screws (2), lock washers (2), muffler gaskets (2) and L- wrenches (2). We suggest using high-temperature RTV as a locking agent on the muffler screws to keep them tight. 1. Put a lock washer on each of the muffler screws. Push the muffler screws through the muffler. 2. Place the muffler gasket over the muffler mounting screws. 3. Align the muffler gasket with the exhaust opening and the muffler mounting screws. 4.
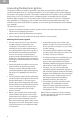
EN Attaching the Fuel Lines Fuel Line 1. Connect medium diameter large diameter FKM fuel tubing to the carburetor and the fuel tank supply line. 2. Connect large diameter FKM fuel line to the vent line. Run this fuel line either around the back of the tank or make a loop on top of the tank to create an “anti-syphoning” loop. Take the other end of the fuel line and route it outside the airplane fuselage.
EN Connecting the Electronic Ignition The Evolution Electronic Ignition Assembly is designed and engineered specifically for the small block engine series. It is smaller and lighter so it fits into tighter spaces of the airplanes the engines are designed to power. The battery voltage required is between 4.8V (4-cell Ni-MH pack) and 8.4V (2S Li-Po battery) and no voltage regulators are needed with any of these batteries.
EN Fuel This engine requires a mix of 20:1 gas to oil lubricant ratio for break-in and a mix of 32:1 gas/oil ratio for normal operation in order to last a long time. The needle bearing at the bottom end of the conrod depends upon this lube ratio to operate properly. Do not go higher than a 20:1 gas/oil ratio for the first gallon of fuel. After this you may decrease the oil content to a 32:1 gas/oil ratio if desired. Do not go higher than a 32:1 gas/ oil ratio or the warranty on your engine will be voided.
EN Engine Break-in Your new engine needs to be broken-in to ensure a long life of all the components. This engine features a piston ring design, which requires a specific break-in procedure to ensure a tight seal between the piston ring and liner. For this to be accomplished, this process requires repeated heating and cooling cycles, and must be done at a needle setting that is slightly rich of peak to ensure the ring expands and contracts.
EN Telemetry Telemetry is a huge asset to help you tune your engine. The ignition module is even capable of communicating with Spektrum telemetry systems directly so you won’t have to add an additional RPM sensor. You will need to connect the Evolution Ignition Telemetry Adapter (EVOA107) between the RPM port on the ignition unit and the RPM port on your Spektrum telemetry module in order to utilize this feature. Telemetry systems other than Spektrum may require a dedicated RPM sensor.
EN Starting and Running the Engine Until the engine is broken in, use an electric starter to start the engine. Once it is fully broken in it can be started by hand, but it is easier and safer to start the engine with an electric starter. 1. Turn on the ignition. 2. Close the choke valve. 3. If Using an Electric Starter a. R otate the propeller in a backwards direction against compression. c. Turn off the choke. d. Flip the engine through compression as before until it starts. 4.
EN High-Speed Needle Tuning Once the engine is running reliably at full (open) throttle: 1. Turn the high-speed needle clockwise 1/16 of a turn at a time. 2. Wait 2–3 seconds for the engine to respond. a. If there is an increase in RPM: Turn the high-speed needle clockwise an additional 1/16 turn and wait for the engine to respond to the tuning change. If there is no increase in RPM after the change, turn the high-speed needle back to its previous position. b.
EN 33GX Evolution Engines Specifications Disp Bore (mm) Stroke (mm) Weight (oz) Cylinder Propeller 33cc 37.5 29.5 48.8 Ringed 18 x 8 @ 8300 rpm F H B G A 70mm 54mm C E = height* Weight (oz) Dimensions (mm) F = length D G= crankshaft thread size H = muffler bolt spacing Engine Only Muffler Ignition Total 38.8 5.8 3.6 48.8 A B C D E* F G H 50 60 31 73.3 104 121 3/8–24 36.5 * Height is from engine C/L to top of cylinder head.
EN Exploded View 2 1 3 4/29 5 23 22 24 20 6 8 7 19 32 25 31 17 16 9 14 27 26/29 13 29 12 11 15 18 28 28/29/30 21 10 15
EN Parts List # Description Part # Description Part 1 Engine Crankcase Screw Set (10) EVOG3346408 20 Complete Ignition System EVOG33300 2 Spark Plug (CM6) EVOG33350 21 Cylinder Head EVOG33103 Ignition Sensor & Mount Bracket EVOG33310A 3 4 Cylinder Head Gasket (2) EVOG33112 22 In Line Fuel Filter EVOA105 In Tank Fuel Filter/Clunk EVOA106 5 Cylinder EVOG33202 23 6 Piston Ring EVOG33236 24 EVOA102 7 Piston Set EVOG33214R Medium Gas-FPM Fuel Tubing 8 Piston Pin & Retaine
EN Limitation of Liability - HORIZON SHALL NOT BE LIABLE FOR SPECIAL, INDIRECT, INCIDENTAL OR CONSEQUENTIAL DAMAGES, LOSS OF PROFITS OR PRODUCTION OR COMMERCIAL LOSS IN ANY WAY, REGARDLESS OF WHETHER SUCH CLAIM IS BASED IN CONTRACT, WARRANTY, TORT, NEGLIGENCE, STRICT LIABILITY OR ANY OTHER THEORY OF LIABILITY, EVEN IF HORIZON HAS BEEN ADVISED OF THE POSSIBILITY OF SUCH DAMAGES. Further, in no event shall the liability of Horizon exceed the individual price of the Product on which liability is asserted.
EN Warranty and Service Contact Information Country of Purchase Horizon Hobby Contact Information Horizon Service Center (Repairs and Repair Requests) servicecenter.horizonhobby. com/RequestForm/ Horizon Product Support (Product Technical Assistance) United States of America Sales Service/Parts/ Sales: Horizon Hobby Limited United Kingdom Germany www.quickbase.com/db/ bghj7ey8c?a=GenNewRecord sales@horizonhobby.com 888-959-2305 sales@horizonhobby.co.
©2013 Horizon Hobby, Inc. Evolution and the Horizon Hobby logo are registered trademarks of Horizon Hobby, Inc. The Spektrum trademark is used with permission of Bachmann Industries, Inc. All other trademarks, service marks and logos are the property of their respective owners. Tygon® is a registered trademark of Saint-Gobain Performance Plastics Corporation.