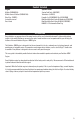
© 2010 Horizon Hobby, Inc. www.horizonhobby.
.40NX Evolution Engine ® USER G UIDE
Table of Contents Content Included.............................................................................................................. 3 Introduction...................................................................................................................... 3 Mounting the Engine........................................................................................................ 5 Installing the Muffler....................................................................................
Content Included Engine Optional Items Muffler (EVO040601A) Muffler Screws & Gasket (EVO036E36A) Glow Plug (EVOGP1) Instruction manual Decal sheet Startup Field Pack (HANSTART) Tachometer (HAN156) Propeller 9 x 6 (EVO09060) 10 x 6 (EVO10060) Blue Block After Run Engine Oil Applicator (EVOX1001) Blue Block After Run Engine Oil Refill (EVOX1002) HAN3015 # 9 Performance Glow Plug Introduction Congratulations on your purchase of the newest and one of the most technically adv
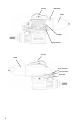
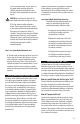
Glow Plug Muffler Nipple Muffler Fuel Nipple High-Speed Needle Glow Plug Muffler Needle Limit Collar Low-Speed Needle Throttle Arm 4
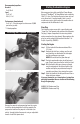
Mounting the Engine Securely tighten all engine mounting screws and recheck tightness before each flying session. Most model airplanes include an engine mount. It is extremely important that the engine mount be securely mounted to the airplane’s firewall and that the engine is securely mounted to the engine mount. Follow the instructions included with the airplane for mounting the engine. Important: Before each flying session, check that all engine mounting screws are securely tightened.
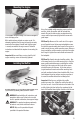
Throttle Linkage A clevis is recommended for attaching the throttle linkage to the throttle. Attach the throttle linkage to the hole in the throttle arm (see photo above). Turn on the radio. With the throttle stick at 1/2 throttle, install the arm on the servo so that the arm is 90° to the throttle pushrod. Select a servo arm that has a hole located 11mm or 7/16" out from center and attach the other end of the throttle linkage (see photos below). throttle barrel is exactly 1mm open.
Recommended propellers: Break in* 9 x 6, 10 x 6 Sport 9 x 6, 9 x 7 10 x 6, 11 x 5 Performance (tuned exhaust) 9 x 6, 9 x 7, ( Prop the engine to achieve over 15,000 rpm on the ground) * 2-blade propellers Attaching the Propeller and Spinner Starting the Evolution Engine Fuel We recommend using high-quality Cool Power Omega, Hangar 9® AeroBlend™ or Power Master fuels containing 10 to 15% nitro. The Evolution Engine has been test-run using these fuels.
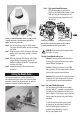
8 Step 1. High-Speed Needle Adjustment With the engine running, advance the throttle to full throttle while a helper securely holds your airplane. Carefully pinch and release the fuel line to temporarily restrict the fuel flow. 60 60 60 60 60 The Hangar 9 START KIT (HANSTART) includes everything needed, except fuel and starter, to get the Evolution engine running. Step 5. Attach the glow driver. Step 6. Turn the engine over using an electric starter.
2 . Close the throttle slowly. You will adjust the low-speed needle setting by rotating the SetRight adjustment bar clockwise to lean the engine and counterclockwise to richen the engine. CAUTION: Do not attempt to adjust the lowspeed needle valve while the engine is running. 3 . The fuel mixture should be adjusted as follows: The low-speed fuel mixture is too rich if, when opening the throttle moderately quickly, the engine emits smoke and "stutters" or "stumbles.
You can combat the effects of the moisture in the air by squeezing all the extra air from your fuel container at the end of the day or transferring your fuel into smaller containers as the level of the fuel is reduced in your gallon jug. Many pilots will invest in 1/2 gallon or quartsize containers and only bring that amount of fuel to the field on any given day. This allows their main supply of fuel to stay at home in a controlled storage environment, virtually ensuring problem-free fuel.
.40NX Evolution Engines Specifications Items EVOE0401 Disp (c.i.) .41 Bore (mm) 21.7 Stroke (mm) 18.2 Weight (oz) 10.
Exploded View 17 7 8, 14 3 20 38 32 21 36 19 20 3 35 5 22 18 28 31 30 26 36 24 4 20 35 29 34 22 23 1 11 33 35 22 35 24 35 27 37 25 17 13 12 10 12 9 15 16 6 2, 14 2 17 17
Cross Reference of Evolution .40NX Part Numbers No.
Warranty and Repair Policy Warranty Period Exclusive Warranty- Horizon Hobby, Inc., (Horizon) warranties that the Products purchased (the “Product”) will be free from defects in materials and workmanship for a period of 2 years from the date of purchase by the Purchaser. 2 Year Limited Warranty Horizon reserves the right to change or modify this warranty without notice and disclaims all other warranties, express or implied.
Be sure your name, address, and RMA number are clearly written on the outside of the shipping carton. Notice: Do not ship batteries to Horizon. If you have any issue with a battery, please contact the appropriate Horizon Product Support Department. Warranty Inspections and Repairs To receive warranty service, you must include your original sales receipt verifying the proof-of-purchase date. Provided warranty conditions have been met, your Product will be repaired or replaced free of charge.