OWNER'S MANUAL DieHard Ev°luti°n Techn°l°gY_" Power for your changing life. Microprocessor Controlled, Operation Battery Charger with Engine Starter Fully Automatic Plus Battery and Alternator Tester 2-AMP SLOW CHARGE 15-AMP FAST CHARGE 40-AMP RAPID 125-AMP ENGINE CHARGE START FOR 12-VOLT BATTERIES Model No, 200,71227 CAUTION: Read all Safety Rules and Operating Instructions, and follow them with each use of this product. Sears_ Roebuck and Co._ Hoffman Estates_ IL 60179 U.S.A.
/q._:] n=i[o];lifo] _Jill=i_ill_"] WARRANTY ................................................................................................................ 2 IMPORTANT SAFETY INSTRUCTIONS ................................................................... PERSONAL SAFETY PRECAUTIONS ...................................................................... 3 4 BEFORE 5 USING YOUR BATTERY CHARGER ........................................................ Plugging It In ...................................
WARNING - RISK OF EXPLOSIVE GASES WORKING IN VICINITY OF A LEAD-ACID BATTERY IS DANGEROUS. BATTERIES GENERATE EXPLOSIVE GASES DURING NORMAL BATTERY OPERATION. FOR THIS REASON, IT IS OF UTMOST IMPORTANCE THAT EACH TIME BEFORE USING YOUR CHARGER, YOU READ THIS MANUAL AND FOLLOW THE INSTRUCTIONS EXACTLY. To reduce risk of battery explosion, follow these instructions and those pubNshed by battery manufacturer and manufacturer of any equipment you intend to use in vicinity of battery.
Never place charger directly above battery being charged. The gases from the battery wilI corrode and damage the charger. Never touch the battery cIamps together when the charger is on. You could cause a spark. Be sure to position the charger power cord to prevent it from being stepped on, tripped over, or damaged. Never pull out the plug by the cord when unplugging the charger. Pulling on the cord may cause damage to the cord or the plug.
itisimportant tounderstand yourcharger's requirements. Thissection willteIIyouabout yourcharger's electrical requirements andhowtoprepare abatteryforcharging. PLUGGING ITIN Wrapclampcablesafterunplugging the Yourcharger requires a 120V AC2-prong powercordfromtheACwalloutletand 'wailoutletreceptacle installed according storeyourcharger inadrylocation. toalIlocalcodes andordinances. USING ANEXTENSION CORD Theuseofanextension cordisnotrecommended.
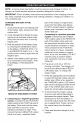
Io] 14 _.!-'1t I1[_]111 f.-'11_.tl[_,ti [o] 1f--1 NOTE: A marine (boat) boat battery must be removed and charged on shore. To charge it on board requires equipment specially designed for marine use. IMPORTANT: Follow all safety instructions and precautions when charging your battery. Wear compIete eye protection and clothing protection. Charge your battery in a well-ventilated area. CHARGING VEHICLE: BATTERY IN THE 1.
CHARGING BATTERY REMOVED FROM THE VEHICLE: POSmVE BATTERY NEGATIVE BATTERY CHARGER CORD __POWER TO GROUNDED POWER OUTLET 1. Note the potarity of the battery posts by checking the identification marks on the battery: POSITIVE (POS, P or +) and NEGATIVE (NEG, N or -). The positive post is usually larger than the negative post. 2. Attach at least a 24-inch-long, 6-gauge (AWG), insulated battery cable to NEGATIVE (NEG, N or -) battery post.
3. CoolDown- Aftercranking, thechargerentersamandatory 3-minute (180 second) cooldownstate.Duringthis period, nosettings canbechanged. The buttons areignored. Thedigital dispIay indicates theremaining cooldowntime inseconds. Itstartsat180andcounts downto0.The125A START LEDblinks onceevery second. During the cool down period, no current is delivered to the battery. After 3 minutes, the 125A START LED will stop blinking and will OVERVIEW Using this battery charger is very simple.
Ifthecharge modeischanged aftercharg- Thevoltage displayed duringcharging is inghasstarted (bypressing theCHARGE thecharging voltageandusually willbe RATEor BATTERY TYPEbutton),the higher thanthebattery's resting voltage. charging process willberestarted. I[o];r-,_=T_=1[_[_o] #bd;[o]_,.'-] "marine". Deep cycle batteries are usually larger than the other types. • AGM/GEL: AGM and geI ceil batteries have sealed cases without vent caps. Such batteries are often smaller than the other types.
71227 CONTROL PANEL GUIDE 4 MODE OF OPERATION Initial power-up, baftery No battery or reversed Digital Display User selected Battery tester activated Battep] tester with charged Battmy battery o o tester with no battery User selected O User selected O 2 Amp charge with battery 15 Amp charged activated 40 Amp charged activated Charge - Maintain complete 125A Engine O o o o o detected Mode started O User selected O User selected O User selected User selected User sel User sele
La[_-,) I_[c]ad-i=m:Lnnj Imid I_II:T._iald=1z_h"dfi d=[...'.,]u d=1z_ OVERVIEW powered up, the charger will remain a tester (not a charger) indefinitely, unless a charge rate is selected. This battery charger has a built-in battery tester that displays either an accurate battery voItage or an estimate of the battery's relative charge based on the battery voItage and the Battery Council International scale.
_l[-_i_[Ltl/:l_ :]ljllllHl_|;lill:lz_;_il[O]Z_ id::_"]ld::lZ_ TESTER STATUS LEDs When the 71227 is operating as an alternator tester, the status LEDs light under the following conditions. This battery charger has a built-in alternator tester that dispIays either an accurate alternator voltage or an estimate of the alternator's relative output compared to normal alternators. The Alternator % • The CHARGED (green) LED will light if the output of the charging system is at the normally desired level.
This charger adjusts the charging time in order to charge the battery completeIy, efficiently and safeIy. The microprocessor automatically makes the necessary decisions. However, this section incIudes guideIines that can be used to estimate charging times. There are some important facts to keep in mind when charging a battery. When the display indicates 77% charged, the battery has been charged enough to start most vehicIes and has already been charged as much as by many other battery chargers.
Read this entire manual before using your charger. The tips below serve only as a guide for specific situations. If your vehicle won't start: You don't need to fully charge a battery to star[ your vehicle. If the charger won't start your vehicle using the 125A START rate, try charging the battery using the 40A rate for 10 or 15 minutes.
I / P.(l]+lJ:| ! ::_']"[.Iei t I+[_ Performance probtems often can be corrected by the user. Please read through this chart for a possible solution to common problems. PROBLEM POSSIBLE CAUSE SOLUTION The battery is connected and the charger is on, but isn't charging. The charger is in tester mode, not charger mode. indicator lights are lit in an erratic manner not explained in the "Using Your Battery Charger" section. You might have accidentally activated a special diagnostic mode.
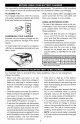
This section shows an illustration of your battery charger. Use it to become familiar with part locations and appearance.