
Instruction manual


25
28
L
R
L
R
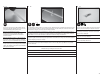
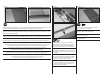
Use the string to pull the extensions to the wing root. Remove the string and fi t the extensions into the notch as shown in the
second photo.
Ziehen Sie die Verlängerung mit der Schnur durch die Tragfl äche. Entfernen Sie danach die Schnur und führen die Stecker zur
Sicherung in die Nase der Öffnung.
Tirez délicatement les rallonges à travers l’aile jusqu’à l’emplanture. Retirez la fi celle et glissez les rallonges dans l’encoche
comme sur la deuxième photo.
Con lo spago tirare le prolunghe fi no alla radice dell’ala. Togliere lo spago e inserire le prolunghe nell’intaglio apposito, come
si vede dalla seconda immagine.
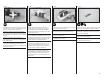
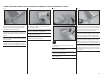
Wrap a small piece of low-tack tape around the extension for the flap servo near
the connector so it can be easily identified when attaching the wing.
Wickeln Sie ein kleines Stück Kreppband um die Verlängerung des Klappenservo um
es später bei dem Zusammenbau der Tragfläche leichter zu identifizieren.
Entourez la rallonge des volets d’un petit morceau d’adhésif à proximité de la
prise afin de l’identifier facilement quand vous reliez l’aile au fuselage.
Avvolgere un pezzo di nastro a bassa adesività intorno alla prolunga per il servo dei flap,
vicino al connettore, per poterli riconoscere facilmente quando si monta l’ala.
29
L
R
L
R
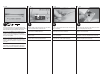
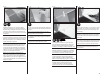
Insert the fl ap servo assembly into the wing with the servo
output facing the trailing edge. Guide the linkage out
through the hole in the wing trailing edge near the fl ap
control horn.
Setzen Sie den Deckel mit dem montierten Klappenservo
in die Tragfl äche mit dem Abtrieb zur Flächenhinterkante.
Führen Sie die Anlenkung durch die Öffnung zum Ruderhebel
der Klappe.
Insérez le servo de volet et son support dans son
emplacement, la tête du servo orientée vers le bord de fuite de
l’aile. Glissez la tringlerie et faites la sortir par l’orifi ce situé
au bord de fuite de l’aile à proximité du guignol du volet.
Inserire il servo dei fl ap fi ssato al suo supporto all’interno
dell’ala con l’albero di uscita rivolto verso il bordo di uscita
dell’ala. Guidare il rinvio attraverso il foro nel bordo di uscita
dell’ala, vicino alla squadretta dei fl ap.
30
L
R
L
R
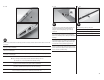
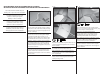
Attach the linkage to the fl ap control horn.
Schließen Sie die Anlenkung am Klappenruderhorn an.
Connectez la tringlerie du volet à son guignol.
Collegare il rinvio alla squadretta dei fl ap.