GL OW E777 E735 E999 Evolution Radial Glow Engines ®
EN NOTICE All instructions, warranties and other collateral documents are subject to change at the sole discretion of Horizon Hobby, Inc. For up-to-date product literature, visit horizonhobby.com and click on the support tab for this product.
EN • Always ensure the aircraft is secure and will not move once the engine is started. • Always rebind your transmitter to your receiver(s) after setup and before first flight. • Always ensure the throttle failsafe is set to low throttle in your transmitter. • Always perform a range check prior to flight. • Always cut off the fuel supply (pinch or disconnect the fuel line to the carburetor) or use the throttle linkage to shut off the air in order to stop the engine.
EN Introduction Thank you for purchasing an Evolution® radial engine, one of the finest engines in the marketplace today. Evolution is committed to you having a positive experience and a lifetime of great operation with your new engine. It is important that you read the engine manual before starting the engine for the first time. Evolution radial engines have different requirements than engines that you may have operated in the past.
EN 1 7 2 EVO LUT I ON 1. Install the engine on the airframe with Cylinder #1 in the top (12:00) position (Cylinder #1 is above the Evolution Engines logo). You can modify this position if you are using the optional collector ring and you want the exhaust to exit the cowl in a specific direction. 6 3 4 5 2. Use three steel screws (not included) to attach the engine mounting ring to the firewall. The size of the mounting ring screws will vary depending on the aircraft.
EN 4. Make sure the fuel tank is no farther than 100mm (4 in) from the back of the firewall. The center of the fuel tank should be in line with the carburetor to prevent fuel siphoning. • You do not need to use a fuel pump with Evolution radial engines • Always use a fuel filter inside the fuel tank • We recommend using medium (3mm) or large (3.5mm) inner diameter fuel line • Make sure there are no sharp bends in the fuel line between the fuel tank and the engine. 5.
EN 2. If necessary, add baffles to the engine to prevent air from moving between the cylinders. Engine baffles force cool air through the cooling fins and greatly reduce the intake area in the front of the cowl. 3. Add cooling baffles to the engine cowl between the top of the cylinder heads and the inside of the cowl. Do not cover the engine exhaust pipe with the baffles. This needs cool air over it to prevent exhaust valve damage.
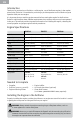
EN Engine Break-In Process A good break-in process is essential to the longevity and performance of your Evolution radial engine. You can complete the break-in process by either mounting the engine on a test stand or on an airframe. If you choose to mount the engine on an airframe, remove the cowl during break-in to ensure adequate cooling. Specific fuel is required for the break-in process. Please refer to the chart above for the proper fuel.
EN Engine Tuning The break-in settings for the carburetor needles are: High-speed needle: 2 1/2 turns open Tip: For the initial break-in, open the high speed needle to 1-1/2 turns before starting. Low-speed needle: 2 turns open Use a tachometer (HAN111 or HAN156) to tune the engine based on RPM. WARNING: Always adjust the carburetor from behind the propeller. Keep all loose items away from the propeller at all times. Never reach over or around the propeller. 1. Start the engine. 2.
EN Test 1. Allow the engine to run at idle with the on-board glow driver ON. Observe the engine RPM. 2. Turn the on-board glow driver OFF. If the engine RPM immediately drops, the low-speed needle is too rich. Lean the low-speed needle (turn clockwise). If the engine continues to run at the same RPM with the on-board glow driver OFF, the low-speed needle setting is close to ideal. Low-Speed Needle Tuning 1. Adjust the high-speed needle for the current conditions. 2.
EN Evolution Blue Block After-Run Oil has been proven to provide long term protection against corrosion when applied immediately at the end of the flying day. Even waiting overnight before applying after-run oil will greatly increase the chances of corrosion within your engine. Take care of your investment. Please do not believe the claims of the fuel companies that claim “No need to use after-run oil”. They don’t own your engine! 3. Occasionally, you will need to adjust the valves.
EN Replacement Parts NOTICE: If a repair outside of normal maintenance as noted in the manual is required, you MUST send the engine to an authorized Horizon Service Center for repair. Any repair work performed outside of an authorized Horizon Service Center will void the warranty.
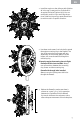
EN Exploded View Optional Silencer Ring (not included) Carburetor Sub-Assembly Rocker Arm Sub-Assembly Inlet and Exhaust Pipe Sub-Assembly Push Rod and Pin Prop Drive Lock Cone Propeller Drive Propeller Washer Propeller Nut 13
EN 1 Year Limited Warranty What this Warranty Covers Horizon Hobby, Inc., (Horizon) warranties that the Products purchased (the “Product”) will be free from defects in materials and workmanship for a period of 1 years from the date of purchase by the Purchaser.
EN facility. An Online Service Request is available at http://www.horizonhobby.com under the Support tab. If you do not have internet access, please contact Horizon Product Support to obtain a RMA number along with instructions for submitting your product for service. When calling Horizon, you will be asked to provide your complete name, street address, email address and phone number where you can be reached during business hours.
DE HINWEIS Alle Anweisungen, Garantien und dazugehörigen Dokumente können ohne Ankündigung von Horizon Hobby Inc. geändert werden. Eine aktuelle Version ersehen Sie bitte im Support Feld unter: http://www.horizonhobby.com.
DE • Halten Sie immer das Gesicht und den Körper weg vom Propellerkreis wenn Sie den Motor starten oder wenn er läuft. • Stellen Sie sich immer hinter den Propeller wenn Sie Einstellungen am Vergaser vornehmen. • Tragen Sie immer eine Schutzbrille beim Starten oder Laufen lassen des Motors. • Bewahren Sie ihren Kraftstoff immer an einem sicheren Ort weit weg von möglicher Funkenbildung, Hitze oder zündfähigen Stoffen auf.
DE Einleitung Wir möchten uns sehr herzlich für den Kauf dieses Evolution Sternmotors bedanken. Dieser Motor ist einer der Besten den Sie heute am Markt erhalten können. Wir sind davon überzeugt, dass Sie mit diesem Motor sehr positive Erfahrungen machen werden und lange Freude daran haben. Bevor Sie den Motor das erste Mal starten ist es wichtig, dass Sie diese Bedienungsanleitung sorgfältig lesen.
DE 1 7 2 EVO 1. Montieren Sie den Motor im Rumpf mit dem Zylinder Nr. 1 auf der 12:00 Position. (Zylinder Nr. 1 ist über dem Evolution Logo). Sie können diese Position mit dem optionalen Kollektorring modifizieren wenn Sie den Auspuff an einer bestimmen Stelle durch die Cowling (Motorhaube) führen wollen. LUT I ON 6 3 4 5 2. Verwenden Sie drei Stahlschrauben (nicht im Lieferumfang) um den Motorhalter an das Brandschott zu schrauben. Die Größe der Schrauben variieren abhängig vom Flugzeug.
DE 4. Stellen Sie sicher, dass der Kraftstofftank nicht weiter als 100mm von der Rückseite des Brandschottes entfernt ist. Die Mitte des Kraftstofftankes sollte dabei auf einer Linie mit dem Vergaser sein, um ein Absaugen des Kraftstoffes vom Motor weg zu verhindern. • Sie benötigen bei Evolution Stermotoren keine Kraftstoffpumpe. • Verwenden Sie immer einen Kraftstofffilter im Tank. • Wir empfehlen die Verwendung von 3,0 mm oder 3,5mm (Innendurchmesser) Kraftstoffschlauch.
DE 2. Montieren Sie falls notwendig Kühlleitbleche am Motor um die Luft daran zu hindern zwischen die Zylinder zu strömen. 3. Montieren Sie die Kühlleitbleche zwischen den Zylinderköpfen und Motorhaube. Decken Sie den Schalldämpfer nicht ab, da er ohne Kühlung beschädigt werden könnte. Propellerauswahl Die Auswahl des richtigen Propeller ist sehr wichtig. In der Tabelle finden Sie Propellerempfehlungen und Drehzahlbereiche.
DE Einlaufenlassen des Motors Ein guter Einlaufvorgang ist die Grundlage für Leistung und Langlebigkeit Ihres Evolution Sternmotors. Sie können den Einlaufvorgang auf einem Motorträger oder im Rumpf eingebaut vornehmen. Wenn Sie den Motor im Rumpf eingebaut einlaufen lassen demontieren Sie bitte die Motorhaube/Cowling um für adäquate Kühlung zu sorgen. Für den Einlaufvorgang ist spezieller Kraftstoff notwendig. Bitte sehen Sie für die Auswahl des Kraftstoffes in die Tabelle.
DE Leerlaufnadel: 2 Drehungen offen Verwenden Sie einen Drehzahlmesser (HAN111 oder HAN156) um den Motor auf Drehzahl einzustellen. WARNUNG: Stellen Sie den Vergaser immer hinter dem Propeller ein. Halten Sie alle losen Gegenstände zu allen Zeiten weg vom Propeller. Greifen Sie niemals um den Propeller herum. 1. Starten Sie den Motor. 2. Geben Sie Gas bis der Motor mit ca. 2.000 Umdrehungen läuft. 3.
DE Test 1. Lassen Sie den Motor mit eingeschalteter Glühkerzenversorgung auf Leerlauf laufen. 2. Schalten Sie die Glühkerzenversorgung AUS. Sollte die Drehzahl unverzüglich fallen ist die Leerlaufnadel zu fett eingestellt. Magern Sie das Gemisch mit der Leerlaufnadel (Im Uhrzeigersinn drehen). Dreht der Motor mit ausgeschalteter Glühkerzenversorgung auf gleicher Drehzahl ist die Einstellung der Leerlaufnadel nah am Idealzustand. Einstellen der Leerlaufnadel 1.
DE Evolution Blue Block After Run Öl hat sich bestens gegen als Langzeitkorrosionsschutz bewährt, wenn es unverzüglich am Ende des Flugtages eingesetzt wird. Bereits das Lagern über Nacht ohne Einsatz des Öl vergrößert die Korrosionswahrscheinlichkeit in ihrem Motor. Bitte achten Sie auf Ihre Investition und schenken den Versprechungen der Kraftstoffhersteller Kein After Run Öl notwendig- keinen Glauben den die besitzen ihren Motor ja nicht! 3. Gelegentlich ist es notwendig die Ventile einzustellen.
DE Ersatzteile HINWEIS: Sollte eine Reparatur ausserhalb der normalen Wartung notwendig werden MÜSSEN Sie den Motor zu einem zertifizierten Horizon Hobby Service Center schicken. Jede Reparaturleistung ausserhalb des Horizon Servce Center führt zum Garantieverlust.
DE Explosionszeichung Optionaler Schalldämpferring (nicht enthalten) Vergaser Kipphebel Ein- und Auslass Stößelstange und Pin Propeller Konus Propeller Mitnehmer Unterlegscheibe Propeller Propellermutter 27
DE Garantie und Service Informationen Warnung Ein ferngesteuertes Modell ist kein Spielzeug. Es kann, wenn es falsch eingesetzt wird, zu erheblichen Verletzungen bei Lebewesen und Beschädigungen an Sachgütern führen. Betreiben Sie Ihr RC-Modell nur auf freien Plätzen und beachten Sie alle Hinweise derBedienungsanleitung des Modells wie auch der Fernsteuerung.
DE erheblichen Ausmaßes führen. Dieses Produkt ist nicht für den Gebrauch durch Kinder ohne die Aufsicht eines Erziehungsberechtigten vorgesehen. Die Anleitung enthält Sicherheitshinweise und Vorschriften sowie Hinweise für die Wartung und den Betrieb des Produktes. Es ist unabdingbar, diese Hinweise vor der ersten Inbetriebnahme zu lesen und zu verstehen. Nur so kann der falsche Umgang verhindert und Unfälle mit Verletzungen und Beschädigungen vermieden werden.
FR REMARQUE La totalité des instructions, garanties et autres documents est sujette à modification à la seule discrétion d’Horizon Hobby, Inc. Pour obtenir la documentation à jour, rendez-vous sur le site www.horizonhobby.com et cliquez sur l’onglet de support de ce produit.
FR • Toujours stocker le carburant à l’écart de sources de chaleur, de flammes ou tout autre élément pouvant l’enflammer. • Toujours vérifier que l’avion est bien sécurisé au sol et qu’il ne risque pas d’avancer une fois que le moteur a démarré. • Toujours ré-affecter votre émetteur après des changement de paramètres ou avant le premier vol. • Toujours contrôler que le failsafe place bien la commande des gaz au ralenti. • Toujours effectuer un test de portée avant le vol.
FR Introduction Nous vous remercions d’avoir acheté un moteur en étoile Evolution, le plus abouti des moteurs sur le marché. Evolution vous souhaite d’être satisfait et durant longtemps avec votre nouveau moteur. Le moteurs en étoile Evolution ont un mode de fonctionnement différent des autres moteurs que vous avez pu utiliser dans le passé. Ce manuel fourni toutes les informations concernant l’installation, le choix de l’hélice, le choix du carburant et les réglages du moteur.
FR 1 7 2 EVO LUT I ON 1. Installez le moteur sur la structure avec le cylindre N°1 à la verticale (12H), ce cylindre est celui situé au dessus du logo Evolution. Vous pouvez changer cette position si vous utilisez le collecteur d’échappement torique optionnel et que vous voulez que les sorties d’échappement sortent dans une direction spécifique. 6 3 4 5 2. Utilisez 3 vis en inox (non fournies) pour fixer l’anneau à la cloison pare feu. La longueur des vis est spécifique à chaque avion.
FR 4. Vérifiez que le réservoir à carburant n’est pas éloigné de plus de 10 cm en arrière de la cloison pare feu. Le centre du réservoir doit être aligné avec le carburateur afin d’éviter le siphonnage du carburant. • Il n’est pas nécessaire d’utiliser une pompe à carburant avec ce type de moteur. • Toujours utiliser un filtre dans le réservoir à carburant. • Nous vous recommandons d’utiliser de la durite de 3mm ou 3.5mm de diamètre intérieur.
FR 2. Si nécessaire, ajoutez des cloisons entre les cylindres. Les cloisons vont rediriger l’air frais sur les ailettes. Cela permet de réduire la surface de l’entrée d’air frontale. 3. Ajoutez des cloisons entre le capot et le dessus des culasses à l’intérieur du capot. Ne cloisonnez pas l’échappement, il doit être en contact direct avec l’air, sous peine d’endommager les soupapes d’échappement. Choix de l’hélice Le choix de l’hélice est très important pour un fonctionnement optimal du moteur.
FR Processus de rodage Un rodage correctement réalisé est essentiel pour les performances et la longévité de votre moteur en étoile Evolution. Ce rodage peut être effectué sur un banc moteur ou sur l’avion. Si vous choisissez d’effectuer le rodage directement sur l’avion, retirez le capot afin d’assurer un refroidissement optimal. Un mélange spécifique est nécessaire durant le rodage. Référez vous au tableau précédent pour le mélange adapté. Le mélange destiné au rodage est plus riche en huile.
FR Réglage du moteur Réglage des pointeaux pour le rodage: Pointeau Haute vitesse: Ouvert de 2 tours et demis Tip: Pour le premier démarrage du rodage, ouvrez ce pointeau de 1 tour et demi avant de démarrer. Pointeau Basse vitesse: Ouvert de deux tours Utilisez un compte tours (HAN111 ou HAN156 pour régler le moteur en se basant sur le régime). AVERTISSEMENT: Toujours régler le carburateur en arrière de l’hélice. Ne laissez pas d’objets à proximité de l’hélice. Ne passez jamais près de l’hélice. 1.
FR Essai 1. Mettez le réchauffeur embarqué sous tension et laissez le moteur tourner au ralenti. Observez le régime. 2. Mettez le réchauffeur hors tension. Si le régime baisse immédiatement, le pointeau basse vitesse est trop riche. Resserrez le pointeau. S’il n’y a pas de variation de régime en mettant le réchauffeur hors tension, le réglage presque idéal. Réglage du pointeau basse vitesse 1. Réglez le pointeau haute vitesse pour des conditions d’utilisation courantes. 2.
FR 8. Avec le boisseau de carburateur ouvert en position plein gaz et les bougies non alimentées, effectuez à la main ou à l’aide d’un démarreur électrique 8 à 10 tours de vilebrequin afin de disperser l’huile dans le moteur. 9. Replacez la tige de culbuteur. Laissez le boisseau de carburateur ouvert. Votre est moteur est maintenant prêt pour être stocké pour une courte période.
FR Pièces de rechange REMARQUE: Si une réparation autre que la maintenance décrite dans ce manuel doit être effectuée, vous DEVEZ envoyer votre moteur au service technique Horizon Hobby pour réparation. Toute réparation effectuée hors des services techniques Horizon Hobby annulera la garantie.
FR Vue eclatée Silencieux torique optionnel (non fourni) Carburateur complet Culbuteur complet Pipe d’admission et d’échappement Tige de culbuteur Cône d’accouplement Plateau d’hélice Rondelle d’hélice Ecrou d’hélice 41
FR Garantie et Réparations Durée de la garantie Garantie exclusive - Horizon Hobby, Inc. (Horizon) garantit que le Produit acheté (le « Produit ») sera exempt de défauts matériels et de fabrication à sa date d’achat par l’Acheteur. La durée de garantie correspond aux dispositions légales du pays dans lequel le produit a été acquis. La durée de garantie est de 6 mois et la durée d’obligation de garantie de 18 mois à l’expiration de la période de garantie.
FR Questions, assistance et réparations Garantie et réparations Votre revendeur spécialisé local et le point de vente ne peuvent effectuer une estimation d’éligibilité à l’application de la garantie sans avoir consulté Horizon. Cela vaut également pour les réparations sous garantie. Vous voudrez bien, dans un tel cas, contacter le revendeur qui conviendra avec Horizon d’une décision appropriée, destinée à vous aider le plus rapidement possible.
IT AVVISO Tutte le istruzioni, le garanzie e gli altri documenti pertinenti sono soggetti a cambiamenti a totale discrezione di Horizon Hobby, Inc. Per una documentazione aggiornata sul prodotto, visitare il sito horizonhobby.com e fare clic sulla sezione Support del prodotto.
IT • Quando il motore sta girando o durante l’avviamento, tenere sempre la faccia o le mani a debita distanza dal disco dell’elica. • Restare sempre dietro al disco dell’elica quando si fa la regolazione del carburatore. • Indossare sempre occhiali di sicurezza quando il motore è in moto. • Tenere sempre il carburante in un posto sicuro lontano da scintille, calore o qualsiasi altra cosa che possa incendiarlo.
IT Introduzione Grazie per aver acquistato un motore radiale Evolution®, il migliore sul mercato odierno. Evolution si impegna a procurare, con questo motore, un’esperienza positiva e una sua lunga durata sempre con ottima funzionalità. È importante leggere il manuale prima di avviare il motore per la prima volta. I motori radiali Evolution hanno esigenze diverse rispetto ai motori usati prima.
IT 1 7 2 EVO LUT I ON 1. Fissare il motore alla fusoliera con il cilindro n. 1 posizionato verso l’alto (ore 12) - il cilindro n. 1 è direttamente sopra al logo “Evolution”-. Si può modificare questa posizione se si sta usando un collettore di scarico opzionale e si vuole far uscire lo scarico dalla capottina motore in una certa direzione. 6 3 4 5 2. Si devono usare 3 viti in acciaio (non incluse) per collegare il supporto anulare per il montaggio all’ordinata parafiamma.
IT 4. Accertarsi che il serbatoio non sia a più di 10 cm dal retro dell’ordinata parafiamma. Il centro del serbatoio deve essere allineato con il carburatore per evitare il travaso di carburante. • Con i motori radiali Evolution non è necessario usare una pompa per l’alimentazione. • Usare sempre un filtro all’interno del serbatoio. • Raccomandiamo di usare un tubetto di alimentazione con diametro interno di 3,0-3,5 mm.
IT 2. Se necessario aggiungere dei deflettori che non permettano all’aria di passare tra un cilindro e l’altro. I deflettori sul motore forzano l’aria a passare attraverso le alette della testa motore e riducono di molto la sezione di ingresso dell’aria sulla capottina motore. 3. Aggiungere dei deflettori alla capottina motore tra la parte superiore della testa cilindro e l’interno della capottina.
IT Procedura per il rodaggio Un buon rodaggio è fondamentale per la vita e le prestazioni del motore radiale Evolution. Il rodaggio si può fare montando il motore sia su un banco di prova sia direttamente sulla fusoliera del modello. In questo caso bisogna togliere la capottina durante il rodaggio, per garantire un raffreddamento adeguato. Per il rodaggio è richiesto un carburante specifico con una maggiore percentuale di olio rispetto al carburante normale, come si evince dalla tabella vista prima.
IT Regolazione del motore Posizione degli spilli per il rodaggio: Spillo del massimo: aperto di 2 giri e 1/2 Consiglio: All’inizio del rodaggio aprire lo spillo del massimo di 1 giro e 1/2 prima dell’avviamento. Spillo del minimo: aperto di 2 giri Usare un contagiri (HAN111 o HAN156) per regolare il motore basandosi sul numero di giri. AVVERTENZA: Regolare sempre il carburatore stando dietro all’elica. Tenere eventuali oggetti lontani dal flusso dell’elica. Non passare mai sopra o intorno all’elica. 1.
IT Prova 1. Far girare il motore al minimo con l’alimentazione delle candele accesa. Controllare il numero di giri. 2. Spegnere l’alimentazione delle candele. Se i giri scendono immediatamente, lo spillo del minimo è troppo grasso e quindi è necessario smagrirlo girando in senso orario. Se il motore mantiene lo stesso numero di giri, allora significa che la regolazione dello spillo del minimo è quasi perfetta. Ottimizzazione dello spillo del minimo 1.
IT 9. Rimettere a posto l’asta del cilindro e il perno inseguitore della camma. Lasciare l’acceleratore tutto aperto. Il motore adesso è pronto per essere riposto per un breve periodo, aspettando un’altra giornata al campo. L’olio Evolution Blue Block After-Run, se applicato subito al termine di una giornata di volo, ha dimostrato di poter fornire una protezione a lungo termine contro la corrosione.
IT Parti di ricambio AVVISO: se fosse necessaria una riparazione al di fuori della normale manutenzione indicata in questo manuale, BISOGNA inviare il motore ad un centro assistenza Horizon. Qualsiasi lavoro di riparazione eseguito al di fuori di un centro autorizzato Horizon annulla la garanzia.
IT Esploso Anello silenziatore opzionale (non incluso) Sottogruppo carburatore Sottogruppo bilanciere Sottogruppo collettori aspirazione & scarico Asta e perno Cono di bloccaggio rondella trascinamento Rondella trascinamento Rondella elica Dado elica 55
IT Garanzia Periodo di garanzia Garanzia esclusiva - Horizon Hobby, Inc., (Horizon) garantisce che i prodotti acquistati (il “Prodotto”) sono privi di difetti relativi ai materiali e di eventuali errori di montaggio. Il periodo di garanzia è conforme alle disposizioni legali del paese nel quale il prodotto è stato acquistato. Tale periodo di garanzia ammonta a 6 mesi e si estende ad altri 18 mesi dopo tale termine.
IT contatto subito con Horizon per prendere una decisione che vi possa aiutare nel più breve tempo possibile. Manutenzione e riparazione Se il prodotto deve essere ispezionato o riparato, si prega di rivolgersi ad un rivenditore specializzato o direttamente ad Horizon. il prodotto deve essere Imballato con cura. Bisogna far notare che i box originali solitamente non sono adatti per effettuare una spedizione senza subire alcun danno.
IT 58
IT 59
31867 Printed: 11/2011 ©2011 Horizon Hobby, Inc. Evolution and the Evolution logo are registered trademarks of Horizon Hobby, Inc. All other trademarks, service marks and logos are the property of their respective owners.