RAGE 6 255mm (10”) Compound Mitre / Table Saw Instruction Manual Read instructions before operating this tool. 30 11 10 V1 www.evolutionbuild.
EC - DECLARATION OF CONFORMITY EC - DECLARATION OF CONFORMITY We, the importer TABLE OF CONTENTS EC - Declaration of Conformity 2 Important Information 4 Evolution Power Tools Ltd.
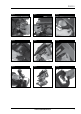
RAGE 6 FIG 1 FIG 2 FIG 3 FIG 4 FIG 5 FIG 6 FIG 7 FIG 8 FIG 9 www.evolutionbuild.
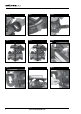
FIG 10 FIG 11 FIG 12 FIG 13 FIG 14 FIG 15 FIG 16 FIG 17 FIG 18 www.evolutionbuild.
RAGE 6 FIG 19 FIG 20 FIG 21 FIG 22 FIG 23 FIG 24 FIG 25 FIG 26 FIG 27 www.evolutionbuild.
EVOLUTION RAGE 6 255mm COMPOUND MITRE/TABLE SAW head office, or call the appropriate Helpline number. Congratulations on your purchase of an Evolution Power Tool’s Rage 6 Compound Mitre/Table Saw. Please complete your product registration on line to validate your machine’s warranty period and ensure prompt service if needed. We sincerely thank you for selecting a product from Evolution Power Tools.
RAGE 6 7. Use the right tool. Do not force small tools to do the job of a heavy duty tool. Do not use tools for purposes not intended; for example do not use circular saws to cut tree limbs or logs. 8. Dress properly. Do not wear loose clothing or jewellery which may get caught in moving parts. Non-skid footwear is recommended when working outdoors. If you have long hair, tie it back and wear protective hair covering. 9. Use protective equipment. Use safety glasses.
3. Always protect your lungs. Wear a face mask or dust mask if the operation is dusty. 4. Always protect your hearing. Wear hearing protection during extended periods of operation. 5. Inspect the machines power cord regularly and if damaged have it repaired or replaced. Always be aware of the cords location. 6. Always check for damaged parts.
RAGE 6 WARNING: If any parts are missing, do not operate your mitre saw until the missing parts are replaced. Failure to follow this rule could result in serious personal injury. SAFETY LABELS & SYMBOLS WARNING: Do not operate machine if warning and / or instruction labels are missing or damaged. Contact Evolution Power Tools for replacement labels. CARRYING YOUR MITRE SAW Safety Advice 1. Although compact, this saw is heavy.
RAGE 6 TABLE MITRE SAW SPECIFICATION Designed to cut: Wood – Max section 75mm x 300mm Aluminium Plastic The declared vibration total value has been measured in accordance with a standard test method and may be used for comparing one tool with another. The declared vibration total value may also be used in a preliminary assessment of exposure. WARNING: The vibration emission during actual use of the power tool can differ from the declared total value depending on the ways in which the tool is used.
RAGE 6 OVERALL VIEW OF RAGE 6 MITRE SAW CONFIGURATION 6 1 3 7 5 9 13 4 12 8 11 14 2 10 1. ON/OFF TRIGGER SWITCH 9. BEVEL ANGLE LOCKING LEVER 2. CUTTING HEAD LOCKING PIN 10. MITRE ANGLE SCALE 3. CUTTING HANDLE 11. POSITIVE STOP LOCKING LEVER 4. ROTARY TABLE 12. FENCE 5. LOWER BLADE GUARD 13. HOLD DOWN CLAMP 6. UPPER BLADE GUARD 14. MOUNTING HOLE 7. BLADE 8. MITRE LOCK KNOB www.evolutionbuild.
OVERALL VIEW OF RAGE 6 TABLE SAW CONFIGURATION 5 7 3 6 1 4 2 8 1. ON/OFF TRIGGER SWITCH 2. CUTTING HANDLE 3. TABLE TOP 4. AUXILLIARY LOWER BLADE GUARD 5. UPPER BLADE GUARD 6. BLADE 7. RIP FENCE 8. PUSH STICK 12 www.evolutionbuild.
RAGE 6 GETTING STARTED CAUTION! ALWAYS DISCONNECT THE SAW FROM THE POWER SOURCE BEFORE MAKING ANY ADJUSTMENTS. Refer to the “Service Parts List Drawing”. Install a blade as detailed in the “Installing or Removing the Blade” section. 1. Mounting the Table Mitre Saw WARNING: To reduce the risk of injury from unexpected saw movement, place the saw in the desired location either on a workbench or other recommended leg set. The base of the saw has four holes to mount the mitre saw.
12. Ensure the both Allen Keys are removed and the machine arbor rotates freely. 13. Ensure the blade guards are fully functional before using the machine. Note: Spacers and spindle rings should not be used with this machine and/or blade. 3. Debris collection bag (Optional Accessory) The Debris Collection Bag should be attached at the debris extraction port. 1. Slide the frame of the collection bag on to the outlet of the extraction port, ensuring that it is firmly connected. 2.
RAGE 6 2. Preparing to make a cut a) Avoid awkward operations and hand positions where a sudden slip could cause fingers or hands to move into the blade. b) Cut only one workpiece at a time. c) Clear everything except the workpiece and related support devices away from the blade before turning the mitre saw on. d) Secure workpiece using clamps to hold the workpiece securely. 3. Body and Hand Position 1. Never place hands near the cutting area and keep hands away from the path of blade. 2.
7. Bevel Cutting The cutting head can be set at any angle up to a 450 to the LH side only. The bevel angle locking lever is found at the rear of the machine and a protractor guide and pointer is incorporated into the casting to the front of the locking lever to aid setting. (Fig. 12) a) Loosen the bevel lock lever. b) Tilt the saw head to the desired angle. Use the protractor guide provided to the front of the lever to aid setting.
RAGE 6 5. Check the integrity of the installation, and that the machine handle has trapped the auxiliary guard in place. (Fig. 16) Warning: The Auxiliary Blade Guard must be fitted when this machine is used as a Table Saw. Do not operate this machine if the Auxiliary Blade Guard is damaged or missing. 2. Adjusting the Table Height The height of the machine table top above the machine motor can be adjusted.
approximately 3mm. Adjust the cutting height of the blade by adjusting the height of the machine table as previously described. This machine is not suitable for cutting rebates or stopped grooves. A vacuum cleaner or workshop dust extraction device can be connected to the extraction port found at the rear of the machine if required. 1. On/Off Switch Operation To start the machine: a) Slide the trigger switch safety locking slide downwards. b) Press the trigger switch. The machine will start.
RAGE 6 When all adjustments, settings or maintenance have been completed, make sure that all keys or wrenches have been removed, and that all screws, bolts and other fittings are securely tightened. While the machine has been factory set, it is advisable that the 00 setting of the rotary table and the 900 perpendicular setting of the tilt head be checked, as these positions may have moved in transit.