
Use and Care Manual


5
EVOLVESTONE.COM
1.2 Setup
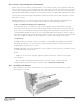
Using a chalk-line, make level guidelines spaced at regular intervals up the wall to assist in the
installation. The stone veneer product does not need to terminate at these guidelines and the
stones may overlap them. These guidelines are used only to ensure that the courses are being
applied to the wall in a level fashion to reduce the possibility of skew.
Pro-Tip: using a laser level may help you to layout your chalk lines to mark out better course
guidelines and eliminate potential sagging in the center of your layout.
2. EVOLVE Stone requires a fully installed water and airtight WRB system prior to the install
of the drainage mat and pin nailed stone. This WRB system includes flashings, self-adhered
joint tapes, flashing tapes, sealants and door and window watertight installations. The Evolve
drainage mat requirements ensure a clear drainage and drying path.
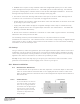
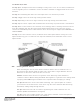
3. The bottom of the 1/8” drainage mat must be left open to allow for water drainage and air
circulation. If an insect barrier is requested, we suggest two methods.
• Simply wrap the excess fabric under the bottom of the mat and attach to the back of the mat
by securing in place with cap nails
• Supply and install a fabric wrapped corrugated drainage starter strip as manufactured by
MTIdry or Equal. Ensure the corrugated strips match the 1/8” mat thickness. See Detail #2.
(MTIDry.com Model #CLSS2316)
4. Evolve Stone must be installed into a minimum of a 7/16” OSB or plywood that is structurally
attached to the studs placed at 16” O.C.
The sheathing must be placed and fastened as per code, APA instructions and the
manufacturer’s instructions. This substrate must not be water compromising or degraded by the
environment or other condition. Evolve Stone must be nailed to a sound structural sheathing
intended to receive and hold pin nails.
2.0 Stone Installation
2.1 Nail Pattern Guidelines
To fasten Evolve Stone products to the wall, adjust the countersink depth on the finish
nailer to ensure that the nail heads will recess slightly below the surface of the stone.
Apply 16-gauge stainless steel finish nails in the arrangements depicted below based on
the stone’s size.
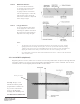
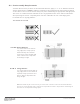
2.1.1 Small Stones:
For stones that are less than 10”
long and less than 5” tall, apply
two or more 16-gauge stainless
steel finish nails at slight angles
into the stone on the left and
right sides along the horizontal
centerline as depicted in the
image at right: