
Use and Care Manual


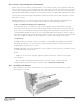

2.3.1 Install Outside Corners (Optional)
EVOLVESTONE.COM
2.3 Corners Fabricated with Field Stone
Evolve Stone can be mitered, cut and butted so as to create outside corners (Start at either the
top or bottom of your corner assembly and work toward the opposite end. Fasten each leg of the
corners with 16-gauge stainless steel finish nails. Treat each leg as its own stone and follow the
appropriate nailing pattern guidelines as specified in section “1.5.1 Nail Pattern Guidelines” below.)
Some practice with stone edge manipulation quickly shows the level of skill required to ‘create’
field stone corners.
Pro-Tip: Treat the out or ‘clipped’ edges with Thompson’s Water SealTM to match the Evolve
Stone factory finish. This is a cosmetic measure and not a waterproofing measure.
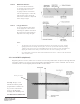
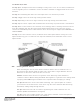
Start at either the top or bottom of your corner assembly and work toward the opposite
end. Fasten each leg of the corners with 16-gauge stainless steel finish nails. Treat each leg
as its own stone and follow the appropriate nailing pattern guidelines as specified in section
“2.1 Nail Pattern Guidelines” below. It is recommended that vertical beads of exterior caulk or
adhesive be applied to the backside of the outside corners prior to fastening. This should help
solve any ‘wobble’ resulting from the substrate or outside corner being out of square.
See Detail #5
Pro-Tip: Install your outside corners according to a comfortable lift height for the installer.
Generally, this means 2’ to 3’ linear feet at a time and then install your field stones before
beginning the next lift of your corners.
Pro-Tip: Alternate corner leg orientations of your outside corners as best as possible to avoid
creating matching vertical seams.
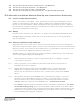
Notes:
• Height of corner stones may vary slightly from the field stones. Adjust corner height
as necessary.
• Do not wrap the drainage material around or outside corners. Cut the mat and
slightly hold back from the inside or outside corner.
(Detail #3 and Detail #4)
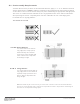
2.4 Installing the Stones
Start installing stones in lifts at the perimeter of your wall and work your way toward the opposite
side, limiting your cut ends.
7