
Use and Care Manual


9
EVOLVESTONE.COM
3.0 Alternate Installation Method (Glue-Up over Cementitious Substrate)
3.1 Pre-Assembly Requirements
Ensure the surfaces are prepped, clean, dry and free of cracks and contaminates. It is the
installer’s responsibility to verify proper adhesion between the substrate and Evolve Stone.
Do this prior to full installation. Water management is the responsibility of others. Adhesive
primers must be installed on the back of the Evolve Stone and the face of the concrete/block
wall per the manufacturer’s instruction.
3.2 Setup
Follow the same instructions as outlined in “1.2 Setup” in the Standard Install Method above.
Pro-Tip: Begin by installing a starter-strip to ensure that the stones do not sag during the
glue-up installation.
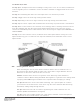
3.3 Stone Installation with Adhesive
Beginning at the corners, make cuts or miter as necessary. Fasten the sill pieces through the
vertical face using two exterior grade concrete screws centered 4” from each end. Predrill at the
fastener locations as necessary per the manufacturer’s recommendations and provide a recess
so the screw head sits slightly below the face of the stone.
Pro-Tip: Using a color matched exterior grade polyurethane sealant fill any screw countersink
holes or fill the gaps bridging two abutting sills.
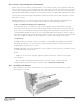
2.6 Evolve Stone at side wall/roof intersection - See Detail #7
2.7 Evolve Stone at deck structure – See Detail #8
2.8 Evolve Stone at various walls – See Detail #9
2.9 Evolve Stone at windows and penetrations – See Details #10, 11 and 12
3.3.1 Clean and prep all surfaces per Tremco’s requirements prior to installing a complete
coat of Tremco 171 primer.
3.3.2 Tremco 171 primer is to be installed on the exterior wall surface. Follow Tremco’s
installation instructions carefully.
3.3.3 Remove dirt and dust from the back of the EVOLVE Stone. Coat the back of the
EVOLVE Stone completely with Tremco 171 primer. Follow Tremco’s instructions.
Allow to dry. Be careful not to allow the 171 to coat the front or sides of the EVOLVE
stones.
3.3.4 Plan ahead for the layout of the EVOLVE Stone. Understand the pattern. It is best to
layout the stone in the pattern you plan to install on a clean, dry surface. Set up a
level line and work up or down from that line. Install heavy vertical beads of Tremco
TREMGrip Adhesive to the back of the EVOLVE Stone.
See Details #13 and #14.
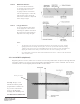
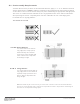
The TREMGrip Adhesive shall be installed per Tremco and Evolve’s requirements. See details
#13 and #14 showing spacing.
Generous vertical beads shall be placed on the back surface
of the Evolve Stone and the stone securely pressed into place leaving a minimum gap of 1/8”
between the concrete/masonry wall and the back of the Evolve Stone. This 1/8” clear gap
ensures drainage and drying (air circulation).