Copyright Notice This material protested by copyright laws and Is proprietary. Disclosure. reproduction.transiation, modification, or use of this document by anyone other than authorized employees, authorized users, or licenses without the prior written consent is prohibited. The information in this document is subject fo change without notice, We shall not be for any damages resulting from technical errors or omissions, which may be present in this documentation from use of this document.
WARNING (Note: Compatibility cannot is guaranteed with other brand trampolines) iris the responsibility of the owner to become familiar with the safely rules and fo convey these rules to all users. Read and follow sli of the warnings and use instructions for your trampoline and safety enclosure. ‘Read and follow all rules specified on the warning labels that came with your trampoline, safety enclosure, and basketball sel.
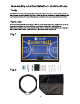
Assembly and Installation Instructions Tools Installation of the Pro Jam Basketball Set requires a 10mm spanner, 8 13mm spannar,sizsors and a second person to assist. An 8 foot A-Frame ladder will be useful for some Steps{use care and follow procedures for use). Safely glasses and gloves are also recommended for safety Parts List Your Pro Jam Basketball Set is shipped with the parts shown below Fig any pairs are missing,immediatsly email us.
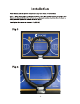
installation Note: Check parts list (Sims components may haves been per-asemblad) step 1. Attach Hoop bolts and Bracket as shown using the supplied screws and bolts. Note Ensure the bracket is fitted the correct way up (Largest section down} to allow the hoop to swing upwards against the backboard as in Fig (4).
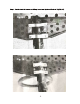
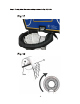
Step 2. Position the assembled backboard on the inside of the safety net at the pole furthest away from the entrance, e.g the opposite side io the entrance With assistance of a second person, hold the bottom of the backboard at the top the safety net pole as shown in Fig {7}. The fixing bracket should be around Sem from the top of the safely net. Locate the four (4) screw holes and using a pair of scissors, carefully snip one strand at each screw location to allow easy fitment. Refer Fig {7} Ww re Step 3.
YOUR Pro Jam Basketball set Is now fully assembled and ready for use! please remember,do NOT hang from the basketball set.