ALUMINIUM Greenhouse Riga XL Factory Manual Version 2.2021 Assembly Instructions Riga XL 5, 6, 7, 8, 9 www.exaco.com 877-760-8500 customerservice@exaco.com Assembly Animation Video is available on our YouTube page, find the link at www.exaco.com or scan the QR code above.
Dear Gardening Friend, Thank you for buying a Riga XL greenhouse from Exaco! Please read these Assembly Instructions and helpful suggestions carefully. Our animated YouTube assembly video will be extremely helpful during assembly - find a link to our YourTube page on our website at www.exaco.com. If you have questions or run into any difficulty, please give us a call! Good Luck! What to do First: Check all the boxes you have received for damage and make sure you have the correct quantity.
Important note regarding polycarbonate glazing during assembly: The ISO-celluar sheets (polycarbonate glazing) must be placed with the UV-coated side to the outside. On the protective film, there will be a corresponding note indicating "UV" or "2UV", most panels should be coated on both sides, but if you are unsure, please give us a call. Loosen the protection film only at the edge and the complete rest of the foil only after the panel is securely in place.
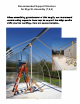
Recommended Support Structure for Riga XL Assembly (7,8,9) Whenas s embl i nggr eenhous esoft hi sl engt h,wer ec ommend c ont s t r uc t i ngs uppor t sf r om 2x4st os uppor tt her i dgepr ofil e whi l eyouar ewor ki ng.Her ear es omeexampl es .
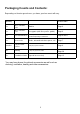
Packaging Counts and Contents: Depending on the size greenhouse you have, your box count will vary. Quantity Content table 1x Basic constructions Gables Page 6 1x Basic constructions Long parts (with floor profile - gable) Page 6 1x Roof window/door You may have additional smaller boxes of roof windows depending on model size Page 8 und 9 1x Accessories Seals, automatic window opener, etc.
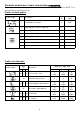
Contents of main box - basic construction components. Note: Some of this inventory section does not include XL 7, 8, 9. Please refer to the XL 7, 8, 9 parts list that you have been sent. Profiles for both gables: Profile design Pos.
Accessories bag basic construction Part design Pos. Description Quantity 100 Plastic corner connector 101 Straight connector plate 102 T-connector slanted 103 T-connector 104 T-connector slanted 105 Floor profile connectors 107 Hexagon head screw M6 x 16 + nuts M6 108 Washers (f. pos.
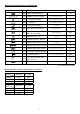
Profiles for each roof window Profile design Pos. Description Quantity Length [mm] 34 Window profile - roof 2 865 35 Window profile - roof 2 993 Quantity Length [mm] Profiles for each divided revolving door - at the bottom Profile design Pos.
Accessories bag for divided revolving door - at the bottom Part Design Quantity Pos.
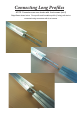
Connecting Long Profiles NOTE: Connectors are now shorter with 4 set screws (not 6) Ridge Beam shown below. Floor profile and foundation profile (if using) will also be connected using connectors with 4 set screws.
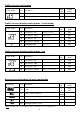
Extra Bracing for Riga XL 7/8/9 ONLY Assembly of the bracing Pos. Length Dimensions Quantity [mm] [mm] Profile/part design Description Bracing strut 1980 1 (XL7) 2 (XL8) 3 (XL9) SM11 Hexagon head screw M6 x 55 2 per bracing strut SM30 Nut M6 2 per bracing strut 30 x 4 Remember during assembly! Place the pair of curves with the notches for the braces in the center of greenhouse. Then assemble as directed. Bracing struts and the corresponding curves should be near the middle.
Extra Bracing for Riga XL 7/8/9 ONLY Assembly of the bracing strut Step 2 Slot for the bracing strut in the curved center profiles Step 3 curved center profile hexagon head screw M6 x 55 with nut M6 curved center profile bracing strut 30 x 4 bracing strut 30 x 4 hexagon head screw M6 x 55 with nut M6 12
Attaching the foundation frame (optional accessory) Profiles and hardware for foundation frame: Profile/part design Pos. 6.1 6.2 Foundation frame profile for gable Foundation frame profile for the sides Note: Foundation frame profiles are shorter than the floor profiles! Assembly of foundation frame 1. 2. --- --- - Quantity/Length in mm Typ IV Typ V Typ VI 2 2 2 4085 4085 4085 2 2 2 3864 4859 5853 Description 3. Self tapping screw 1.
Anchoring the greenhouse to your own foundation Mounting brackets to attach base/floor profile to existing foundation. Part design Pos. Quantity/Length in mm Typ IV Typ V Typ VI Description 6.7 Mounting brackets XL 14 16 18 117 Hexagon head screw M6 x 12 + nut M6 56 64 72 Note: You will need to insert 2 bolts (M6 x 12) in each vertical profile (gable ends and curved profiles) to attach mounting brackets.
Foundation plan Riga XL Construction of your greenhouse with a concrete perimeter or strip foundation If you did not buy a foundation frame, the greenhouse has to be erected safely by means of a perimeter/strip foundation. Please build this according to the dimensions in the chart below. You may also attach the greenhouse to a full concrete slab if desired - consider texture and drainage. The foundation must be even and level.
Gable Assembly - Start with the assembly of the gables - front and rear gables are identical. Important: Look for the circle and note of 1x, 2x , etc. for insertion of bolts. during assembly! inside 1x vertical profile middle, left (pos. 6) Step 1 Ensure top angles of vertical profiles are correct! vertical profile middle, right (pos. 7) Warning: If you are using the foundation frame, it has to be attached to the base profiles FIRST! (Page 8) Attention: Before assembly, insert required M6 x 16 (pos.
Step 7 View from inside ing az Connect Crossbar (pos. 8) with straight connector plate (pos. 101)and inserted bolts M6 x 16 (pos. 107) and nuts M6. Gl Gl az g in laz G ing Straight connector plate (pos. 101) Gl az ing az Gl ing Step 8 View from inside Attention: Insert noted bolts M6 x 16 (pos. 107) in profile groove e dg e a yb r- c sta urv s. po ( ed 2) 2x ed ge sta 2x yb ar -c urv ed (po s. before assembly. # 2x in crossbar (pos.
Side Wall Assembly Warning: If you are using the foundation frame, it has to be attached to the base profiles FIRST! (Page 8) Attention: Insert bolts M6 x 16 (pos. 107) in profi le groove before assembly. * . 16 pos pos. 2 Step 10 po s. 1 floor profi le connector (pos. 105) + bolt M6 x 16 + nut M6 (pos. 107) Step 11 Attach roof beam to back gable with endcap/cover plate (pos. 114) with Philips head screws 4,2 x 13 (pos. 111).
Step 16 Step 17 floor profi le connector (pos. 105) + bolt M6 x 16 + nut M6 (pos. 107) Attach doors with hinge hardware. Roof windows slide into the roof beam from the end. Note digram below for proper insertion. Attach assembled front gable in same manner as rear gable. Mounting roof window wrong!!! right! X Attach floor profile corner connector (pos. 116) with screw 4,8 x 16 (pos. 113).
Assembly roof window plastic corner connector (pos. 127) window profile (pos. 34)(No T-seal in this profile! Important! Neutral cure silicone must be used to seal the corner connectors/caps (pos. 127) where they meet the aluminum profiles, as well as all around the window glazing where it meets the aluminum. This is to avoid any penetration of humidity. Attention: Insert 2 bolts in the groove of the bottom profile - for window opener! window profi le (pos. 35) window profi le (pos.
Automatic Window Opener 2 3 4 5 opener frame pressure cylinder cotter pin mounting plate window profile mounting plate cross bar 3 3 4 2 5 Auto Opener Installation 1. Check whether the greenhouse window can open and close freely and unhindered. 2. Install the opener with the mounting plate (4) in the center of the lower roof window profile (pos 4.2) 3. Secure the cylinder by lining up the hole in the piston with the upper hole in the T-coupling, then insert the cotter pin. 4.
Riga Greenhouse Window Auto Opener Correct Installation In the correct position, the opener is sitting parallel to the window, which means that it will not demand a lot of pressure from the cylinder when the opening starts. Before fitting a new cylinder to the openers, you must check that the window can open freely right from the start. If not you must change the position of the aluminum profiles.
Roof Vent Recommendation for High Wind Areas If you get strong wind gusts, we recommend protecting your roof vents and openers with restraint cables. Roof vent restraints can be purchased from Exaco Trading (US distributor of Rigas) or can be made. They are not a standard part from the Riga manufacturer. Two restraints are used for each window; one on each side of the window. Install each loop between two flat washers on screws inserted into the channel.
Mounting divided revolving door - at the bottom View from outside Place the profiles on a flat surface according to the diagram below (a cardboard surface works well). plastic corner connector (pos. 127) Important! Silicone should be used to seal the corner connectors/caps (pos. 127) where they meet the aluminum profiles, as well as all around the window glazing where it meets the aluminum. rectangular tube and door-profi le attached with 4,2 x 50 (pos. 142) end cap for rectangular tube (pos.
Mounting revolving divided door - top View from outside Place the profiles on a flat surface according to the diagram below (a cardboard surface works well). plastic corner connector (pos. 127) Important! Silicone should be used to seal the corner connectors/caps (pos. 127) where they meet the aluminum profiles, as well as all around the window glazing where it meets the aluminum. phillips head screw 4,2 x 60 (pos. 112) door profi le - top (pos. 48) door profile - left (pos. 41) door profile - right (pos.
Assembly instructions for lockable handle 9 1 2 8 3 7 4 5 6 Riga XL Metal Door Holder After the door is assembled and installed, you may place the door holder as seen to the left. You may use self-tapping screws or predrill a small hole.
Question: Is it necessary to seal the greenhouse or greenhouse glazing? We strongly recommend sealing the exterior horizontal transitions from the glazing to the aluminum profiles with neutrally cure transparent silicone. This will help keep water and dirt from the glazing channels. In the diagram below, the dotted lines show the areas that should be sealed. In the long term the greenhouse has a better appearance. The tendency for algae formation in this area decreases tremendously.
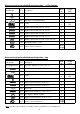
Polycarbonate Glazing Panels: 16mm triple wall Riga XL Size Curved Panel for Gables 602 x 1922 Curved Panel Square Panel small (gables) (gables) 5 Sided Panel (gables) Door Panels 888 x 835 980 x 944 980 x 1008 4 4 4 8 8 8 2 2 2 980 x 3893 Roof Windows 888 x 943 Side wall panels under roof windows 980 x 2830 20 980 x 727 Side Wall Panels Large Riga XL 7 Riga XL 8 Riga XL 9 4 4 4 28 4 4 4 10 10 10 4 6 8 4 6 8
OPTIONAL ACCESSORY: Exhaust Fan installation for RIGA XL, RIGA 4 & RIGA 5 If you have both an intake shutter vent and exhaust fan, you will want them to be opposite/diagonal from each other to get the best cross-breeze. Plug the fan into the thermostat (optional) to control when it turns on. If you are using both a shutter vent and an exhaust fan you will need to purchase a plug splitter and plug them both into the thermostat.
OPTIONAL ACCESSORY: Intake Shutter Vent Installation for RIGA XL, RIGA 4 & 5 You will want your intake shutter vent to be opposite from your exhaust fan (i.e. opposite wall and lower part of the greenhouse) to get the best cross-breeze. They should both be plugged into the thermostat with a plug splitter to engage them simultaneously. We recommend cutting a hole in the polycarbonate to bolt the intake shutter vent to the horizontal bar next to the front door.
Notes:
Customer Service or Assembly Questions? Give us a call Toll free: 1-877-760-8500 customerservice@exaco.com Exaco Trading www.EXACO.com Please watch our animated assembly video on our Exaco Trading Co YouTube Channel. Find the link at www.exaco.