
Installation Guide
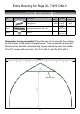
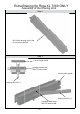
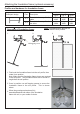
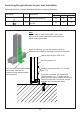
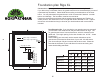
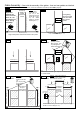


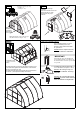
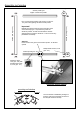
Table Of Contents

Step 18
19
Step 16
Step 17
fl oor profi le connector (pos. 105)
+ bolt M6 x 16
+ nut M6 (pos. 107)
Attach floor profile corner connector (pos.
116) with screw 4,8 x 16 (pos. 113).
Attach
assembled
front gable in
same manner
as rear gable.
Mounting roof window
wrong!!! right!
Attach doors
with hinge
hardware.
Roof windows slide into the roof
beam from the end. Note
digram below for proper
insertion.
The lateral supports (pos.20/21/22) are attached to all the curves
on the inside of the greenhouse with bolts M6 x 16 and nuts M6
(pos.107) and washer (pos.108).
The lateral supports are also back profiles for the optional tables
and shelves. (See separate assembly instructions!)
For illustration detail
the panes are shown
cutaway.
Then you should look for:
Press Insulation seal 6 - 8 mm in
between the floor profil
e and
glazing on all 4 walls on the inside
of greenhouse.
Attention:
Please compress the seals,
because it contracts in cold weather.
Hexagon bolts can be inserted later into
most of profi les through a special „hole“ in
the channel. If there is no hole you can drill
one yourself.
T-sealings (pos. 126, 138, 153) for all
doors and windows (altogether ca. 26 m).
Attention:
The t-seal goes only on 3
sides of the roof window - not the top
bar profi le.
Attention: The t-seal must be inserted
fi r st in the top profi le of the bottom door
before assemble the rectangular tube.
pos. 1
pos. 2
pos. 3
pos. 4
pos. 5
pos. 6
pos. 7
pos. 8
pos. 26
pos. 2
pos. 3
pos. 8
pos. 8
pos. 8
pos. 8
pos. 34
pos. 25
pos. 16 (17, 18)
pos. 19
pos. 19
pos. 19
pos. 35
IMPORTANT!
X