
Instructions / Assembly


OPTIONAL ACCESSORY: SHADECLOTH
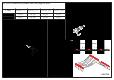
Inserting the curlicue hooks into the curtain: The curlicue hooks that insert into the curtain will go in every 6
th
loop in the white
ribbon– look at the picture diagram to ensure you are inserting them in the correct direction so the curtain hangs well. Your curtains
will have one looped ribbon running across the center (for the ridge) and 3 white looped ribbons on either side. If you have a VI23
you will use the ribbons closest to the center, the VI34 and 36 as well as the Royal Orangerie use the center ribbons. The VI46 will
use the ribbons closest to the edge. Please note in the 10 ft long curtains there are 2” gaps located about 30” in from each edge
along the center ridge ribbon, this is not a defect. These gaps are intentional to allow for misting system support hooks (as needed)
and diagonal supports (VI 34/36/46). Please note: if you have forgotten to insert any items during assembly, you may “notch” the
channel with a ½” drill bit in an inconspicuous place. We can send a touch up paint pen if you need one.
VI 23 (7’9” x 10’2”) - One shadecloth section (SUN236-300). The misting system is best hung from one bolt/hook at one end of the
shadecloth and through the intentional gap at the other side. This allows for the curtain to be gathered around one of the hooks
when not needed. Insert the following in this order:
In ridge profile:
o 1 bolt (for L bracket that connects at gable end)
o Twist lock (optional)
o 30 Sliding Eye Hooks
o Twist lock (optional)
o 1 bolt (for L bracket that connects at gable end)
In each gutter profile:
o 1 Twist lock (optional
o 30 Sliding Eye Hooks
o 1 Twist lock
VI 34 (10’2” x 15’) - Has three separate curtains – (2) SUN310-73 (these smaller sections fit between each gable end and the
diagonal support) and (1) SUN310-300 (placed in the longer middle section). The misting system is best hung from 2 bolts/hooks
placed next to each diagonal support so the larger curtain moves freely in the middle. Insert the following in this order:
In ridge profile:
o 1 bolt (for L bracket that connects at gable end)
o 9 Sliding Eye Hooks
o 1 bolt for diagonal support
o 1 bolt for hook for misting system
o Twist lock (optional)
o 30 Sliding Eye Hooks
o Twist lock (optional)
o 1 bolt for hook for misting system
o 1 bolt for diagonal support
o 9 Sliding Eye Hooks
o 1 bolt (for L bracket that connects at gable end)
In each gutter profile:
o 1 Twist lock (optional
o 48 Sliding Eye Hooks
o 1 Twist lock
VI 36 (10’2” x 19’11”) and VI 46 (12’7” x 19’11”) -Shade cloths are (2) SUN310-300. The diagonal supports at the gable ends will
be inserted through the intentional gaps in the shadecloth. The misting system is best supported by (3) bolts/hooks: one by each
of the diagonal supports and one in the center. The VI 36 and VI 46 have additional “scroll” supports that are placed across the
gutter and ridge profiles in the middle of the greenhouse – there is no hardware inserted in these profiles for the supports, but
they will be mentioned. Insert the following in this order:
In ridge profile:
o 1 bolt (for L bracket that connects at gable end)
o 9 Sliding Eye Hooks
o 1 bolt for diagonal support
o 1 bolt for hook for misting system
o 20 Sliding Eye Hooks
o Twist lock (optional)
o 1 bolt for hook for misting system
o Space for “scroll” support
o 1 Twist lock (optional)
o 20 Sliding Eye Hooks
o 1 bolt for hook for misting system
o 1 bolt for diagonal support
o 9 Sliding Eye Hooks
o 1 bolt (for L bracket that connects at gable end)
In each gutter profile:
o 1 Twist lock (optional)
o 30 Sliding Eye Hooks
o Space for “scroll” support
o 30 Sliding Eye Hooks
o 1 Twist lock (optional)