e18 Digital to Analogue Converter 8 Channel 32bit / 384kHz 2 Channel DSD 64Fs / 2.8 MHz Owner’s Manual (Windows) PLEASE READ BEFORE OPERATION REV. 1.0.
Table of Contents Table of Contents.......................................................................................................... 2 Safety Information ....................................................................................................... 4 Explanation of Graphical Symbols ............................................................................................................ 4 Important Safety Instructions .....................................................................
PC System Requirements ........................................................................................................................ 14 Windows ASIO Driver Installation ........................................................................................................... 14 Configuring Audio Player with ASIO Output ........................................................................................... 16 Using the e18 DAC .................................................................
Safety Information Explanation of Graphical Symbols The lightning flash with arrowhead symbol, within an equilateral triangle, is intended to alert the user to the presence of uninsulated “dangerous voltage” within the product’s enclosure that may be of sufficient magnitude to constitute a risk of electric shock to persons.
• • • • • Unplug the power adapter if you are not going to use the device for an extended period of time. Hold the power adapter when unplugging. Do not pull on the cord. The power adapter is used as the mechanism for cutting off power, therefore make sure it is easy to unplug. To ensure proper ventilation around this product, do not place this product on a sofa, bed or rug. High temperature will lead to abnormal operation of this device.
This product, when no longer usable, when disposed off can’t be treated as generic garbage, but must be disposed of at a collection point for recycling of electrical and electronic equipment, in compliance with the WEEE regulation (Waste of Electrical and Electronic Equipment). By making sure that this unit is correctly recycled, you will help preventing potential damages to environment and human health, which could be caused by the incorrect treatment of this product as generic garbage.
Welcome Thank you for purchasing the exaSound e18 DAC! The e18 DAC brings the highest quality of music reproduction to computer audiophiles. It delivers stereo or 8 channels at sampling rates up to 384 kHz/32bit with unprecedented bit-perfect low-jitter precision. e18 Mk II adds support for SACD quality stereo DSD (64 Fs / 2.8Mhz). e18 exceeds the expectations of the demanding stereophile, while delivering a multichannel sound stage perfected for musical experience.
Quick Start Package Content The following items should be in the box: • e18 DAC • Power supply • Mini A-B USB cable • IR Remote Control Proper Device Placement Place the device on a stable solid base, far from heat sources. Do not expose the device to direct sunlight. Allow at least 2.5 cm (1'') around the device for ventilation. Do not place the device on fabrics, inside enclosed space, or in contact with curtains. Do not place the device on top of power amplifiers or any other equipment that emits heath.
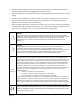
Rear Panel Connectors Coaxial SPDIF IN 1 Optical SPDIF IN 2 USB IN Line Outputs 1-8 Power adapter connector SPDIF IN1 - Coaxial SPDIF Input SPDIF IN2 - Optical TOSLINK SPDIF Input DC 12V / 0.
Features The e18 DAC is based on the ES9018 Sabre32 reference DAC chip. It delivers 32-bit precision capable of resolving the smallest signal details. ES9018features patented 32-bit Hyperstream™ architecture and Time Domain Jitter Eliminator. It delivers the industry’s highest performance levels that will satisfy the most demanding audio enthusiasts.
Connecting and Powering the e18 DAC Before connecting, turn off the power to all the components in your system. Connecting the Digital Inputs All digital inputs are galvanically isolated to eliminate ground loop noise. The e18 DAC accepts three digital inputs • USB - This is the recommended and most capable input. It supports stereo DSD and up to 8 channels and 32 bit resolution at sampling frequencies from 44.1 kHz to 384 kHz. Connect the e18 DAC to your computer using the supplied Mini A-B USB cable.
• • • Reliable electrical contact Low resistance Robust mechanical design Remember that cables act as filters. The shorter the cable, the more transparent your system will be. Connecting the Power Adapter To minimize ground noise and hum, it is recommended to connect the power cords of all components to a single point - usually a single surge protector with multiple outlets.
Remote Control Setup The e18 DAC is pre-programmed to work with the supplied remote control. If you like, you can reprogram the e18 DAC to work with a different IR remote control. The exaSound e18 DAC can be trained to recognise commands from most infrared remote controls using Sony and NEC IR protocols. Use the following procedure to change remote control button assignments or to pair the e18 DAC with a different remote control: 1. Power on the e18 DAC. Make sure that the unit is not in playback mode. 2.
Windows Drivers Setup PC System Requirements • • • • Operating systems: o Windows 8 x86 or Windows 8 x64 o Windows 7, 32 or 64 bit o Windows XP / 32 bit with the latest service packs installed USB 2.0 / USB 3.0 interface 2 GB of RAM 10 GB disk space mainly for music files Windows ASIO Driver Installation The first step required in the Windows setup process is to install the exaSound ASIO driver: 1. Don’t connect the e18 DAC to the PC until the driver is installed.
4. Connect the e18 DAC. You should see a pop-up message on the computer screen indicating that e18 DAC is successfully installed. 5. Upon completion of the Windows ASIO driver installation you will see the exaSound Dashboard Icon in the System Tray area next to the clock.
6. If you don't see it, right-click on the clock and select Customize Notification Icons from the menu. 7. Scroll down to the exaSound Dashboard icon and from the dropdown select Show icon and notifications. Click OK. 8. You should be able to see the exaSound Dashboard icons at all times. The Icon changes to indicate playback and displays an exclamation mark when the USB cable is disconnected: exaSound Dashboard Stop Icon Play Icon USB Cable Disconnected Icon 9. Close all programs and reboot Windows.
Using the e18 DAC Computer Playback Using the Asynchronous USB Input Before turning your amplifiers ON, always check the e18 DAC front panel to make sure that the volume level is below -25dB. • The e18 DAC can be controlled from the from the front panel buttons, using an IR remote control or from the computer screen. Make sure that all cables are connected. Turn on the unit using the Power button on the front panel of the remote control. The front panel display will light up.
Volume Control The e18 volume is controlled by the ES9018 DAC chip. It is completely independent from the Windows software volume control and it preserves the maximum possible signal to noise ratio. The volume level changes in steps of 0.5 dB. At first power on, the volume level is set to -40dB. When the dashboard is closed it remembers the volume level settings. Use the sliders on the exaSound Dashboard window to control the volume for individual channels and the master volume.
Playing Music From SPDIF Sources The e18 DAC offers greatly improved level of sonic clarity and fidelity from SPDIF sources. The sonic improvement is the result of the outstanding jitter cancelling capability, superb signal to noise ratio, and low distortion levels of the e18 DAC. You can connect up to two SPDIF devices like disk players and wireless music servers. To use SPDIF sources 1.
Specifications D/A Converter IC: ESS Technology ES9018S Sabre32 Reference DAC PCM Sampling Rates Asynchronous USB ASIO: 44.1kHz, 48 kHz, 88.2 kHz, 96 kHz, 176.4 kHz, 192 kHz, 352.8 kHz, 384 kHz DSD Sampling Rate Asynchronous USB ASIO: e18 e18 Mk II n/a DSD 64 Fs / 2.82 MHz (SACD quality) Sampling Rates SPDIF Coaxial IN 1: 44.1kHz, 48 kHz, 88.2 kHz, 96 kHz, 176.4 kHz, 192 kHz Sampling Rates SDIF Optical IN 2: 44.1kHz, 48 kHz, 88.2 kHz, 96 kHz Total Harmonic Distortion + Noise: 0.
Volume Matching between Channels: Better than 0.1 dB Line Output: RCA jacks with gold-plated contacts Line Output Level: 2 Vrms (unbalanced) Line Output Impedance: 200 ohms Line Output Offset: < 5 mV Headphone Amp Current Output: 700 mA peak Headphone Amp Output Impedance: 0.25 ohm, 20Hz-20KHz Headphone Amp THD+N: 0.004%, 2Vrms into 60ohms Headphone Jack: 1/4" TRS SE Power Jack Diameter: Internal: 2.1mm External : 5.5mm Power Consumption: <8 W Dimensions (W x H x D): 6.5 x 2.2 x 7.
Limited One Year Warranty exaSound Devices are warranted against defective workmanship or materials for one (1) calendar year from the original date of purchase. This warranty applies only to exaSound brand products manufactured by exaSound and sold to the original consumer by either exaSound or an exaSound authorized reseller. This warranty does not apply to exaSound brand products imported and sold by unauthorized dealers, distributors, or other sellers.
TO OBTAIN WARRANTY SERVICE, please follow these instructions: • Contact exaSound customer service via email at CustomerService@exaSound.com with details of the defect claimed, product model, serial number, date and place of the original purchase. • If it is determined that your product needs service, a Return Merchandise Authorization (RMA) number will be issued to you along with return instructions and address of an exaSound service center.
Appendix A: J River Media Center Quick Start Guide J River Media Center is a "jukebox"- style media player that allows users to play and organize various types of media. It offers a world-class engine for audiophile playback. All data paths within the program are 64 bit. J River Media Center supports most lossless formats including APE, FLAC, Windows Media Lossless, and Apple Lossless. Follow these steps to install and configure J River Media Center for use with the e18 DAC. 1.
On the following screen select Normal install. Portable install is possible only if you have purchased a licence. 4. Accept the default installation location.
5. When the installation is finalized you will see the J River Media Center Main window. At this point you have 30 seconds to cancel the automatic scanning of your computer for media files. Click on the link in the lower left corner of the application window if you prefer to select the location of your media files manually.
6. The following screens present options for configuring your media library. 7. Complete the steps in the Media Import Wizard. You will be taken back to the main application window. 8. The media import will continue in the background. You will be notified when all media files are processed.
9. At this point you should be able to test J River Media Center with your default Windows sound driver and the PC speakers. In the navigation tree select Audio -> Artist. Select an album and double-click a track. You should hear music. This confirms than the basic J River Media Centre installation is working.
Configure J River Media Center for Bit-perfect ASIO Playback with the e18 DAC Before you continue make sure that J River Media Center is installed and you can play music using the default Windows sound card and the PC speakers. For instructions see the previous section. 1. Start J River Media Center. Select Tools -> Options from the application menu. 2. From the left pane of the Options window select Audio. Open the Output Mode dropdown in the right pane and select ASIO.
3. From the right pane of the Options window select Output Mode Settings. On the ASSIO Settings Screen select exaSound ASIO and click OK. 4. From the right pane of the Options window select DSP & Output Format. Check the Output Format checkbox. In most cases you can accept the default settings. Make adjustments as necessary to setup the software for your speakers configuration.
5. From the right pane of the Options window select Track Change -> Switch Tracks: Gapless. Click OK to close the Options window. 6. In the navigation tree select Audio -> Bitstreaming. From the dropdown select Custom. Please note that older versions of J River Media Center display this setting on the Video tab under the Streaming dropdown menu. 7. Select DSD.
8. In the navigation tree select Audio -> Artist. Select an album and double-click a track. You should be able to play music with the e18 DAC. 9. You can enable Theatre View from the View menu.