
Owner`s manual


Page | 11
Connecting and Powering the e18 DAC
Before connecting, turn off the power to all the components in your system.
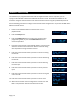
Connecting the Digital Inputs
All digital inputs are galvanically isolated to eliminate ground loop noise. The e18 DAC accepts three
digital inputs
• USB - This is the recommended and most capable input. It supports stereo DSD and up to 8
channels and 32 bit resolution at sampling frequencies from 44.1 kHz to 384 kHz. Connect the
e18 DAC to your computer using the supplied Mini A-B USB cable. Most standard Mini A-B USB
cables with length up to 6 ft (2m) can be used.
• SPDIF IN1 - SPDIF Input, 75-ohm RCA. Supports 2 channels PCM up to 24 bit resolution at
standard sampling frequencies from 44.1 kHz to 192 kHz.
• SPDIF IN2 - SPDIF Input, TOSLINK, Optical. Supports 2 channels PCM up to 24 bit resolution at
standard sampling frequencies from 44.1 kHz to 96 kHz.
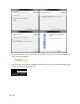
Connecting the Line Outputs
Line Outputs 1-8 - Connect the left, right and surround channels to an analogue power amplifier using
pairs of RCA interconnects.
Direct Connection to Analogue Power Amplifier
If your music sources are digital, you don't need a preamplifier. The built-in volume control allows
analogue power amplifiers to be connected directly to the e18 DAC. Amplification always brings some
level of noise and distortion. Eliminating unnecessary amplification helps to achieve higher level of
transparency.
Avoid connecting the e18 DAC to receivers and any other sound processing equipment
that performs analogue to digital (ADC) conversion. Digitizing the analogue output signals
back to the digital domain for processing will undo the benefits that e18 brings to you.
Remember that your sound system is as good as the weakest link in the sound processing
chain.
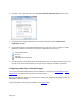
Analogue Interconnect Recommendations
Over-engineered interconnects made from exotic materials are unnecessary. When selecting cables, the
following characteristics are important: