PREMIUM SERIES ELECTRONIC METERED WATER SOFTENER Installation Manual 220 Bayview Avenue Unit #18 Barrie, Ontario Canada L4N 4Y8 www.excaliburwater.
EXCALIBUR PREMIUM WATER SOFTENER INSTALLATION MANUAL GENERAL WATER SOFTENER INSTALLATION PROCEDURES The Water Softener control valve, fittings and/or bypass Water Softener valve are designed to accommodate minor plumbing misalignments that may occur during the Water Softener installation. Do Not use Vaseline, oils or other hydrocarbon lubricants when installing your Premium Water Softener or spray silicone anywhere.
place screwdriver in slots on caps and/or tap with a hammer as this could damage the Premium Water Softener WATER SOFTENER INSTALLATION SITE REQUIRMENTS • Water pressure 20 – 125 psi • Water temperature 5 to 30°C or 40 to 100°F • The Water Softener tank should be on a firm level surface • Electrical use of 115/120 volt 60 Hz uninterrupted outlet • Current draw is 0.25 amps • A 15 foot power cord is furnished • The plug-in transformer is for dry location only • Batteries are not used 1.
. Do not locate the Premium Water Softener where it’s connections including the Water Softener drain and overflow plumbing will be in a room with a room temperature under 2°C or 34°F. 5. The use of resin cleaner in your Premium Water Softener in an unvented enclosure is not recommended. 6. The Water Softener inlet/outlet plumbing will be installed downstream of outdoor spigots.
backwash flowrate is greater than 7 gallons per minute, use a ¾ inch Water Softener drain line. Where the Water Softener drain line is elevated but empties into a water drain below the level of the Water Softener control valve, form a 7 inch loop at the discharge end of pipe so that the bottom of the loop is level with the drain connection of the Water Softener control valve. This will provide an adequate anti-siphon trap. Where the drain empties into an overhead sewer pipe, a sink-type trap must be used.
IMPORTANT: Never insert a drain line directly into a drain, sewer line or ptrap. Always allow an air gap between the drain line of the waste water to prevent the possibility of sewage being backsiphoned in the Water Softener. 10. WATER SOFTENER SERIAL NUMBER Record the Water Softener serial number on the installer’s records and consumer’s sales invoice. 11.
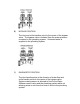
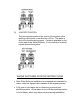
B) BYPASS POSITION The inlet and outlet handles point to the centre of the bypass valve. The bypass valve is isolated from the water pressure contained in the plumbing system. Untreated water is supplied to the plumbing system C) DIAGNOSTIC POSITION The inlet handle points in the direction of water flow and outlet handle points to the centre of the bypass valve.
D) SHUTOFF POSITION The inlet handles points to the centre of the bypass valve and the outlet points to the direction of flow. The water is shut off to the plumbing system. If water is available on the outlet side of the Water Softener, it is an indication of water bypass around the system. WATER SOFTENER STARTUP INSTRUCTIONS • After Water Softener installation is completed and checked for leaks, rotate the bypass valve handles to the bypass position.
THE WATER SOFTNER IS NOW READY FOR TESTING 1. With the bypass valve in the bypass position, manually pour 5 gallons of water into the Water Softener brine tank. 2. Press and hold the Water Softener regeneration button for three seconds until the motor drive starts. Wait until the motor stops and the display reads “Backwash”. The backwash time will begin to count down. 3. Open the inlet handle of the bypass valve very slowly allowing water to fill the Water Softener slowly to expel air.
WATER SOFTENER PROGRAMMING SETTINGS Step I: Press next and up simultaneously for 3 seconds. Step II: Set hardness in grains per gallon using the up and down buttons. The default is 15 with a valve range of 1 to 150 in 1 grain increments. The display will show NA if filter is selected. Add 5 gains of hardness for every one part of iron, then press next to go to Step III.
Table 15 Troubleshooting Procedures Problem 1. Timer does not display time of day 2. Timer does not display correct time of day 3. No softening/filtering display when water is flowing Possible Cause a. Transformer unplugged b. No electric power at outlet a. Connect power b. Repair outlet or use working outlet c. Defective transformer d. Defective PC board a. Switched outlet b. Power outage c. Replace transformer d. Replace PC board a. Use uninterrupted outlet b. Reset time of day c.
Problem 6. Control valve stalled in regeneration 7. Control valve does not regenerate automatically when REGEN button is depressed and held 8. Control valve does not regenerate automatically But does when REGEN Button is depressed Possible Cause a. Motor not operating b. No electric power at outlet c. Defective transformer d. Defective PC board e. Broken drive gear or drive cap assembly f. Broken piston retainer g. Broken main regenerant piston a. Transformer unplugged b. No electric power at outlet c.