
Use and Care Manual


16
TO REDUCE THE RISK OF INJURY, ALWAYS TURN OFF THE SAW AND WAIT FOR THE BLADE TO COME TO
A COMPLETE STOP BEFORE REACHING IN TO REMOVE WASTE MATERIAL FROM A FRET CUT.
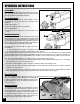
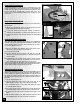
The saw is a great tool for fret cutting because unlike most
scroll saws it allows you to raise the upper arm with the blade
a
ttached B, line up the guide hole in your workpiece with the
hole in the table and then lower the arm while guiding the
blade through the hole from above (see step by step instruc-
tions below). This can be a very useful time saving feature, par-
ticularly for intricate or complex fret designs that can involve
dozens or even hundreds of holes.
1
. With the saw turned off and unplugged, install the appro-
priate blade for the type of material to be cut and the
type of cut to be made (Refer to the section“Choosing and
Installing a Saw Blade” on page 11 of this manual).
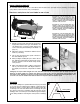
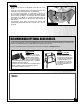
2. With your pattern or design transferred onto the workpiece,
d
rill a guide hole in the inside waste portion of the work-
piece C. Make sure that the hole is large enough for the
blade to fit through.
Helpful hints on drilling guide holes: If multiple fret cuts are
required on the same workpiece, drill all of your required
guide holes before taking the workpiece to the scroll saw.
This will keep you from going back and forth from the saw
to the drill press.
To prolong blade life by limiting unnecessary cutting, drill your
guide holes as close as possible to your reference lines D.
3. Release tension on the blade by flipping the blade tension
lever forward.
4. Loosen the thumbscrew on the lower blade mount, located
under the table, to release the blade from the mount.
5. Raise the upper arm assembly which will lift the blade up
through the hole and above the table.
6. Position the workpiece on the table so that the guide hole
lines up with the hole in the table.
7. Lower the arm assembly with one hand while guiding the blade through the hole in the workpiece and table.
8. Re-install the bottom end of the blade in the lower blade mount and tighten the thumbscrew, only enough to
secure the blade in the lower blade clamp and prevent it from slipping.
Note: Overtightening the blade clamp thumbscrews can cause premature wear to the blades gripping surface and result
in blade slippage or cause premature wear of the threads in the blade clamp housing. (added this sincd Norm’s copy)
9. Flip back the blade tension lever to re-tension the blade and test the blade tension as described in “Installing
or Changing Blades” section of this manual.
10. To begin cutting follow the same steps as described in “Basic 90° straight or curved cuts” section on page 14 of
this manual.
C
D
B