
Use and Care Manual

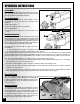

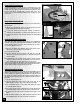

SQUARING THE BLADE TO THE TABLE
Depending on frequency of use and how much the tilting mech-
anism is used, normal wear will over time cause the blade to
come slightly out of alignment with the table. Periodically check
the blade for square with the table. When needed, adjust as
described in the following steps to re-align the blade square to
the table.
1. Turn off and unplug the saw.
2. Using the blade tilt controls at the front of the saw, set the
blade angle to read 0 - which is 90° vertical to the table.
3. Set a machinists square on the table and against the blade
to verify the blade angle, C.
4. If the blade angle requires adjustment loosen the 4 bolts in the
front trunnion D as well as the 4 bolts on the rear trunnions E.
5. By hand,move the entire head to bring the blade square to the
table.
6. With the blade square to the table hold the head in position
and re-tighten the bolts on the front and rear trunnions.
C
Front View
Back View
E
D
D
E
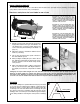
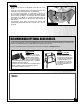
BLADE TENSION LEVER LUBRICATION
A regular application of white grease (or petroleum jelly) to the
friction point (bottom) of the tension lever is recommended. This
will allow for smoother operation as well as prolong the life of the
tension lever. Apply a small dab of grease after every 10-15
h
ours of use or as needed depending on the frequency of use
of the saw.
UPPER ARM ADJUSTMENT FOR FRET WORK
Over time and with normal wear the upper arm adjustment
screw A may require slight adjustment in order to hold the arm
in the raised position when the arm is lifted by the operator.
To reset the adjustment screw:
1. Remove the blade and with the upper arm down set the
arm more or less parallel to the saw table.
2. Loosen the lock nut B.
3. Turn the adjuster screw clockwise 1/4 turn at a time B,
until there is just enough resistance to hold the arm in the
raised position.
4. Re-tighten the lock nut and check again to make sure the
upper arm will now stay up when lifted. If not repeat these
steps, using slight 1/4 turn adjustments on the screw.
Note: Do not over tighten the adjustment screw! Over tightening the adjust-
ment screw will apply too much tension and prevent the free movement of
the arm during operations causing damage to your saw.
Apply
grease
here
A
B
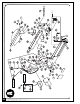
BLADE TENSION LEVER REPLACEMENT
Over time, with normal wear, the blade tension lever will need to
be replaced.
1.
Flip the lever forward as shown to release tension from the
blade and remove the blade completely.
2.
Loosen the barrel bolt using two phillips screwdrivers,
and remove the binding screw and worn blade tension lever.
3.
Install a new tension lever using the barrel bolt and binding
screw.
18