Model 4300 OPERATOR MANUAL DORAN SCALES, INC. 1315 PARAMOUNT PKWY. BATAVIA, IL 60510 1-800-262-6844 FAX: (630) 879-0073 http://www.doranscales.com MANUAL REVISION: 4.
INTRODUCTION Introducing the Doran Scales Excel Series, Model 4300 Digital Scale Indicator. This scale uses state of the art technology to provide you with a low cost solution to the most demanding weighing applications. With ease of use and setup in mind, the scale is simple to set up and ready to use. The Model 4300 offers many features. A few of these features are listed below: ? ? ? ? ? ? ? ? ? ? ? ? ? ? ? ? ? ? ? ? ? ? ? ? ? NTEP certification for Class III installations to 10,000d.
Unpacking Your Scale Before unpacking your Doran scale, please read the instructions in this section. Your new scale is a durable industrial product, but it is also a sensitive weighing instrument. Normal care should be taken when handling and using this product. Improper handling or abuse can damage the scale and result in costly repairs that may not be covered by the warranty. If you notice any shipping damage, notify the shipper immediately.
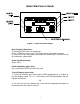
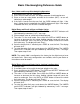
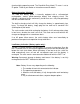
Quick Start User's Guide Figure 1. 4300 Front Panel Layout Basic Weighing Operations: 1) Remove all items from the scale platter. 2) Press ZERO to zero the scale. The weight display should now read zero. 3) Place an item on scale platter and wait for the motion (MOT) indicator to turn off, indicating a stable weight. Power Up (AC Operation) Plug in scale. Power Up (Battery option only): Press and release ZERO to turn on the scale.
Indicators: The Doran 4300 has a main display and eleven indicator lights. These indicators provide the operator with information about the scale and the current weighing operation. The main display is used to provide the operator with the current weight. The units indicators, located on the right of the main display, show the current measurement units. ? The Motion (MOT) located on the left side of the display, informs the operator when the scale is in Motion.
OVER / UNDER: The OVER and UNDER pushbuttons are used to enter the weight values needed for checkweighing applications. In their simplest configuration, these buttons will enter the check weight by pressing either the OVER or UNDER button. When in this mode, the current weight is entered as the checkweighing limit.
Basic Checkweighing Reference Guide Over, Under and Accept Checkweighing Operation: 1) Remove all items from the scale platter. 2) Press ZERO to zero the scale. The weight indication should now be zero. 3) Place an item on scale platter and wait for the motion (MOT) to turn off, indicating a stable weight. 4) If the item is heavier than the over limit, the OVER indicator will light, If the item is lighter than the under limit, the UNDER indicator will light.
NOTE: To digitally adjust platform weight for over and under limits, the Checklimit Entry Mode C.E. menu is set to SCS option. Refer to your dealer or Instruction manual for details. Push-button Entry of Over and Under Limits: (optional configuration) 1) Zero the scale. 2) Place an item with the desired over weight on the scale. 3) Press and release the OVER button. The OVER and ACCEPT indicators will light, followed by displaying "over", the current weight, then “donE” to indicate the limit has been saved.
5) To enter the UNDER limit, press and hold the UNDER button until the display shows "louu" and the UNDER and ACCEPT indicators flash. 6) Then follow steps 2 to 4. NOTE: To digitally enter in high and low limits, the following parameters must be configured. The Check Weighing Operation parameter C.o. set to any of the menu options (5BA, 5BS, 5Bt, 5Bb) that has the five band check weighing operating mode. The Checklimit Entry Mode C.E. menu is set to SCr option.
check weighing operating mode. The Checklimit Entry Mode C.E. menu is set to Pb option. Refer to your dealer or Instruction manual for details. Battery Operation: (Optional) The 4300 with battery option is internally equipped with a self-contained rechargeable, sealed, gelled-electrolyte battery and charging circuit. The indicator is designed to run continuously for 60 hours on a fully charged battery with one 350 ohm load cell.
Troubleshooting Scale Messages: Message “donE” Function Complete “Abort” Aborted Function "rEL Pb" Release push button. "Ldg 0" Loading zero. "CLr Ac" Clear accum/counter Meaning The scale has successfully completed the requested action. The requested action has been canceled prior to completion. The scale has detected that a key has been depressed for more than 3 seconds. The scale is attempting to zero the scale upon startup. This message will remain until scale is stable.
Scale drifts off of zero. Check for air currents and/or vibration around the scale. If that is the cause it may be necessary to set the AZT aperture to a wider setting to compensate. Scale reading is bouncing Check for air currents and/or vibration around the scale. If or "flighty". that is the cause it may be necessary to set the Digital Averaging to a higher setting to stabilize the reading.