
Installation Guide

Getting Started:
Adjustments:
Installing Your Pleated Draperies:
You are now ready to hang your draperies.
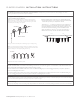
1
2
3
4 Repeat the same steps for all other panels.
5
BACK OF DRAPERY
EYELETS
DRAPERY PINS
RINGS
Return
Drapery Pin
Drapery Pin
Return
Screw Screw
BUCKRAM
Care and Cleaning:
PLEATED DRAPERY INSTALLATION INSTRUCTIONS
Dressing Your Drapery:
NOTE: Item Indicated as Custom Made Size online: Due to transit, some additional wrinkling may occur. Prior to hanging your draperies you may want to lay them out
and press out wrinkles gently with a cool iron.
Items Indicated as Made to Measure online: All of our Made to Measure draperies are hand-pressed prior to shipping, however due to transit, some additional wrinkling may
occur. Prior to hanging your draperies you may want to lay them out and press out wrinkles gently with a cool iron.
Further Questions? Visit halfpricedrapes.com or 1.866.413.7273
Please read through all instructions carefully before you begin installation. Carefully remove your new draperies from their packaging. Use caution,
as drapery pins have been pre-inserted into pleats of drapery.
With drapery rod already installed, insert drapery pins through the
eyelets of the rings / carriers. Note: Once you have inserted drapery
pins in rings / carriers you may want to pinch the drapery pins closed
to prevent pins from falling out of eyelets.
(Optional) Installing returns on the ends of your draperies allows the last
fold of the drapery panel to “return” back to the wall. This is ideal especially
in areas where you can see your draperies from the side.
Take the last 3 ½” – 4” (will vary from product to product) of fabric at the
top of the drapery next to the last pleat, and simply return the fabric back
toward the wall. Affix the return to the wall by hooking a drapery pin to the
back side of the panel and then placing a screw in the wall at the same
height. Then attach pin to the screw. You may also use a staple gun to
fasten the return securely to the wall. This will keep the return in place.
Once you have inserted the pins in all the rings, let your drapery hang.
Begin to break (bend) the buckram (buckram is the stiffener sewn at the
top of the drapery behind the pleats) as shown in sketch below. This will
allow the drapery to stack properly and gain memory.
Once your draperies are installed, most wrinkles and folds will hang out on their own. You may also use a garment / commercial steamer to help eliminate wrinkles. Please
keep in mind linens will characteristically have wrinkles regardless of steaming or pressing.
Once your drapery is hung, if you need to make an adjustment to the height of the drapery, you can drop or raise the drapery pins +/- 1" to make the drapery
longer or shorter. If further adjustment is required you may have to adjust rod height.
simply vacuum over it using an upholstery attachment. For stubborn stains or overall deep cleaning,If the drapery is dusty, professional on-site service is recommended.