INSTALLATION GUIDE FOR ALL UNDERMOUNT SINKS www.exclusiveheritageusa.
INSTALLATION Instructions Attention Installer Please carefully read our installation guide prior to installation. Make sure you have observed your local plumbing and building codes thoroughly before you begin. • Metal edges may be sharp, please use caution when handling. You should always wear gloves. • Carefully unpack your new sink and make sure all necessary parts are included (sink, mounting brackets and cutting template). If any items are missing, contact us within 5 days of delivery.
RECOMMENDED TOOLS AND MATERIALS NEEDED Drill & Drill Bits Channel Locks Adjustable Wrench Rubber Mallet Caulk and Caulk Gun Phillips Screwdriver SILICONE Jig Saw Tape Measure Denatured Alcohol Tape Tubing Cutter Denatured Alcohol Protective Gear Please always wear personal safety devices for your protection and use proper tools for installation MOUNTING OPTIONS POSITIVE REVEAL The rim of the sink is exposed beyond the countertop edge.
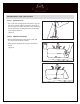
UNDERMOUNT SINK APPLICATION STEP 1 - POSITION OF THE SINK • Determine where the sink will be positioned on the countertop. • Make sure there is sufficient clearance of the sink on all sides below the countertop. • Carefully tape the cutting template to the countertop at the appropriate position (Templates are provided only for reference, carefully measure the actual sink dimensions).
UNDERMOUNT SINK APPLICATION STEP 4 - DRILL HOLES ON THE COUNTERTOP • Review the clip length carefully where the edge of the clips should overlap the sink rim. • Use 3 clips on the long sides of the sink. Use 2 clips on the short sides of the sink. The holes should be evenly spaced apart from each other starting near the corner. • Determine the thickness of the countertop. Use a drill bit with a stop block to avoid drilling through the countertop.
UNDERMOUNT SINK APPLICATION STEP 7 - CLEANING UP • Use a soft cloth with denatured alcohol to wipe off any excess silicone adhesive from the inside lip of the bowl after the sink is attached to the countertop. Always follow the cleaning directions on the label of the silicon adhesive. (Figure 7) STEP 8 - CHECK FOR LEAKS • Run a small amount of water into the sink and check for leaks under the cabinet. • Make proper adjustments or repairs if leaks are found. (Figure 8) Figure 6.
Stainless Steel Strainer 1 OPEN / CLOSE STOPPER 2 STRAINER BASKET 3 STRAINER BODY 4 RUBBER GASKET 5 PAPER WASHER 6 LOCKNUT 1 2 3 4 5 6 NOTE: • Installation of the strainer must be completed by a professional licensed plumber. • Always wear proper safety gear to protect yourself from injury. For questions and comments, please contact us at support@ehhomeusa.com. To learn more about Exclusive Heritage or our product line, you can visit our website at http://www.exclusiveheritageusa.com.
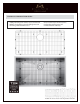
STAINLESS STEEL BOTTOM GRIDs • T304 premium grade stainless steel construction • Rubber feet bumpers provide added protection • Chrome polished stainless steel • Protect sink surface from scratches • Dishwasher and hygienic safe • Limited lifetime warranty Available in various sizes for both single and double sinks
OUR STORY The late 1930’s and early 1940’s were a period of turmoil and uncertainty. Many of the lifelong dreams of hard working men and women came crashing down as World War II took its toll. My grandfather was one of many men who took pride in what he could create with his bare hands, his vision and his imagination. As an accomplished carpenter for most of his life, he knew the characteristics of great furniture making. He appreciated detail, fine tools, intricate inlays and master craftsmanship.
OUR PRODUCTS There are so many interesting ways to bring together today’s tools with our traditional craftsmanship skills. Imagine how inspiring the creations must be. We value quality, history and elegance to bring you today’s diverse product lines. Although each piece is unique, it carries the tradition of the noble pursuit of my grandfather and others of his same generation.
www.exclusiveheritageusa.