
Instructions / Assembly

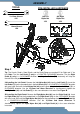


Table Of Contents

10
ASSEMBLY
Step 2
Tip: The Cranks, Pedals, Pedal Shafts, and the Pedal Straps are marked “R” for Right and “L” for
Left. Note: Turn the Left Pedal (7) only in a COUNTER-CLOCKWISE direction. Turn the Right
Pedal (8) only in a CLOCKWISE direction. Installing the Pedals (7/8) incorrectly will strip the
threads of the left pedal shaft.
2A Installing the Left Pedal: Remove the Left Nylon Nut (84) from the Left Pedal (7). Insert the
Left Pedal (7) into the threaded hole in the Left Crank (23) in a COUNTER-CLOCKWISE direction
with your hand. Reinstall the Left Nylon Nut (84) onto the protruding shaft of the Left Pedal (7) in a
CLOCKWISE direction. Use the 13,15mm and 19mm Wrenches to simultaneously tighten the
Left Nylon Nut (84) and Left Pedal (7) in the same directions instructed. See Figure B.
2B Installing the Right Pedal: Remove the Right Nylon Nut (86) from the Right Pedal (8). Insert
the Right Pedal (8) into the threaded hole in the Right Crank (24) via the CLOCKWISE direction
with your hand. Reinstall the Right Nylon Nut (86) onto the protruding shaft of the Right Pedal (8)
in a COUNTER-CLOCKWISE direction. Use the 13,15mm and 19mm Wrenches to
simultaneously tighten the Right Nylon Nut (86) and Right Pedal (8) in the same directions
instructed.
TOOLS
19mm Wrench
1PC
13-15mm Wrench
1PC
PRE-INSTALLED HARDWARE
(84) Left
Nylon Nut
1PC
(86) Right
Nylon Nut
1PC
Figure B