
Instructions / Assembly


12
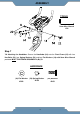
ASSEMBLY
Step 3
Tip: Only turn the pedals in direction instructed. The left, right pedals and left, right pedal
nuts will have different directions for installation. The Cranks, Pedals, Pedal Shafts, Pedal
Nuts, and Pedal Straps are marked “R” for Right and “L” for Left
3A. Removal of Hardware : Remove the Left Pedal Nut (90L) and Right Pedal Nut (90R) from
the Left and Right Pedal (10L, 10R). DO NOT MIX UP THE PEDAL NUTS.
3B. Installing the Left Pedal onto the Left Crank: Insert the Left Pedal (10L) perfectly straight
into the threaded hole in the Left Crank (09L). Turn the Pedal shaft by hand in a
COUNTER-CLOCKWISE direction until snug. Use the Multi-Hex Tool with Phillips Screwdriver
to tighten the Left Pedal (10L) until the shaft protrudes. Attach the previously removed Left Pedal
Nut (90L) to the protruding shaft in a CLOCKWISE direction. Use both the Multi-Hex Tool with
Phillips Screwdriver and 13,15 and 19mm Wrench and to simultaneously tighten the Left Pedal
(10L) and the Left Pedal Nut (90L). Only tighten in the directions instructed.
3C. Installing the Right Pedal onto the Right Crank: Insert the Right Pedal (10R) perfectly
straight into the threaded hole in the Right Crank (09R). Turn the Pedal shaft by hand in a
COUNTER-CLOCKWISE direction until sung. Use the Multi-Hex Tool with Phillips Screwdriver
to tighten the Right Pedal (10R) until the shaft protrudes. Attach the previously removed Right
Pedal Nut (90R) to the protruding shaft in a CLOCKWISE direction. Use both the Multi-Hex Tool
with Phillips Screwdriver and 13,15 and 19mm Wrench and to simultaneously tighten the Right
Pedal (10R) and the Right Pedal Nut (90R). Only tighten in the directions instructed.
Multi Hex Tool with
Phillips Screwdriver
1PC
TOOL
13,15,19mm Wrench
1PC
PREINSTALLED HARDWARE
(90L) Left Pedal Nut
1PC
(90R) Right Pedal Nut
1PC