
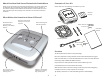
User's Manual


17
How to Mount the Alarm (cont.)
Drywall
Plastic Anchors
Mounting Bracket
1” Screws
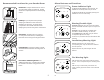
Situation B: No Wood
If no wood is present, use a Phillips
screwdriver to screw the two plastic
wall anchors into the pre-drilled holes
until fully seated. Then secure the
mounting bracket to the wall anchors
using the two 1” screws.
Situation C: Combination
Where there is no wood present, first
screw the plastic wall anchor into
the pre-drilled hole using a Phillips
screwdriver.
Then secure the mounting bracket in
place using the two 1” screws.
Drywall
Plastic Anchors
Mounting Bracket
1” Screws
Wood
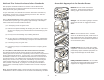
4 Lock Into Place
With the batteries installed and wire
harness connected (if AC powered)
and with the alarms fully networked
together, position the Smoke Alarm
onto the center of the bracket and
turn clockwise. The Alarm will lock into
place.
18
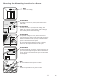
Black
Line (Hot)
Neutral
Signal
White
Red
Black
Line (Hot)
Neutral
Signal
White
Red
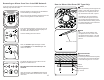
How to Wire and Mount the AC Powered Alarm
When installing an AC powered alarm (Model RF-360TEB), the mounting location is
determined by the position of the electrical box that will power the alarm. Electrical
power to the box must be disconnected prior to alarm connection and
installation!
With the AC power turned off, connect
the wire harness provided with the alarm.
Connect the black wire of the harness
to the black wire(s) in the electrical box
(Hot).
Typical
Circuit
End of
Line
Circuit
Align and attach the mounting bracket
with the two screws of the electrical box.
Pass the wire harness through the center
of the bracket.
Plug the new wire harness into the back
of the alarm.
Press and twist the alarm clockwise into
place.
Reconnect power to the AC lines of the
smoke alarm circuit. The POWER icon will
glow continuously.
Using the supplied orange wire nut, cap
the red wire (not used) and push it back
inside the electrical box.
Connect the white wire of the harness
to the white wire(s) in the electrical box
(Neutral).