
User's Manual

14
15
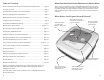
12” (30cm)
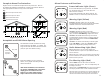
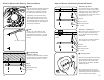
Choosing the Mounting Location in a Room
BEST
Center on ceiling.
ACCEPTABLE
On ceiling
ACCEPTABLE
On wall, the top of the alarm must be no more
than 12” (30 cm) from the ceiling (if local
codes permit wall mounting).
ACCEPTABLE
On peaked ceilings or roofs, mount at least 4”
(10cm) from the upper corner, but high enough to
allow a maximum of 36” (91cm) of horizontal air
space as measured off the peak.
4” (10cm)
36” (91cm)
36” (91cm)
ACCEPTABLE
On sloped ceilings, at least 4” (10cm) from
the upper corner, but high enough to allow
a maximum of 36” (91cm) of horizontal air
space as measured off the peak.
36” (91cm)
4” (10cm)
OK
Install on exposed face of joist or rafter.
NO!
Do not install between joists or rafters.
Do not mount alarm between joists or rafters;
mount on the exposed surface of the joist.
Note: Avoid placement of the alarms close to
ceiling fans or heating/air conditioning vents.
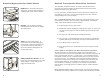
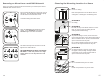
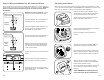
Removing an Alarm from a multiLINX Network
In the event that an alarm must be removed from your network, the alarm’s
multiLINX data must be erased.
Press and hold the button on the front cover of
the alarm. The red FIRE light will flash rapidly
and the alarm will sound three tones.
Continue holding the button down.
Next, the WARNING light will begin to flash
yellow. Count
10 flashes of the yellow
WARNING light and release the button.
The alarm will chirp twice and all four of the
lighted icons will strobe on.
All multiLINX data has been erased from
the alarm. It will now perform as a single
station alarm or it can be joined to a new
network.
Smoke Manual with FCC and IC Statement.indd 14-15 8/9/2013 10:39:31 AM