ULTRA VAC ® LAZER Z® HP MODELS For Serial Nos. 850,000 & Higher Part No. 4500-599 Rev.
Exmark reserves the right to make changes or add improvements to its products at any time without incurring any obligation to make such changes to products manufactured previously. Exmark, or its distributors and dealers, accept no responsibility for variations which may be evident in the actual specifications of its products and the statements and descriptions contained in this publication. © 2009—Exmark Mfg. Co., Inc. Industrial Park Box 808 Beatrice, NE 68310 2 Contact us at www.Exmark.com.
Introduction CONGRATULATIONS on the purchase of your Exmark Ultra Vac. This product has been carefully designed and manufactured to give you a maximum amount of dependability and years of trouble-free operation. This manual contains operating, maintenance, adjustment, and safety instructions for your Exmark Ultra Vac. BEFORE OPERATING YOUR MOWER, CAREFULLY READ THIS MANUAL IN ITS ENTIRETY. Figure 1 1.
Contents Introduction ........................................................... 3 Safety ..................................................................... 5 Safety Alert Symbol ......................................... 5 Safe Operating Practices .................................. 5 Safety and Instructional Decals ....................... 8 Specifications ......................................................... 9 Model Numbers .............................................. 9 Systems ...................
Safety Safety • Never let children or untrained people operate or service the equipment. Local regulations may restrict the age of the operator. Safety Alert Symbol • Only adults and mature teenagers should operate a mower, and even mature teenagers should have adult supervision. Be sure a teenager: This Safety Alert Symbol (Figure 2) is used both in this manual and on the machine to identify important safety messages which must be followed to avoid accidents 1.
Safety Slope Operation collection system or mulch kit in place and working properly. Use Extreme caution when mowing and/or turning on slopes as loss of traction and/or tip-over could occur. The operator is responsible for safe operation on slopes. DANGER There are rotating blades in the blower and under the mower deck. Blade contact can cause serious operator or bystander injury or even death. DANGER Operating on wet grass or steep slopes can cause sliding and loss of control.
Safety progressively greater care on slopes as the hopper fills. Maintenance and Storage • Disengage drives, set parking brake, stop engine and remove key or disconnect spark plug wire. Wait for all movement to stop before adjusting, cleaning or repairing. • Use care when checking blades. Wrap the blade(s) or wear gloves, and use caution when servicing them. Only replace damaged blades. Never straighten or weld them. • Keep all guards, shields and all safety devices in place and in safe working condition.
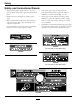
Safety Safety and Instructional Decals • Keep all safety signs legible. Remove all grease, dirt and debris from safety signs and instructional labels. • Replace all worn, damaged, or missing safety signs. • When replacement components are installed, be sure that current safety signs are affixed to the replaced components. • If an attachment or accessory has been installed, make sure current safety signs are visible.
Specifications Specifications Model Numbers Serial Nos: 850,000 and Higher LHPUV4448; LHPUV4650; LHPUV5256 Systems Curb Weight: Bagging System 156 lb (71 kg), including the front weight. • Collection Bins: – Commercial grade, cloth mesh bags with reinforced bottoms. – Capacity: 8 bushels (2 bags and hood) • Dump Mechanism: Manual lift off • Blower Tube: Fixed, abrasion resistant molded polyethylene. • Impeller: 5–bladed, 1/4 inch (6.4 mm) thick abrasion resistant steel, with vertical axis.
Operation Product Overview Operation Note: Determine the left and right sides of the machine from the normal operating position. Pre-Start Make sure you understand the controls, their locations, their functions, and their safety requirements. Ensure the blower, belt cover, bags, tube and hood are in good condition, properly attached, and latched. For units above Serial Nos. 600,000 with Triton decks: Make sure that the adjustable dog leg baffle is closed to match the intake into the Ultra Vac Blower.
Operation 3. To remove the bags, shut off deck drive, stop the engine and wait for all moving parts to stop. Open the hood and remove the bags by lifting up on the rear of the bag, then unhooking the front clip. Empty bags by inverting them. 4. Reinstall bags, close and latch the hood before continuing mowing. Tips for mowing conditions: • When mowing in areas with sandy soil, use low lift blades on the cutting deck and higher cutting heights to minimize wear on the blower components.
Operation 8. Remove the hair pins and clevis pins holding the hood assembly to the mount weldment. CAUTION The deck sheave will become very hot. Touching a hot deck sheave can cause severe burns. 9. Lift the bag and hood assembly off the mount. 10. For units with a 2 post ROPS installed: Remove the hairpins and lift the front weight off of the mount plates (see Figure 8). Allow the deck sheave to cool completely before removing the belt. 4.
Operation 7. Install the belt cover using the two knobs. Install the discharge tube assembly by slipping the upper end into the hood, then sliding the lower end over the blower discharge opening. Use the latches to retain the lower end to the blower. WARNING Loading a unit on a trailer or truck increases the possibility of backward tip-over. Backward tip-over could cause serious injury or death. 8.
Operation ramp angle. The trailer or truck should be as level as possible. Important: Do Not attempt to turn the unit while on the ramp, you may lose control and drive off the side. Avoid sudden acceleration when driving up a ramp and sudden deceleration when backing down a ramp. Both maneuvers can cause the unit to tip backward.
Maintenance Maintenance Note: Determine the left and right sides of the machine from the normal operating position. WARNING WARNING While maintenance or adjustments are being made, someone could start the engine. Accidental starting of the engine could seriously injure you or other bystanders. The engine can become very hot. Touching a hot engine can cause severe burns. Allow the engine to cool completely before service or making repairs around the engine area.
Maintenance Lubricate Grease Fittings Check Condition of Belt Note: See chart for service intervals. Service Interval: Every 50 hours 1. Stop engine, wait for all moving parts to stop, and remove key. Engage parking brake. 1. Stop engine, wait for all moving parts to stop, and remove key. Engage parking brake. 2. Lubricate fittings with NGLI grade #2 multi-purpose gun grease. 2. Inspect the belt for damage or wear.
Maintenance Cleaning Clean Muffler and Rear Frame Area Service Interval: Before each use or daily Stop engine, wait for all moving parts to stop, and remove key. Engage parking brake. WARNING Operating engine parts, especially the muffler, become extremely hot. Severe burns can occur on contact and debris, such as leaves, grass, brush, etc. can catch fire. • Allow engine parts, especially the muffler, to cool before touching. • Remove accumulated debris from muffler and engine area.
Troubleshooting Troubleshooting Important: It is essential that all operator safety mechanisms be connected and in proper operating condition prior to mower use. When a problem occurs, do not overlook the simple causes. For example: starting problems could be caused by an empty fuel tank. The following table lists some of the common causes of trouble. Do Not attempt to service or replace major items or any items that call for special timing or adjustment procedures (such as valves, governor, etc.).
Exmark Commercial Attachments and Accessories 1 Year Limited Warranty Conditions and Products Covered Exmark Mfg. Co. Inc. and its affiliate, Exmark Warranty Company, pursuant to an agreement between them, jointly warrant on the terms and conditions herein, that we will repair, replace or adjust any part on these products and found by us (in the exercise of our reasonable discretion) to be defective in factory materials or workmanship for a period of one year.
Notes: 20
Notes: 21
Service Record Date: Description of Work Done: 22 Service Done By:
G011841 Figure 10 This page may be copied for personal use. 1. The maximum slope you can safely operate the machine on is 15 degrees. Use the slope indicator to determine the degree of slope of hills before operating. Do Not operate this machine on a slope greater than 15 degrees. Fold along the appropriate line to match the recommended slope. 2. Align this edge with a vertical surface, a tree, building, fence pole, etc. 3. Example of how to compare slope with folded edge.
SEE EXMARK’S COMPLETE LINE OF ACCESSORIES AND OPTIONS MID-MOUNT RIDING ACCESSORIES AND OPTIONS CUSTOM RIDE SEAT SUSPENSION SYSTEM OPERATOR CONTROLLED DISCHARGE FULL SUSPENSION SEAT ROLL OVER PROTECTION SYSTEM (ROPS) DECK LIFT ASSIST KIT SUN SHADE HITCH KIT TRASH CONTAINER LIGHT KIT TURF STRIPER 12V POWER PORT ULTRA VAC COLLECTION SYSTEM MICRO-MULCH SYSTEM ULTRA VAC QUICK DISPOSAL SYSTEM OUT-FRONT RIDING ACCESSORIES AND OPTIONS CUSTOM RIDE SEAT SUSPENSION SYSTEM SNOW BLADE DUAL-TAIL WHEEL SN