
User`s guide


CUEMIX CONSOLE
75
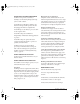
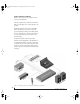
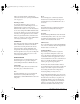
Figure 10-2: Typical hardware setup for Talkback and Listenback.
CueMix Console setup
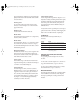
To s e t up Talkback and/or Listenback in CueMix
Console, choose File menu> Talkback settings>
Configure Talkback/Listenback to open the window
shown in Figure 10-3:
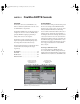
Figure 10-3: Configuring Talkback and Listenback.
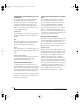
Talkback / Listenback Mic Input
Choose the audio input to which your Talkback
and/or Listenback mic is connected. These inputs
are labeled with a purple and blue swatch,
respectively, just above the channel fader.
Figure 10-4: The purple label identifies the Talkback mic input; the
blue label indicates the Listenback mic. Use the input fader to control
the mic volume.
Talkback / Listenback Monitor Dim
Choose the amount of attenuation you would like
to apply to all other audio signals (besides the
talkback volume) when Talkback and/or
Listenback is engaged. To completely silence all
other audio, move the slider all the way to the left
(-Inf).
Talk / Listen signal routing
As shown in Figure 10-3, check the boxes next to
the outputs on which you’d like to hear the
Ta l k b ac k m i c a nd / or Li s te n back mic. For example,
as demonstrated in the diagram in Figure 10-2, to
hear the Talkback mic on the headphones in the
live room, check the Analog 7-8 check box in the
Tal k column as demonstrated in Figure 10-3. To
hear the Listenback mic on the main monitors in
the control room, check the Analog 1-2 check box
in the Listen column, also demonstrated in
Figure 10-3.
Listenback
mic
Control room
Ta lkback
mic
Main
outs
Live room
Outs
7-8
Headphone distribution amp
These labels identify
the Talkback and
Listenback mic inputs.
!Traveler Manual/Win Page 75 Monday, November 29, 2004 3:50 PM