USB CD-RW Drive Installation Manual
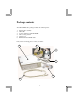
Package contents The USB CD-RW drive package includes the following items: 1. 2. 3. 4. 5. 6. The CD drive assembly USB cable A driver diskette for USB CD-ROM CD recording software AC line cord Blank CD-R and CD-RW disks If any items are missing please contact your dealer.
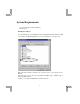
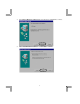
System Requirements • A computer with an enabled USB port. • Windows 98 Enabling the USB port Go to the Start menu; select Settings and then Control Panel. Double-click the System icon and select the Device Manager tab to look for USB devices, as shown below. If the Universal serial bus controller is not on the list, refer to your computer’s User’s Manual. You may need to access the system configuration (CMOS setup, or BIOS setup) to enable the USB function.
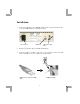
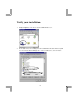
Installation 1. Connect the USB cable to the CD-ROM (small connector). First, attach the AC line cord to the CD-ROM, then to a working AC outlet. AC Connector USB Port CD Audio output Jacks. 2. Press the power button. The power LED should light up. 3. Locate the USB port (usually on the back of your computer). Connect the USB cable to the USB port on your computer. (See picture below.
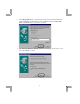
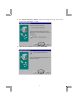
4. The Add New Hardware Wizard window should appear. Click Next to continue. 5. Select “Search for the best driver …”. Click Next to continue.
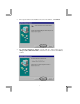
. Select Floppy disk drives, or select Specify a location A:\cdrwdrvr1.01.0023 then insert the installation diskette labeled “Onspec USBAT3 driver for CDR, CDRW, HDD”. Click Next when you are ready to continue. 7. The Add New Hardware Wizard should read the floppy and show the screen below. Click Next to continue.
8. The computer will read and install the drivers from the diskette. Click Finish. 9. The Add New Hardware Wizard program will also detect another device, “OnSpec USB to IDE/ATAPI Link”, and search for the new driver. Click Next to continue.
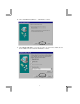
10. Select “Search for best driver…”. Click Next to continue. 11. Select Floppy disk drives or Specify a Location as shown below. Make sure the driver diskette is inserted and then click Next to continue.
12. The Add New Hardware Wizard should start reading the floppy and show the screen below. Click Next to continue. 13. After the driver installation is complete, click Finish.
Verify your installation. 1. In My Computer you should see another CD-ROM drive icon. 2. In the Start menu, select Settings and then Control Panel. Double-click the System icon and select the Device Manager tab to look for USB devices, as shown below.
Using the CD-RW with the USB interface After the very first time you install the drive, you can connect or disconnect the CDRW drive without powering off the computer. Please follow the steps below: Connecting the CD-RW drive to your computer 1. Connect the small connector to the interface connector of the CD-RW drive. 2. Connect the AC adapter plug into the DC IN jack of CD-RW; attach the AC adapter to the AC power outlet. 3. Press the power button. The power LED should light up. 4.
Adaptec program Easy CD Creator This program is beneficial for users who work mainly with CD-R. The user needs to create a CD layout first. (Audio or data CD.) Select a file(s) or audio track(s) from the upper portion of the screen and drag it/them to the lower portion. Drop the file(s) on the CD layout, and then write to the CD as the final step. Direct CD This program is beneficial for users who work mainly with CD-RW.
Easy CD Creator cannot access CD-RW drive because the Direct CD is using it. If you are working mostly with CD-R, uninstalling the Direct CD program is the best solution. How can get Adaptec User’s manual? The manual is on the CD in PFD format (in case you do not have the PDF reader, there is Acrobat reader program you can install). Also there is an on-line manual at www.adaptec.com site too.