20X Max Portable CD-ROM Drive User's Guide OPTIONS by IBM
Note: If you are using this product in the United States, Canada, or Puerto Rico, be sure to read the information under Appendix E, “Product Warranty and Notices” on page 3-16 before using this information and the product it supports. For all other countries, the warranty terms and conditions applicable in the country of purchase are available from IBM or your reseller.
Contents Safety: Read First About This Book . . . . . . . . . . . . . . . . . . . . . . . v . . . . . . . . . . . . . . . . . . . . . . . . vi Part 1: Quick Installation Guide Part 2: User's Guide . . . . . . . . . . . . . . . . . . . . . . . . . . . . . . . . . . . . . . . . . . . . . . . . . . . . . . . . 2-1 Installing the Drive . . . . . . Introduction . . . . . . . . . . External Connectors of the Drive Indicator Panel . . . . . . . . . Installation Requirements . . . Handling Instructions . . .
Part 3: Appendixes . . . . . . . . . . . . . . . . . . . . . . . . . . . . . . . . . . . . . . . . . . . . . . . . . . . . . . . . . 3-1 Appendix A. Safety Information . . . . . . . . . . . . . . 3-1 . . . . . . . . . . . . 3-11 . . . . . . . . . . . . . . . 3-13 Appendix B. Product Specifications Appendix C. Problem Solving Appendix D. Help and Service Information Step 1: Problem Solving . . . . . . . . . . Step 2: Preparing for the Call . . . . . . . . Step 3: Placing the Call to IBM . . . . . .
Safety: Read First v
About This Book This book describes how to install the 20X Max Portable CD-ROM Drive and how to use it.
Part 1: Quick Installation Guide The following is an overview of the CD-ROM drive installation instructions. For more detailed instructions, go to “Part 2: User's Guide” on page 2-1.
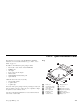
Bottom Installing the Drive For your computer to be compatible with the 20X Max Portable CD-ROM Drive, it must include the following: 7 PC Card Type II slot 3.5-inch diskette drive One of the following operating systems installed: – – – – – 1 6 2 5 3 4 If you have DOS or Windows 3.11, you need one of the following PCMCIA card support software packages: .1/ Power input jack .5/ .2/ Game port connector .6/ .3/ .4/ Interface connector Microphone jack (stereo model only) .
Attention Be sure to insert and remove the interface cable and PC Card carefully. The connectors on the interface cable are designed to be inserted in only one position; they cannot be inserted upside down. If you try to insert the connectors upside down, you might damage them. Make sure that the pins on the cable connectors are aligned with the holes in the interface connectors. If they are not aligned and you force the connection, you might damage the connectors.
b. If you are using Windows 95: Turn on the computer. Windows 95 recognizes a new drive and displays the New Hardware window. Click on OK and follow the instructions given in the dialog boxes. When the installation process completes, restart Windows 95. c. If you are using OS/2 Warp 3: 1) For the base model, insert the Option Diskette into drive A. On your desktop, double-click on the OS/2 System folder, then on System Setup, then on Device Driver Install.
e. If you are using Windows NT: e) Click on OK in the Install Driver window, and follow the instructions given on your screen. 1) For version 3.51: a) Insert the Option Diskette into drive A. b) Open the Main window, then open Windows NT Setup. Attention For Ni-Cd Battery Pack Disposal: Dispose of the battery as required by local ordinances or regulations. In the United States, call 1-800-IBM-4333 for disposal information. c) Click on Add/Remove SCSI Adapters, click on Add, then click on OK.
Part 2: User's Guide Installing the Drive Introduction When used as a CD-ROM drive, the 20X Max Portable CD-ROM Drive can operate at up to either 10 times the speed of an audio CD player (power-saving mode), or 20 times the speed of an audio CD player (normal mode). You can use the CD-ROM drive connected to your computer, or as a portable audio CD player.
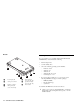
The following illustrations show the top and bottom views of the drive, identifying the connectors and controls. Bottom Top 14 1 13 7 12 2 1 6 11 9 7 5 6 .3/ .4/ .5/ .6/ .7/ 2-2 3 4 4 8 .1/ .2/ 5 3 10 2 Disk cover Speaker jack (right) (stereo model only) Open button Line output jack Headphone jack Lock button Volume control .8/ Play/pause button .9/ Stop button .1ð/ .11/ .12/ .13/ .
The following illustrations show the additional accessories which come with the stereo model. Accessories (Stereo Model Only) Removable speaker External Connectors of the Drive You can use the CD-ROM drive to read data CDs or play audio CDs. These functions are described in “Using the Drive” on page 2-25.
Indicator Panel No. Use the indicator panel to determine the operational state of the CD-ROM drive. The following illustration shows the position of each indicator on the display panel when the indicator is active. The table shows the meaning of each indicator. 1 2 3 .5/ Indicator Description On Flashing The number of the track being played. The track being played is paused. High (normal mode) is indicated when the speed is up to 20 times that of an ordinary audio CD player.
Installation Requirements Handling Instructions For your computer to be compatible with the 20X Max Portable CD-ROM Drive, it must include the following: Read these instructions to preserve and care for the CD-ROM drive: PC Card Type II slot 3.5-inch diskette drive One of the following operating systems installed: – – – – – DOS 5.0 or later Windows 3.11 Windows 95 Windows NT 3.51 or 4.0 OS/2 Warp V3 or V4 Use only the AC adapter in the options package with the drive.
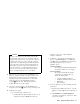
Use the following steps to connect and install the software for the CD-ROM drive. Refer to the illustrations of the top and bottom of the drive (page 2-2) to identify the external connectors and controls. Step 1. Connecting the Power Source Connecting the AC Adapter To use the AC Adapter, do the following: 1 Make sure that the power switch of the CD-ROM drive is off.
2 Connect the AC Adapter to the CD-ROM drive. To DC IN 10V 3 Connect the AC Adapter to a power outlet. 4 Turn on the power switch of the CD-ROM drive.
Installing the Ni-Cd Battery Pack To use the battery pack, follow these steps: 1 Make sure that the power switch of the CD-ROM drive is off. 2 Open the battery cover by gently pushing the two protruding clips as shown. 3 Slide the battery pack into the drive. The positive end (+) of each battery has a protrusion. This end should be opposite the springs. 2-8 20X Max Portable CD-ROM Drive Attention Do not insert the battery pack into the CD-ROM drive with the polarity reversed.
4 The battery begins to charge, and the charging ( ) indicator on the indicator panel appears. After about 5 hours, the indicator disappears, and charging is complete. Close the battery cover. Note: If the battery charge becomes low soon after charging, try to discharge the battery completely and then fully recharge it. If the charge still becomes low in a short period, the battery needs to be replaced. Contact your place of purchase to get a new one.
Attention Installing Alkaline Batteries Do not combine new and used batteries. To use alkaline batteries, follow these steps: 1 Make sure that the power switch of the CD-ROM drive is off. 2 Open the battery cover by gently pushing the two protruding clips as shown. 2-10 20X Max Portable CD-ROM Drive 3 Install six alkaline AA batteries into the battery compartment with their polarities facing as shown.
4 Close the battery cover.
Attention Step 2. Connecting the Drive This section describes how to connect the CD-ROM drive to your computer. 1 Make sure that the power switches on the CD-ROM drive and your computer are turned off. 2 Squeeze both sides of the small connector on the interface cable, and connect it to the interface connector on the CD-ROM drive, as shown in the illustration.
4 Insert the PC Card into the PC Card slot on your computer. Operating system Refer to page DOS or Windows 3.11 2-14 Windows 95 2-15 Windows NT 2-18 OS/2 Warp 2-19 Note M C P IA C E ID C P a C rd If your laptop computer has only one PC Card slot and you need a PC Card slot to connect the diskette drive, create a subdirectory on the hard disk drive and copy the Option Diskette to it.
Automatic installation The setup program will automatically install the required software into your computer. DOS or Windows 3.11 Attention 1 Selective installation The setup program installs the required software into your computer after you specify the following items: Remove any other PC Cards from your computer. The device driver cannot be installed from a Windows MS-DOS prompt. You must exit Windows 3.11 before installing the device driver.
To install the sound function of the stereo model, follow these steps : 1 Insert the Option Diskette into the diskette drive. 2 Open File Manager, select the diskette drive, and double click on the file SETUP.EXE. 3 Run Install Driver and Install Application according to the instructions on the screen. 4 When the installation is complete, restart your computer. Windows 95 This section contains installation instructions for the base model and the stereo model separately.
driver or joystick device driver already installed on your system, the setup program will recognize each device driver separately. If this happens, you will repeat steps 3, 4, and 5 until all the necessary drivers have been installed. If you have already installed a device driver for a joystick or sound card, this step may not apply to your system. occurs, the setup program will ask if you want to keep the device driver you have. Select Yes.
Duplicate Sound Functions With Windows 95, other sound functions installed in your computer do not interfere with the stereo model sound function.
Windows NT 8 Check that 20X Max Portable CD-ROM Drive is displayed; click on OK. This section contains separate installation instructions for Windows NT Version 3.51 and Version 4.0. Read the explanation appropriate to your version. 9 Click on Install. Note Windows NT does not support the stereo sound function on the stereo model CD-ROM drive. 10 Click on Continue. 11 Click on Close. 12 Select Exit in the Options window and click on OK.
Version 4.0 OS/2 Warp 1 Check that your computer and your CD-ROM drive are connected correctly; turn on your computer and your CD-ROM drive and start Windows NT 4.0. 1 Check that the your computer and your CD-ROM drive are connected correctly, and turn on your computer and the CD-ROM drive. 2 Open My Computer in the desktop double-click on the SCSI Adapter icon in the Control Panel. 2 Insert the Option Diskette (provided) into the diskette drive.
If the field contains None: For Warp Version 3: Select OTHER and go to step 9. For Warp Version 4: Select IDE CD-ROM and go to step 9. If the field does not contain None, go to step 8. 8 Installing the Audio Device Driver (Stereo Model Only) Note The sound function only works in the standard OS/2 environment; it does not work in WIN-OS/2. Close the System Configuration window. If the message Installation is not completed. Select Cancel to continue installing additional hardware or software.
For Warp Version 4: Click on Next. 4 Click on OK when installation is complete. 5 Restart your computer. 6 Insert the Option Diskette (provided) into the diskette drive. 7 Open OS/2 System and then Drive. 8 Open the diskette drive (drive A or B) into which you inserted the diskette. 9 Run MINSTALL.EXE on the Option Diskette. 14 Click on OK in the window displaying the message MMPM2 multimedia installation successful. 15 Restart your computer.
Warp Version 3 2 Select the MIDI tab, and then remove the check mark from the Default Sequencer device. 3 Click on the right arrow at the bottom right corner of the dialog window. 4 Select MID in the Current extensions. 5 Move the cursor to the Next extension. Then press the Space bar and the click on Remove. 6 Select the MIDI 2 tab. Then check the Default Sequencer device. For Digital Audio (WAVE) setup: 1 Open Multimedia Setup in the Multimedia folder.
Warp Version 4 2 Select the MIDI tab. Then remove the check mark from the Default Sequencer device. 3 Click on the + mark at the top right corner of the dialog window. 4 Select MID in the Current extensions. 5 Move the cursor to the Next extension. Then press the Space bar and click on Remove. 6 Select the MIDI 2 tab. Then check the Default Sequencer device. For Digital Audio (WAVE) setup: 1 Run STPM.EXE in the MMOS2 directory. 2 Select the Digital Audio tab.
Optional Device Driver Settings Step 4. Completing the Installation The following options can be specified for the CD-ROM device driver: /P:nn I/O base address. The sound function is mapped from this address (hexadecimal). /EXIRQ:n The specified IRQ number is excluded. Another IRQ number is assigned to the sound function. /NOBEEP The device does not beep at insertion of the PC card.
Using the Drive 3 Insert the disk as shown. Be careful to hold the CD only by the outside or inside edges. Fit the disk to the center pivot. Firmly press the disk down until you hear it click into place. 4 Close the cover. Inserting and Removing the Disk To insert a CD-ROM or audio CD: 1 2 Press the Open button to release the CD cover. Lift the CD cover up until it snaps into the open position.
To remove a CD: 1 Press the Open button to open the disk cover. 3 Attention Do not touch the disk until it comes to a complete stop. 2 2-26 Lift the disk by its edge while pressing the pivot. 20X Max Portable CD-ROM Drive Close the cover.
Switching to Power-Saving Mode Changing Modes You can switch between normal mode (up to 20 times the speed of an ordinary CD player) and power-saving mode (up to 10 times the speed of an ordinary CD player) with the Mode Selection button. The default mode (data transfer rate) varies with the type of power supply.
Mounting the Speakers (Stereo Model Only) 2 Rotate the angle of each speaker as desired. With the removable speakers attached to the stereo model, you can listen to an audio CD or to PCM/MIDI sounds generated by your computer. You can either mount the speakers directly onto the CD-ROM drive, or you can mount them on the included clips, which you can use to attach the speakers to the sides of your portable computer.
Mounting on the Speaker Clips 1 2 Fasten each clip to its speaker with the screw. With a coin, tighten the screw firmly clockwise. Attach each speaker to a speaker clip, as shown below.
3 Connect the CD-ROM drive to the speakers with the speaker cables. Using the CD-ROM Drive Before using the unit as a CD-ROM drive, confirm the following: Has the required software been installed? (See page 2-13.) Is the power source connected? (See page 2-6.) Keep the following points in mind before using the CD-ROM drive: You can now clip the speakers to the sides of your laptop monitor, to enhance your enjoyment of the stereo sound.
You can remove the PC Card while your computer is on. Do not remove the PC Card while the CD-ROM is being accessed. You might damage the drive. 3 Open the disk cover and insert a CD-ROM disk. With DOS The following message is displayed, and a drive letter is assigned to the CD-ROM drive. The CD-ROM drive uses the letter D in the following cases: MSCDEX version 2.25 Copyright (C) Microsoft Corp. 1986-1995, All rights reserved. c. Click on the CD-ROM icon and check the access to the CD-ROM.
Playing a Game (Windows 95 Only) 1 Check that the CD-ROM drive is off, and connect a joystick or gamepad to the game port connector. 2 Connect the interface cable to the PC Card and the CD-ROM drive (see page 2-12). Then turn on the CD-ROM drive. 3 Insert the PC Card into your computer (see page 2-13) and start your computer. 4 Open Control Panel in My Computer, double-click on the Joystick icon, select the type of your device, and run Calibrate and Test.
With OS/2 Warp 1. Open Multimedia. 2. Select and start Compact Disk. For more information, refer to the OS/2 manual. With Other Operating Systems Using the CD-ROM Drive as a Stand-Alone Audio CD Player To use the CD-ROM drive to play an audio CD, use the buttons on the front of the drive. The table below gives the name of each button and the icon depicted on it, and gives a description of each button's function.
Guard-Against-Dropout Function Slight shocks to a CD player can cause the audio track to hesitate. The 20X Max Portable CD-ROM Drive has a special function to reduce this kind of dropout. The CD-ROM drive reads ahead on audio CDs and keeps 2.8 seconds of the current track in memory. This reduces interruptions to playback that can occur if the CD-ROM drive is moved or bumped. Attention Do not set the CD-ROM drive near electronic equipment.
Volume control Mixer Balance control 7 Select Save as and specify a file name. You can save the recording as a WAVE file. Audio Recorder Recording Control Input selection Master volume adjustment Mute button Balance control Volume adjustment You can also mix recordings from your CD with a live recording in digital. For further information, see “Digital Recording.” Digital Recording 1 Open Recording Control and Audio Recorder. 2 Select the sound source to be recorded from Recording Control.
Maintaining the Drive Use the following instructions to clean your drive and CDs: Cleaning the Surface of the CD-ROM Drive: Lightly wipe the CD-ROM drive with a dry soft cloth. If stains remain on the surface, use a damp cloth (soak cloth in a diluted mild detergent and squeeze it firmly). Do not use solvents such as thinner, alcohol, and benzene. They cause deformation and discoloration. Cleaning the Lens: If the lens is dirty, the CD-ROM drive might not operate correctly.
Part 3: Appendixes Appendix A. Safety Information name=d3qy9501depth=24p. Copyright IBM Corp.
3-2 20X Max Portable CD-ROM Drive
Part 3: Appendixes 3-3
3-4 20X Max Portable CD-ROM Drive
Part 3: Appendixes 3-5
3-6 20X Max Portable CD-ROM Drive
Part 3: Appendixes 3-7
3-8 20X Max Portable CD-ROM Drive
Part 3: Appendixes 3-9
3-10 20X Max Portable CD-ROM Drive
Appendix B. Product Specifications Basic Model Data transfer rate Basic Model Power supply Interface Type II PC Card (IDE) Buffer size Storage environment Error rate Outside dimensions (mm) Weight Access rate Guard-against-dropout function MPC3-compliant 512KB Temperature: 5 to 40°C Battery life Humidity: 8 to 80% Temperature: −20 to 60°C 95% Humidity: 5 to 10xE-12 or less (hardware failure) 10xE-9 or less (software error) 130.5 (width) × 203.5 (depth) × 32.
Basic Model I/O terminal Game port Stereo Model PHONE OUT LINE OUT Game port PHONE OUT LINE OUT Game port MIC IN (Mono) LINE IN Speaker D-SUB 15-pin Quantizing bit count 16-bit, 8-bit Sampling frequency 11∼44.1 KHz S/N ratio 75 dB 1W+1W Speaker output Headphone output Line output 8 mW–8 mW 16Ω 0.
Appendix C. Problem Solving Problem Response No indicator appears when the power is turned on. The CD-ROM drive is not recognized on your computer. The CD-ROM fails to operate. Check if the AC Adapter is connected correctly. (See page 2-6.) Check if the batteries are inserted correctly. (See page 2-10.) Check if the battery pack is fully charged. (See page 2-8.) Check if the batteries are dead. Check if the required software is installed correctly. (See page 2-13.
Appendix D. Help and Service Information During the warranty period, you can get toll-free technical support 24 hours a day, 7 days a week, to answer any questions about your new IBM option. If you need warranty service, return or exchange is available. In addition, if your IBM option is installed in an IBM computer, you might be entitled to service at your location. Your technical support representative can help you determine the best alternative.
Step 3: Placing the Call to IBM Technical support is available during the warranty period to answer any questions about your new IBM option. Response time will vary depending on the number and nature of calls received. Marketing, installation, and configuration support will be withdrawn from the PC Company HelpCenter 90 days after the option has been withdrawn from marketing. Online Technical Support IBM PC Company Web Page www.us.pc.ibm.
Appendix E. Product Warranty and Notices Machine: 20X Max Portable CD-ROM Drive Warranty Period*: One Year *Contact your place of purchase for warranty service information. Warranty Production Status The following warranty information applies to products purchased in the United States, Canada, and Puerto Rico. The warranty terms and conditions applicable in the country of purchase are available from IBM or your reseller.
equivalent, without charge. The replacement may not be new, but will be in good working order. If IBM or your reseller is unable to repair or replace the Machine, you may return it to your place of purchase and your money will be refunded. If you transfer a Machine to another user, warranty service is available to that user for the remainder of the warranty period. You should give your proof of purchase and this Statement to that user.
Circumstances may arise where, because of a default on IBM's part or other liability you are entitled to recover damages from IBM. In each such instance, regardless of the basis on which you are entitled to claim damages from IBM (including fundamental breach, negligence, misrepresentation, or other contract or tort claim), IBM is liable only for: 1. damages for bodily injury (including death) and damage to real property and tangible personal property; and 2.
Multimedia Presentation Manager MMPM/2 The following terms are trademarks of other companies: Microsoft, Windows, Windows 3.11, Windows NT, and Windows 95 are trademarks or registered trademarks of Microsoft Corporation. Other company, product, and service names may be trademarks or service marks of others.
Electronic Emission Notices 20X Max Portable CD-ROM Drive Federal Communications Commission (FCC) Statement Note: This equipment has been tested and found to comply with the limits for a Class B digital device, pursuant to Part 15 of the FCC Rules. These limits are designed to provide reasonable protection against harmful interference in a residential installation.
European Union - Emission Directive This product is in conformity with the protection requirements of EU Council Directive 89/366/ECC on the approximation of the laws of the Member States relating to electromagnetic compatibility. IBM can not accept responsibility for any failure to satisfy the protection requirements resulting from a non-recommended modification of the product, including the fitting of non-IBM option cards.
( ) (VCCI) 3-22 20X Max Portable CD-ROM Drive
IBM Part Number: 4304493 Printed in U.S.A.