
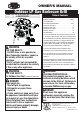
User Manual

8
Assembly Instructions
Do Not Return To Place of Purchase
1
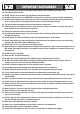
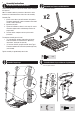
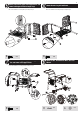
Assemble Shorter Legs and Shorter Leg Connector
4
Assemble Longer Legs
3
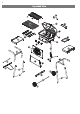
Assemble Cart Frames and Side Shelves
2
Please have your owner’s manual and model number available
for reference.
Note: The model number is printed on a label which can be
found on the inside door, back or side of the cart assembly.
Assembly Tips:
1. Select an area where you will assemble this product.
To protect components, choose a smooth surface that’s
free of cracks or openings.
2. Spread out all parts.
3. Tighten all hardware as direct in each step. Be careful
not to over-tighten which could damage surfaces or
strip threads.
4. For best results, complete each step in the order
presented.
To complete assembly you will need:
• (1) Leak detection solution (instructions on how to
make the solution are included in the “Operating
Instructions” section of this manual).
• (1) Precision-filled LP gas grill tank with Acme Type 1
external threaded valve connection (standard grill size)
(not included).
Typical assembly is approximately 30 minutes.
A
10
19
24
24
A
x 4
x2
B
D
Notch upside
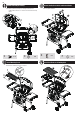
26
26
27
D
x 2
B
x 2
Note: Fully tighten hardware.
Note: Fully tighten hardware.