LiveStrings User manual Set up and use instructions for LiveGuitar, LiveCello and LiveBass
Introduction Thank you for purchasing a LiveStrings H-clamp The H-clamp opens a whole new world of tonality and freedom that may take years to explore fully. And for many more years it should continue to give reliable service.
© 2012 Exploraudio, all rights reserved Under copyright law this manual may not be copied, in whole or in part, without the written consent of Exploraudio. The LiveStrings H-clamp product is a registered design: Europe 000523253 USA 29/268,045 Canada 117958 Australia 14875/2006 New Zealand 408251 Japan 2006-29415 China 200630189418.8 Exploraudio, LiveStrings, LiveGuitar, LiveCello, LiveBass, BlueStrings, BlueAir and H-clamp are Trademarks of Exploraudio.
Contents The instructions for assembly and basic use are the same for all three versions of the LiveStrings H-clamp (LiveGuitar, LiveCello and LiveBass). Advice about how to get the best from the LiveStrings H-clamp for your instrument is provided in separate sections for each model. Section Page 1. Assembly 5 2. Attaching the optional shockmount 9 3. Fitting & using the H-clamp 13 4. Your instrument 27 4a. Advice for LiveGuitar 29 4b. Advice for LiveCello 37 4b.
4
1 Assembly H-Clamp’s components are packed separately for transport and comprise: 1 2 3 4 5 Top clamp disk & shaft assembly Bottom clamp disk Clamp tightening screw Boom Shockmount (optional) and/or Accessories The length of the shaft of component 1 depends on the model you have chosen (as shown in the diagram). 5 1 4 ar™ uit eG Liv ™ ello eC Liv 3 a eB Liv ss™ 2 Component 5 is a bag of accessories only, unless you have also selected the optional multi-purpose shockmount.
1. 2. 3. 4.
To assemble the LiveStrings H-clamp: 1. Remove all components from the box and using the diagram and contents list on page 5, check that they are all correct 2. Take components 1 and 2 and place the shaft of 1 through the centre of 2 so that the disk stalks are facing each other 3. Take component 3 and screw it into the end of the shaft of component 1 4.
8
Attaching and using the optional multi-purpose shockmount 2 The multi-purpose shockmount included as an optional extra with the Hclamp simply screws onto the end of the H-clamp’s boom. The multi-purpose shock mount can be used for instrument or vocal microphones with barrel diameters of between around 20mm and 28mm. It can also be used with most styles of lavalier (tie clip or button) microphone or Bluetooth headsets (see product information at exploraudio.com for more details about compatibility).
Lavalier (tie clip or button) microphones and Bluetooth headsets can be fitted in a variety of different ways, depending on the shape and size of the device and the attachment options (if any) it offers. When in use, the combination of the optional multi-purpose shockmount’s hinged joint and the H-clamp’s own adjustments means microphones held in the shockmount can be positioned in any orientation relative to the instrument.
Bluetooth headsets can be used as wireless instrument microphones by securing them in the optional multi-purpose shockmount. Despite the diverse range of Bluetooth headset styles available, it should be possible to find a way to fit practically any of them into the multi-purpose shock-mount, either as it is supplied or by changing the configuration of the suspension elastic to trap the headset in the mount more securely. The pictures show suggested fitting options for a variety of different styles of headset.
12
3 Fitting & using the H-clamp The H-Clamp has been designed to be as simple as possible to use and has a number of features to protect both your instrument and any microphones used with it, from accidental damage. In normal use in accordance with the instructions contained in this manual, the H-clamp should be completely safe for use with any of the instruments for which it was designed.
The microphone and clip / mount combinations shown on the previous page illustrate the range of possibilities for using different types of microphone with the H-clamp. Anything from the lightest lavalier (tie clip / button style) microphone to some of the largest studio condenser mics can be used with the H-clamp. But the heavier and more bulky the microphone, the more care must be taken when attaching it to your instrument.
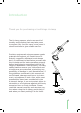
To attach the H-clamp: 1. Screw the H-clamp’s boom into the chosen microphone’s clip or shock mount, ensuring it is tightened sufficiently to prevent the weight of the microphone from causing it to untighten (if necessary, re move the boom from the H-clamp temporarily to twist it into the clip / mount tightly). 2. Select the most obvious position on your instrument for attaching the H-clamp (see the notes for your own particular instrument in Section 4). 3.
7. Ensure the clamp is tightened sufficiently to prevent it falling off when the selected microphone is attached to the boom but do not over-tighten. It is unlikely that sufficient force can be applied to damage the instrument but if in doubt always consult a specialist dealer, maker or repairer of similar instruments. Also ensure the boom itself is held tightly enough to prevent it from dropping onto the instrument under gravity when the microphone is attached. 8.
Alternatives to the standard fitting method Once the general principles of how the H-clamp is fitted and adjusted have been grasped, its use is largely intuitive and each user will find their own preferred methods for fitting and adjustment. One alternative approach to fitting the Hclamp is to insert the boom in it’s grip from the opposite side and turn the whole clamp upside down, as shown.
Weight restrictions All LiveStrings H-clamps are designed to hold microphone & clip / shockmount combinations weighing up to 0.5Kg. Up to at least this weight, the H-clamp boom can be used with care in any position. Beyond this, the boom should be used in the ‘captive boom’ position that causes it to lock in the top disk’s boom slot under the weight of the microphone attached to it.
General precautions IMPORTANT: Whatever microphone is attached to the H-clamp, it is essential to check that the H-clamp is fitted securely before moving the instrument. Ensure the microphone and/or H-clamp itself will not move when the instrument is being carried or laid down. Particular care must be taken with large microphones.
CAUTION Tapering or domed instruments: With most instruments, there is little restriction on the position around the sound box where the H-clamp can be fitted. Tapering tends to be more of an issue along the sides of the However, for instruinstruments such as guitars (not normally significant for celments with sound los or double bases). boxes that are considerably deeper (front to back) at one end than another or that have domed sound boards or backs, more care may be needed in positioning the Hclamp.
The following additional general precautions should be observed for instruments with prominent tapering or doming. 1. Check that the H-clamp’s disks are able to remain parallel with both upper and lower edges of the sound box as the clamp is tightened. If not, take further precautions: 2. Tighten the H-clamp as hard as possible without risking damage to the instrument.
CAUTION Heavy microphones: Many microphone and clip or shockmount combinations can be fitted to guitars using the H-clamp without any special precautions. But heavier microphones need to be handled with more care. Typical professional vocal microphones and large diaphragm studio microphones are both bulky and heavy. As long as the clamp can be tightened sufficiently securely, it is possible to mount these safely on an instrument using an H-clamp but the following additional precautions must be taken. 1.
4. The heavier the microphone, the less likely it is that it will be possible to use the H-clamp with its boom extended horizontally. There is no universal rule for when a microphone is too heavy to be held in this orientation. For most instruments, it should be possible to mount a professional vocal microphone with the H-clamp boom extended fully horizontally.
Accessories provided with the H-clamp. The accessories provided with the H-clamp are not necessary for its function but are either helpful when the H-clamp is in use or are spares of items that could conceivably be lost at some stage during the product’s long life. All LiveStrings H-clamp models include cable tidy / strain relief accessories (the elastic loops and the velcro straps) and spare clamp disk ‘O’-rings. All LiveCello and LiveBass H-clamps also include silicone sleeves.
Cable tidies: Both the elastic loops and the Velcro straps can be used as cable tidies. Suggested uses are shown in the pictures below. Although it is possible to use the Velcro straps to provide limited strain relief on microphone cables by using them to strap the cable to the Hclamp, this is not recommended. The strain relief method described earlier is much more effective as it prevents tugs on the cable being transferred to either the microphone or the H-clamp.
26
4 Your instrument The basic operation of the LiveStrings H-Clamp is much the same for all models but the range of instruments to which it can be fitted is too diverse to make generalisations about all aspects of its use. In the forthcoming sections, the use of the H-clamp is described with reference to your own particular model.
28
LiveGuitar H-clamp 4a The LiveGuitar H-clamp’s standard shaft length is optimised to allow it to be mounted on the widest possible range of acoustic guitars. It can be adjusted to fit widths: 84mm - 116mm The standard shaft should fit all but the shallowest or deepest of acoustic guitar sound boxes but if your instrument falls outside these limits, adapters can be purchased separately to extend the useable range to fit both narrower and wider guitars.
Positioning the H-clamp The H-clamp can be positioned anywhere on the guitar where its circular jaws can be tightened securely without damaging the instrument. General guidelines for ensuring safe use are provided in Section 3 (“Fitting and using the H-clamp”).
Microphone mounting considerations With relatively light microphones, such as lavalier (button / tie-clip) or professional instrument microphones, there should be no real restrictions on where the H-clamp is attached on the body of the guitar. Nor should any boom orientations cause significant problems, though as noted in Section 3, greater care is required to ensure the clamp is fitted securely when the sides of the body taper (or are domed) and/or when the boom is extended horizontally.
Cable considerations Following the precautions described in Section 3 (“Fitting and using the Hclamp”) should prevent any damage to either guitar or microphone but the H-clamp is also supplied with simple accessories for improving safety and convenience. Any microphone or guitar cable presents a potential tripping or snagging hazard.
When fitted properly, the Velcro strap strain reliever on the strap button should prevent most accidental jerks on the cable from being transmitted to the H-clamp. The strain reliever can be used with or without a guitar strap and although one strain reliever should be more than adequate for most circumstances, a second can be fitted (in the same way) to the other strap button.
Common uses for the LiveGuitar H-clamp The H-clamp’s design is based on circular clamps used by stringed instrument makers to hold the edges of the sound box together very tightly while the glue that fixes them together sets. The circular clamp jaws mean that it can be fitted very quickly and easily to any location around the body of the guitar.
A) On stage (continued) 3. Microphone blended with on-board pick-up. Best for group performances where the higher volumes required create problems with feedback or where the pick-up is used for the live sound but a microphone recording is needed for studio mixing later. 4. Wireless microphone. For total freedom on stage, use a conventional wireless microphone (lapel / button or standard vocal).
36
LiveCello & LiveBass H-clamp 4b LiveCello and LiveBass H-clamps are designed to fit essentially all standard acoustic versions of these instruments. Their respective adjustment ranges are as follows.
Positioning the H-clamp The H-clamp can be positioned anywhere on the instrument where its circular jaws can be tightened securely without causing damage. General guidelines for ensuring safe use are provided in Section 3 (“Fitting and using the H-clamp”).
Microphone mounting considerations With lighter microphones, there is little restriction on how or where they are mounted. As long as the H-clamp jaws and boom grip are tightened securely, the microphone should remain in position regardless of how the instrument moves while being played, with the obvious exception of the kind of upright bass spinning practised by some ‘rockabilly’ exponents.
Cable considerations Following the precautions described in Section 3 (“Fitting and using the H-clamp”) should prevent any damage to either instrument or microphone but the H-clamp is also supplied with simple accessories for improving safety and convenience. Any microphone or pick-up cable presents a potential tripping or snagging hazard.
Common uses for the LiveCello and Live Bass H-clamps The H-clamp’s design is based on circular clamps used by stringed instrument makers to hold the edges of the sound box together very tightly while the glue that fixes them together sets. The circular clamp jaws mean that it can be fitted very quickly and easily to any location around the body of the instrument.
A) On stage (continued) 3. Wireless microphone. For total freedom on stage, use a conventional wireless microphone (lapel / button or standard vocal). Alternatively, any Bluetooth headset can be used as a wireless microphone in combination with a BlueAir Bluetooth Audio Adapter (visit exploraudio.com for details) 4. Multiple microphones (with or without onboard pick-up). For capturing the live performance in a way that offers maximum flexibility and tonal options in subsequent studio mixing. B) Studio 1.
43
www.exploraudio.