
User manual


7
To assemble the LiveStrings H-clamp:
1. Remove all components from the box and using the diagram and con-
tents list on page 5, check that they are all correct
2. Take components 1 and 2 and place the shaft of 1 through the centre
of 2 so that the disk stalks are facing each other
3. Take component 3 and screw it into the end of the shaft of
component 1
4. Take component 4 (the boom) and push it through the boom grip on
the top of component 1 so that the screw thread on the end of the
boom is at the opposite side of the boom grip to the slot in the disk.
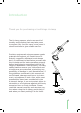
The H-clamp
should now look
like this picture
and is ready for
use.
NB: Before use,
ensure the shaft
of component 1 is
screwed tightly into
its disk (the top
disk).
The ‘O’-ring supplied with all H-clamps is a spare for the small ‘O’-rings on
the clamp jaw disks. Use of the other accessories is explained on page 24
and in Section 4.
The accessories provided exclusively with LiveCello and LiveBass (silicone
sleeves) are solely to provide extra protection for the ‘lip’ on the edge of
the sound box of these instruments. Acoustic guitars do not normally have
‘lips’ of this kind and do not need any additional protection. If you are us
-
ing a LiveGuitar H-clamp with an instrument that has a ‘lip’ similar to those
on cellos and double basses and would like to have the added protection
provided by this accessory, it can be purchased from the Exploraudio web
site (exploraudio.com) or by writing to Sales at the address on page 2.
Clamp tightening screw
Boom grip tightening screw
Boom Grip
Shaft
Clamp jaws - Bottom disk
Clamp jaws - Top disk
Boom