Instruction Manual
WELCOME TO THE WORLD OF EXPLORATION. www.explorescientific.
Welcome To The PMC-Eight™ With the PMC-Eight™ OpenGOTO system in your arsenal of astronomical tools flawlessly navigating the skies has never been easier. Designed to meet the versatile needs of astronomers of all levels, this advanced GOTO system is a clean slate approach to precision motion control technology that maximizes the potential of your optical equipment. The robust electronics that power the PMC-Eight™ include eight CPUs that are independently dedicated to performing set functions.
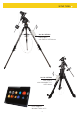
SETUP TYPES Art. No. 0456200 PMC-Eight™ with EXOS-2 GOTO Mount Art. No.
GENERAL WARNINGS RISK of ELECTRIC SHOCK Never bend, pinch or pull the power and connecting cables, extensions and adapters. Protect the cables from sharp edges and heat. Before operating, check the device, cables and connections for damage. Never use a damaged unit or a unit with damaged power cables. Damaged parts must be exchanged immediately by an authorised service centre. Only use the device in complete dry environment and do not touch it with wet or moist parts of your body.
QUICK START PMC-Eight™ System Quick Start Guide Although the PMC-Eight™ is a complex precision motion control system, it is simple to set up. Step 1: Choose Your Platform Before using the PMC-Eight™, you will need to select and load your operating program of choice to your device. Our intuitive ExploreStars app can be downloaded for free from the Windows App store. Once installed, you will simply download the object database from www.explorestars.com and you are ready to go.
SYSTEM SETUP Welcome to the PMC-Eight™ System! The PMC-Eight™ is a precision motion control system designed to flawlessly navigate the night sky and ensure you spend more time observing and imaging. Astronomical GOTO systems play an important role in the world of amateur astronomy. A GOTO mount works with a variety of software platforms to move an attached telescope to a specific celestial object that is chosen by the observer from a vast database of potential targets.
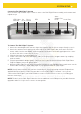
SYSTEM SETUP Connecting The PMC-Eight™ System Once the telescope is balanced, it is time to connect the PMC-Eight™ box assembly to the mount and tripod set-up. AutoGuider Port LED Lights 12v Reset (ST4) DEC RA Serial Port Indicator DC In Button To Connect The PMC-Eight™ System: 1. Attach the mounting bracket onto one leg of the tripod, using the Velcro strap to firmly secure it. 2.
SYSTEM SETUP Changing The WiFi Channel In most instances, the pre-set WiFi channel should work perfectly well when operating the PMCEight™ wirelessly. However, if you are in an area where a lot of wireless activity is occurring, you may need to switch the pre-set WiFi channel. To Change The WiFi Channel: 1. Use a pen or a paperclip to push the reset button that is inset on the back of the PMC-Eight™ box near the connection lights.
EXPLORE STARS APP Welcome to ExploreStars! Designed specifically for the PMC-Eight™, the intuitive ExploreStars app will streamline your observing experience by making it easy to align your equipment, navigate the stars and learn specifics about tens of thousands of celestial objects. It also leaves room for manual operation. Installing The ExploreStars APP The free ExploreStars application can be downloaded from the Windows app store onto your Windows device.
EXPLORE STARS APP Point Mode and Track Mode There is an advanced feature in the ExploreStars application that ensures accurate tracking rates are maintained when a proper physical polar alignment is not obtained and you are performing the 2 or 3 Star Alignment procedure. There are two tracking modes available called Track mode and Point mode.
EXPLORE STARS APP object, select “Target Info” in the bottom right corner. To exit the tour, simply press App Bar. Coordinate Input: To move to specific coordinates, select “Coordinate Input” from the bottom menu options. This will bring you to the coordinate entry screen where you can enter either RA/DEC or ALT/AZ information in either decimal or hms format. Once you submit your information, the destination of the telescope will be displayed on the screen as it slews.
ASCOM ASCOM Driver Although Explore Scientific has developed its own app — ExploreStars — to operate the PMC-Eight™, we recognize that the astronomy community is a diverse one. That is why we also offer an ASCOM driver so users may employ the ASCOM-powered planetarium software of their choosing to run the PMC-Eight™. With this driver, the PMC-Eight™ is compatible with a wide range of guidance software programs built around the industry standard ASCOM interface.
ASCOM 16. On the diagnostic programs’ top menu find “Choose Device” and “Choose and Connect to Device”. 17. This will bring up the programs window. Find and push the “Choose” button. 18. The ASCOM Chooser window will display. Find and select “ES_PMC8.Telescope” in the drop-down list. (Figure 1.) 19. Push the “Properties” button and display the PMC-Eight™ ASCOM Driver Configuration window. (Figure 2.) Figure 1. ASCOM Telescope Chooser window. Figure 2.
ASCOM / PROGRAMMING ReleaseComObject GC Collect GC Collect Releasing COM instance Starting garbage collection Completed garbage collection 29. Close the “Device Connection Tester” window 30. Exit the ASCOM Diagnostics program. 31. Reset your network settings to your normal SSID if you are not going to use the PMC-Eight™ any further, otherwise, start up your ASCOM planetarium client or other type of ASCOM client and connect to the PMC-Eight™ using the ASCOM chooser available in that client.
EXOS II MOUNT SET UP / POLAR ALIGNMENT PROCESS EXOS II GT w/PMC-Eight™ System Mount Set Up 1) 2) 3) 4) 5a) 5b) 5c) 6a) 6b) 7a) 7b) 7c) 7d) 8) 9) 16
EXOS II MOUNT SET UP / POLAR ALIGNMENT PROCESS 4. R.A. Lock 1. Dec. Lock 6. Polar VF Cap 3. Latitude Dial 2. Latitude Adjustment Handle 5. Azimuth Control Knobs Fig. 1a Setting the Polar Home Position 1. 2. 3. 4. 5. Level the mount by adjusting the length of the three tripod legs. Use the included bubble level to assist in this leveling. Unlock the R.A. Lock (4, Fig. 1a) Rotate the Optical Tube Assembly until the counterweight shaft is pointing straight down over the mount.
EXOS II MOUNT SET UP / POLAR ALIGNMENT PROCESS Finding the Polar Star (for Northern Hemisphere only) Star hopping is a technique used by amateur astronomers to navigate the night sky. By using easily recognizable constellations and asterisms as a guide, an observer can locate stars and other objects. Polaris, which is commonly referred to as The North Star, can be located quickly using star hopping.
EXOS II MOUNT SET UP / POLAR ALIGNMENT PROCESS Polar Viewfinder Reticle (for Northern Hemisphere Only) Southern Hemisphere users will need a crosshair reticle eyepiece. Available at astronomy shops. Not Aligned Fig. 3b CEPHEUS Polaris 40’ 60’ Polaris Rotate Image on polar viewfinder will be inverted. Aligned URSA MINOR DRACO URSA MAJOR Fig.
Manual_0456000-0456200_PMCEight_en_EXPSC_v052018a. Map Design: - Uranography & Graphic Design - Website: www.wil-tirion.com www.explorescientificusa.com www.explorescientific.com/pmc-eight ©2017 Explore Scientific, LLC. All model names and logos are registered trademarks.