
User Manual


8
SYSTEM SETUP
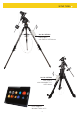
Connecting The PMC-Eight™ System
Once the telescope is balanced, it is time to connect the PMC-Eight™ box assembly to the mount and
tripod set-up.
To Connect The PMC-Eight™ System:
1. Attach the mounting bracket onto one leg of the tripod, using the Velcro strap to firmly secure it.
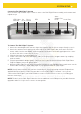
2. Attach the antenna into its port on the front side of the PMC-Eight™ box, then attach the DB9
motor cables into the two middle connection points on the back of the box and tighten the screws
on either side of the connectors to secure.
3. Slide the box onto the mounting bracket.
4. Connect the other end of the DB9 motor cables to the ports on the stepper motors by coupling
male to female.
5. Plug the provided AC adapter power connector into its port on the back of the PMC-Eight™ box.
Plug the adapter into an AC power outlet.
6. When the PMC-Eight™ is on, go to the network settings on your Windows device and connect to the
mount’s WiFi network — SSID: PMC-Eight-xx. The password will be “PMC-Eight”.
NOTE: You will want to make sure you have installed your chosen operating software (ExploreStars
app/ASCOM Driver) before connecting your device to the PMC-Eight™ “network.” Once you are
connected to PMC-Eight™ you will be unable to connect to other wireless sources, including your
Internet connection”.
NOTE: The back of the PMC-Eight™ box also has an additional serial DB9 port for possible firmware
upgrades and a RJ-12 jack for to connect an auto-guider.
Serial PortRADEC
Reset
Button
12v
DC In
LED Lights
Indicator
Auto-
Guider Port
(ST4)