
User's Manual


5
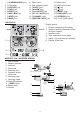
Install the wireless 5-IN-1 sensor in an
open location with no obstructions above
and around the sensor for accurate
rain and wind measurement. Install
the sensor with the smaller end facing
the North to properly orient the wind
direction vane.
Secure the mounting stand and bracket
(included) to a post or pole, and allow
minimum 1.5m off the ground.
1.5 meter off
the ground
A
dd rubber
pads before
mount on
the pole
Point to
NORTH
POWER UP CONSOLE
Your console can pairing up with the wireless 5-IN-1 outdoor weather sensor and up to 7
optional wireless sensors. (Not included)
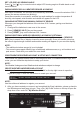
INSTALL THE BACKUP BATTERY
1. Remove the battery door of the console.
2. Insert a new CR2032 battery as per the polarity information marked on the battery
compartment.
3. Replace the battery door.
NOTE:
The backup battery can backup: Time & Date, Max/Min & Past 24 hours weather records, Alert
setting values, offset value of weather data and Sensor(s) channel history.
The built-in memory can backup: Router setting and Weather server setting
POWER UP THE CONSOLE
1. Plug the power adapter USB plug to power up
the main unit.
2. Once the main unit power up, all the segments
of the LCD will be shown.
3. The console will automatically start AP mode.
USB cable
NOTE:
If no display appears on the LCD after you plug the adaptor, press [ RESET ] key by using a
pointed object.
TABLE STAND INSTALLATION
The unit is designed for
desktop or wall mount for easy
viewing. follow the steps to
hook the table stand on the
botton of the console.
Step 1 Step 2