
Instructions / Assembly


UV Bulb
1. Unplug the power cord from the power outlet. DO NOT Unscrew the metal cap.
2. Carefully and slowly pull the black plastic cap off the UV Sterilizer (the bulb may come out with the
cap, if it does not tilt the system until the white ceramic portion of the bulb is accessible).
3. Unplug the power cord from the UV Bulb and dispose of the old bulb.
4. Connect the new UV Bulb to the power cord.
5. Carefully push the new UV Bulb into the UV Housing though the opening in the metal cap. Then
slowly push the black plastic cap back on to the sterilizer.
6. Reconnect the power cord to power outlet.
UV Ballast
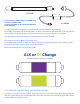
ALK or DI Change
(Recommended change 6 months)
1. Now disconnect the Stem Elbows from each side of the filter.
2. Note the orientation of the old filter, install the new filter in the same orientation. Remove the old
filter from the holding clips and discard. Next, insert the new filter into the holding clips and connect
the Stem Elbows to the new filter.
DO NOT TOUCH THE BULB DIRECTLY, HANDLE WITH
THE WHITE CERAMIC AREA
DO NOT LOOK DIRECTLY AT THE UV BULB WITHOUT
EYE PROTECTION