RO Countertop System Installation Manual Customer Support 1-800-992-8876
Reverse Osmosis Overall System Connections Your drinking water is going to be healthier and taste better from now on, and nothing makes us happier. Getting started is a breeze— your Reverse Osmosis System is already assembled and you just need to make a few connections before you’re ready to go. Express Water’s Countertop RO is the easiest simplest solution for safe clean water in your home. We know life isn’t always so simple though. If you have questions during your setup we can help.
Connection Points A to B Connect the WHITE Tubing from the Diverter Valve Out (Point A) to the Sediment Filter’s IN (Point B) C to D Connect the BLACK Tubing from the Diverter Valve In (Point C) to the Union Connector (Point D) A Diverter Valve Out Flow B Sediment Filter In Flow C Divert Valve In Flow D Union Connector
Conditions READ THIS FIRST Please pay attention to the following installation and safety recommendations: - Read the installation manual before installing this system. NOTE! Please make sure your installation location has enough room for the RO Countertop System. We suggest an installation location where the RO Faucet can overhang your sink. Incoming Water Incoming water pressure must be between 45 PSI and 80 PSI. If your water pressure is under 45 PSI you will need a booster pump on your system.
Table of Contents Introduction Components List System Diagram Tubing Quick Connect Guide Installation Diverter Valve RO Faucet Page 8 Page 10 Page 11 Page 12 Page 13 Page 13 Using the System Page 14 System Startup Page 14 System Maintenance Page 15 Page 15 Page 16 FAQ Warranty Page 17 Page 18 Filter Change Instruction Troubleshooting
Introduction First, get ready to have safe clean water. You’re going to need under 30 minutes for the initial installation and two hours to run the system and flush out your filters before you can drink the water. Take a Look at Your System First inspect your system and make sure all parts are present and have not been damaged during shipping.
Replacement Sets Express Water offers replacement filter sets for the EZRO5 Countertop Reverse Osmosis Water FIltration System. For purchasing information on replacement filters please visit our website at www.ExpressWater.
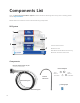
Components List Your new Reverse Osmosis Water System should include the following items. If any item is missing please contact Express Water.
System Diagram 1 4 2 5 3 6 5 10 5 9 7 7 7 14 13 8 12 5 11 1. Diverter Valve 2. System Feed Tube 3. System Drain Tube 4. Sediment Filter 5. Stem Elbow 1/4” 6. Granular Activated Carbon Filter 7. Male Elbow 1/8” 8. RO Membrane Housing 9. Drain Flow Restrictor 10. Union Connector 11. Male Connector 1/4” 12. Post Activated Carbon Filter 13. Male Faucet Connector 1/4” 14.
Tubing Quick Connect Guide The tubing in your RO System uses a Quick Connect locking mechanism to lock the Color Coded Tubing in place. Be careful not to damage your tubing as you unpack it. NOTE! Make sure to remove any plugs before attempting to insert tubing. Plug Collet Locking Clip Fitting Release Tubing/Plugs If there is a Locking Clip on the Collet it must be removed before the Tubing can be released. Push and hold the Collet in to release the lock while pulling out on the Tube/Plugs.
Installation CAUTION! The water supply to the unit MUST be COLD WATER ONLY. Using HOT WATER will severely damage your RO System. Diverter Valve 1.
Using the System When the diverter valve is in the vertical position water will come through your sink’s faucet into your sink. You can still use faucet as you normally would. When the diverter valve is in the horizontal position water will be sent to the RO System and pure clean drinking water will come through your RO faucet. When using the RO Faucet the waste water (carrying rejected contaminants away from the RO membrane) will pour from the smaller port into your sink.
Once you are sure there are no leaks and water has begun to come out of the RO Faucet, let the system run for two hours. This will flush out any loose carbon fines and prime your filters. Inspect your system occasionally during this time to make sure there are no leaks. Your water may be cloudy for the first week of operation. This is just air bubbles escaping from the new system. You can shift the sides of your system up and down while running your water to help this air escape.
How to Change the RO Membrane (Recommended about once a year) NOTE! Make sure water flow to the system is off Make sure the O-Ring is in place before you tighten the Membrane Housing Cap 1. Remove the 3 stem elbows attached to the Reverse Osmosis Membrane Housing. For detailed directions of disconnecting these refer to the Quick Connect Guide (Page 12) 2. Unscrew the cap from the Membrane Housing and remove the Membrane inside, be sure to note the correct orientation of the membrane 3.
FAQ’s Does this system filter Fluoride, Lead, Pharmaceuticals, and Arsenic? Yes, as well as Cyanide, Phosphate, Pesticides, Sodium, Cadmium, Sulfates, and many other contaminants up to certain levels. You may need other changes to media for high levels of these substances. What PSI do I need? What is the operating pressure? The minimum PSI for the system is 45 and the maximum PSI is 80. If your PSI is too high you can purchase a Pressure Regulator to reduce your pressure to acceptable levels.
1 Year Limited Warranty We Cover This warranty covers any defects in the parts or manufacturing of your Express Water Countertop Reverse Osmosis Water Filtration System. We will give you new replacement parts in exchange for any defective parts. What to Do Give us a call at 1-800-992-8876 or send an email to support@expresswater.com and describe the problem to our support. Be sure to have a copy of your purchase confirmation email or receipt.