
User manual


If you are ready with the settings and want to install the EX-3521, please proceed with
the following installation instructions. Because the design of computers varies greatly,
only general installation instructions are given. Please refer your computer’s reference
manual whenever in doubt.
1. Turn off the power from your computer and any other connected peripheral.
2. Remove the mounting screws located at the rear and/or sides panels of your Com-
puter case and gently slide the cover off.
3. Locate an available PCI-Express expansion Slot and remove its covers from the
rear panel of your computer.
4. Align the EX-3521 with the expansion Slot, and then gently but firmly, insert the
card. Make sure the card is seated and oriented correctly.
5. Align the EX-3521 with a screw against the rear panel of the case.
6. Connect the IDE cable to the 40 pin male connector and to your drives as shown
on the picture below. Make sure the drives are correctly set to master & slave (CD-
writer is Master) and the Pin1 is at the right position!
7. Gently replace your computer’s cover and the mounting screws.
HARDWARE INSTALLATION :
6 5
EX
EX
EX
-
-
-
3521
3521
3521
English
English
English
EX
EX
EX
-
-
-
3521
3521
3521
English
English
English
1
JUMPER EINSTELLUNG & ANSCHLÜSSE:
Die EX-3521 ist eine ATAPI kompatible PATA IDE Schnittstellenkarte mit einem 40 Pin
IDE Port, für den Anschluss von bis zu 2 CD– & DVD-Laufwerken (Master ,Slave). Die
Ex-3521 ist explizit für den Anschluss von allen CD-, DVD-, Brennern und Kombilauf-
werken geeignet und unterstützt alle PCI-Express Slots von x1 bis x16. Der serielle PCI-
Express Bus unterstützt dabei optimal die Leistung des Chipsets. Die EX-3521 gewähr-
leistet so eine sichere Datenübertragung! Es ist nicht möglich die I/O Adressen und
Interrupts manuell einzustellen, da die Einstellungen der Karte vom System (BIOS) und
beim Installieren des Betriebssystems automatisch vorgenommen werden.
BESCHREIBUNG & TECHNISCHE DATEN :
AUFBAU :
Kompatibilität: PCI Express x1 bis x16
Betriebs Systeme: Win 2000/XP/Server 2000/Server 2003/Vista/(Linux vom OS)
Anschlüsse: 1 x 40 Pin IDE Anschluss
Lieferumfang: EX-3521, Deutsche Anleitung, IDE Kabel
Zertifikate:
CE
CECE
CE
/ FCC / RoHS / WEEE DE97424562 / WHQL
Bedienungsanleitung
Bedienungsanleitung
Vers. 2.0 / 25.04.07
JUMPER SETTING & CONNECTORS:
DRIVER INSTALLATION :
Windows 2000/2000 Server/XP/2003 Server/Vista :
After starting the operating system Windows will recognize a new device “Standard
PCI IDE Controller“ . The Windows Hardware wizard will appear and automatically
search and install the driver for the card.
CHECK INSTALLED DRIVER:
Click at >Start< >Settings< >Control Panel< >Administrative Tools< >Computer
Management< >Device-Manager<. There you will see at „IDE ATA / ATAPI Controller)“
a new „Standard PCI IDE Controller“ „Primary IDE Channel“ & „Secondary IDE
Channel”. If you see this or a similar information the EX-3521 is installed correctly.
Windows 2000/Server 2000/XP/Server 2003/Vista from CD:
If you want to install a new Windows simply connect the Ex-3521 to your CD- or DVD-
drive and install the new operating system by using the Windows setup CD. Windows
will automatically install the card while the setup routine.
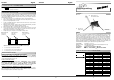
PATA IDE
ATAPI Chipset
J3 Anschluss für
Gehäuse LED´s
J2 IDE Anschluss für
DVD-Laufwerke 40Pin
Connector for Device 1
Connector for Device 2
LED1 | LED2
J3:
IDE 40Pin:
40 Pin IDE PATA Stecker :
Pin Signal Pin Signal Pin Signal
1 RESET 14 DD 13 27 IO_CH_READY
2 GND 15 DD 1 28 ALE
3 DD 7 16 DD 14 29 N/C
4 DD 8 17 DD 0 30 GND
5 DD 6 18 DD 15 31 IRQR
6 DD 9 19 GND 32 /IOCS16
7 DD 5 20 KEY 33 DA1
8 DD 10 21 N/C 34 N/C
9 DD 4 22 GND 35 DA0
10 DD 11 23 /IOW 36 DA2
11 DD 3 24 GND 37 IDE_CS0
12 DD 12 25 /IOR 38 IDE_CS1
13 DD 2 26 GND 39 ACTIVE
40 GND
Black Connector
Master drive
(DEVICE 0)
Grey Connector
Slave drive
(DEVICE 1)
Blue Connector
Connect to Ex-3521
(System)
Attention! Connect Pin 1 (marked red) only to Pin1 at the device !!!
• Connect the blue connector to the Ex-3521
• Connect the black connector the the Master drive
• Connect the grey connector to the Slave drive